


I plan to make a garden that will have moisture meters hooked up to a pump for water that will regulate the moisture of the soil.
https://www.clickandgrow.com/collections/products
I would also like to setup potentially a separate red board with a pH level reader and temperature probe for the soil temperature. These two measurements will be displayed on an LCD screen and will read every couple minutes.
Along with the other sensors I would like to set up a timer for a grow light to be on for 4 hour cycles 3 times a day. I plan to make the garden bed and structure after I complete the wiring for it. For now I am growing my knowledge of programming and circuitry.
I have completed the Arduino start up kit and have moved on to the red bot car kit. Below is a picture of wiring that I did to show an LCD screen of the temperature in the room.
I plan to finish this then begin to start my programming for the many machines I plan to hook up with coding to self regulate itself.
After completing this red bot I will continue to test it and further understand the coding of it. I will look deeper into the details of the codes and understand more of the wiring.
I plan to take one more period to strengthen my understanding of coding, once that is completed, I will start coding and building of my moisture meter connected with my water pump on a relay. Hopefully about a week after we get back from long weekend I can have the water pump and moisture sensors wired up and set up ready to run.
After this I will do the other coding of temperature, pH level, and light regulation. I plan to have all that done by the March break. Upon my return I will build the garden bed and have all the parts of my self regulating garden.
For the past couple of weeks I have been working out coding issues as well as furthering my understanding on how it works. I will continue to learn more about code and its functions as I develop farther into this project.
Step 3After some errors and minor changes I was able to come up with the circuit that will be used for the measuring soil moisture and turning the valve on to allow water to flow into the plant.
With the help of Dan I was able to work out all kinks and write the proper code for the moisture meter with pump. I tested it without water and learned that it is working good and doing what it should be doing. I will now do the necessary tubing/ plumbing work for the gravity water valve when I return from the break. I will also start to build the structure so that I have time to make adjustments.
I have successfully wired and written the code for the first step of this project and have made good progress with this completion. I now have my code written for the moisture reading to automatically turn on the solenoid that will allow the water to flow into the garden.
Step 4I will now build the garden and work out details of the specific measurements but below is the plan
I made a solid plan a and sketch that I went off of to build the unit. I made relative measurements for the needs I wanted. I also made the plan according to the need of the garden such as the roof for the lights to hang off and the water bucket to sit on top of as well as the electrical situation to sit on top and stay away from potential water spillage on.
- I got the necessary materials for the connection of the solenoid valve and attached them aswell as tested this.
I Cut the wood to the measurements of my blueprints. Then started to assemble them.
I used many techniques that I had known prior to the construction of this project but as well learned a few new techniques and had the opportunity to consult my ideas with experts in the field. I was able to complete my garden design quite well and constructed it as planned.
Once I completed the structure I began to consider what I will do for the inside of the garden to waterproof it and allow a moist environment to around the wood without it rotting.
With discussion of Dave we decided I will use a latex like paint called red guard to waterproof it and seal it from water entering the wood on the walls, before I could paint the red guard on I had to paint a layer of primer to allow the wood to absorb all the red guard. I had to do two layers of primer and about 3 layers of the red guard:
Next I needed to make the garden more mobile because it will be heavy with the soil and other components of it. I added 6 casters to the bottom evenly spread out. These wheels made the build easier as I was able to move the object much more easily.
One thing that I noticed after the fact is that the 4x4 posts were twisted and did not go straight. I had to make adjustments for the roof and decided for support reasons at that time I will add cross supports to the sides.
Because the 4x4 were not straight and twisted a little it changed the way I had to do the roof. I had to make it with a little extra room on each side too offset the 4x4’s that looked out of place. Overall I spread it out so it’s looked good and people could not see this unless they look really close.
I connected the roof and clamped it in place as well as screwed it into place.
The garden structure was completed now and I could start to mesh in the electrical components.
I connected the lights and measured where they would make the best impact and screwed them into place. I placed the bucket and Arduino on the top of the roof but then decided I should build a holder for them to be secured.
The code for the moisture pump action is as follows below.
I used a piece of Plywood to build a flat stand that will hold all the components on the top.
I added bracing on the sides of the gardens insides for further support when the soil is in the basin:
I made sure all the the necessary parts have a place to be held.
I will connect this plywood holder to the top of the roof once I have finished the final aspect which is to build the irrigation line running from the solenoid valve.
I have to now build minor adjustments to be complete. But the major things left to deal with is the drainage and I plan to use gravel and landscape tarp to create a slope for the water to runoff into one side where I will have a drainage system to let excess water escape.
I plan to do the irrigation line next then build the drainage system and the project will be complete and ready for the soil to be added on top and the plants to grow.
Nearing the end of the project I have really noticed how much this process has improved my developmental skills and creative skills. Through this project I have enjoyed myself very much as well as I felt that I have learned a lot with experience and theoretical thoughts. I really enjoyed working in the makers lab and working with such amazing mentors while building this project.
I added a rubber lining for the soil to sit in as well as I layered the bottom with stones.
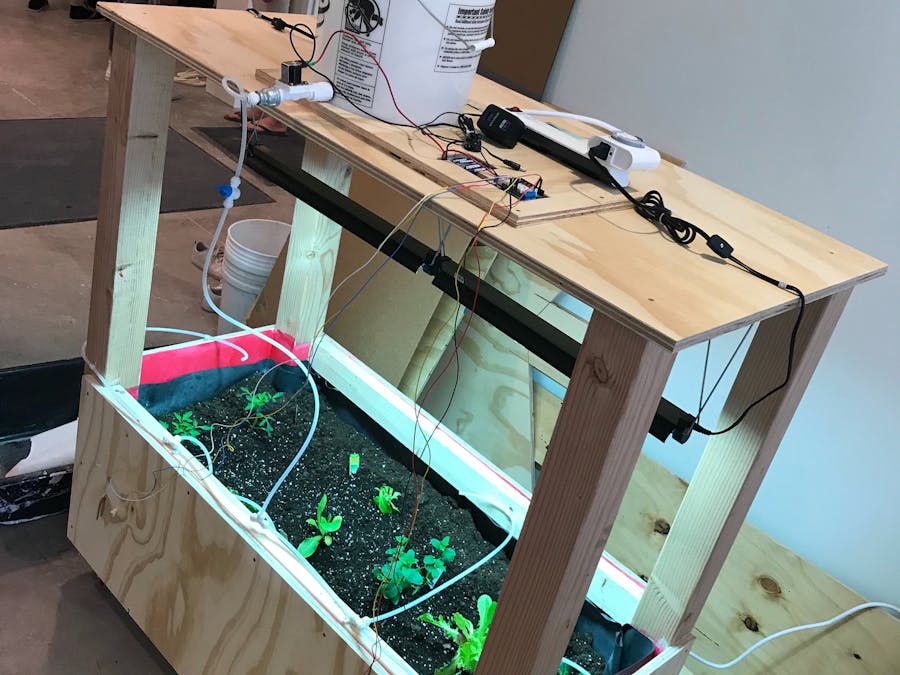
After adding the stones for drainage collection at the bottom I added the soil on top and placed the plants in the soil. I then placed my soil moisture's meters in relative locations. I made minor adjustments to the irrigation system and will continue to make minor adjustments to suit the needs of the plants.
For protection of the soil moisture meter I coded the conductive parts with a liquid glue that is made from silicon.
The last thing that I did was to calibrate the soil moisture meter and figure out the optimum moisture level.
I have finished the project and am very impressed by the results but feel I have gained more knowledge and experience throughout building this project. I am confident that I will be able to take on more challenging problems and intense projects after accomplishing this one.
The exposition went really well and lots of people really enjoyed the idea of my garden and the self sustaining method. Many people were very intrigued in the set up of it and I enjoyed explaining how it worked. It was fun presenting it to the community and I felt my project really stood out because of all the work I put into it. The expo was a great experience for me and I really enjoyed being apart of it.
Overall the project was a success and will successfully grow plants. Video of self regulating garden in action.


Comments