


Hardware components | ||||||
 |
| × | 1 | |||
 |
| × | 1 | |||
 |
| × | 1 | |||
Software apps and online services | ||||||
 |
| |||||
The overall circuit is very simple in such a way that even a beginner can built its own in a super easy way with just few components and supplies. With the help of arduino we can also make this overall system so accurate that we can even be useful in many different application like home security system, anti-theft alarm etc. Now Let's start with the step wise procedure of how to built this one, so lets get started.
Step 1: Ingredients You Need- PIR sensor
- NPN Transistor
- Diodes
- 7805 regulator IC
- Zero PCB/Perf Board
- Buzzer
- Connecting wires
- USB wire
- Power supply
Also Tools you will need :
* Soldering Iron
* Dremel tools
* Glue gun
* Multimeter
* Wire stripper
Step 2: Understand the Basic PrincipleA PIR sensor is one that senses movement in a limited range, usually around 7 feet. They are small, inexpensive, low-power, easy to use. They are often referred to as PIR, "Passive Infrared", "Pyroelectric", or "IR motion" sensors. The sensor "senses movement" by detecting patches of infrared radiation in comes in front of it. Everything emits some level of infrared radiation (IR radiation), and the more infrared radiation from object emits, the more the sensor can "track" it and generates a signal which can be use to trigger other outputs. If you will look into your PIR module you will notice that sensor module have two small potentiometers on it. Those potentiometers adjusts the sensitivity of the sensor and the delay time between the successive signals. Now that we have basic knowledge of this kind of sensor, so now let's built the circuit using the supplies mentioned above.
TipQuestionComment
Step 3: Circuit Diagram and WorkingHere is the circuit diagram. Diodes are used as a bridge rectifier that will convert AC into DC if you are using AC supply and if you are using directly a DC supply it will bypass it or you can also connect the DC supply just after the rectifier circuit. This DC supply is then fed into 7905 regulator IC for perfect 5v output. Now this 5v output is fed into buzzer via transistor and fed into PIR + terminal. Connect all negative terminal of PIR sensor and 7085 IC with negative teminal of rectifier.
Now whenever obstacle comes in front of sensor, it will turn ON the Base terminal of transistor hence will complete the circuit of Buzzer and it will sound as alarm. In this way this simple works and now lets do soldering part.
Step 4: Building CircuitNow its time to solder every components properly. Solder the circuit as per the circuit diagram. Select the suitable temperature for soldering iron if you have a variable temperature control. Use heat shrink tubing to keep all connections safe such that there should not be any shorts. Use helping hand if required. You can also use a Etching PCB technique if you are master in it.
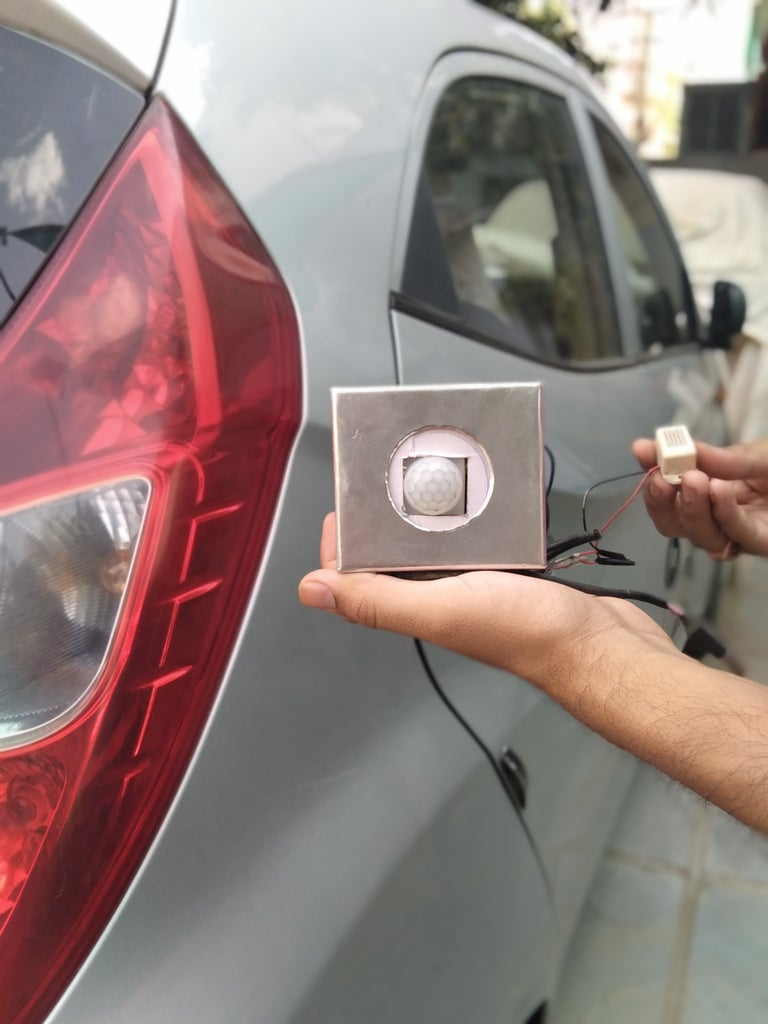
Step 5: Preparing HousingI have taken a cube type of box made of cardboard. Measure the dimensions of PIR and mark in order to cut the suitable shape and fix inside the casing. Use hot glue or any other adhesive to put them in place.Take care while using adhesive such that it should not cover the surface of PIR sensor, otherwise it would not detect the movement/ obstacle outside our vehicle.
Step 6: Installing Circuit Into Housing and VehicleAdjust the PIR sensor into the car in such a way that it cover the maximum part outside the vehicle and adjust the two potentiometer to increase or decrease sensitivity and time delay. You can now connect 5 to 12volts into the USB port. The 7805 IC will make it 5 volts which will feed into all parts of circuit. I have used 9 volts battery Bank in my case.
For powering the circuit you can also use music system USB port and charging port that will also provide you 5 volt supply for operation.
Step 7: Finalizing and TestingNow its testing time. As you can see whenever any obstacle, even a human being comes in front of it, it will make you aware of it by alarming sound from the buzzer. As soon you hear the buzzer sound that mean there is obstacle around it that can damage your vehicle. Hurray! You have saved your vehicle from damaging.
That's it! I hope you enjoyed the project and found it helpful.
Please vote if you like the project.
Comment below if you have any Query.
Thanks for reading and as always...
Stay Creative Keep Learning!
Lets make it!
Did you make this project? Share it with us!
Nextpcb Is one of the best Online PCB manufacturing Company from where you can order PCBs online without any hassle. The company fast lead time : as fast as 24 hours. With their high tech machinery and automated work stream, they can manufacture huge quantities of high-class PCBs within hours.
Nextpcb can Develop PCBs of various complexity . They Develop simple and cheap PCBs with single layer Board For hobbyists and enthusiasts as well as complex multi layer board for high standard industrial applications NextPcb work with Large product Manufacturers And may Be the PCB of devices you are using such as laptop or smartphone were made at this factory.


Comments