
Hardware components | ||||||
| × | 1 | ||||
 |
| × | 1 | |||
 |
| × | 1 | |||
 |
| × | 1 | |||
 |
| × | 1 | |||
Software apps and online services | ||||||
| ||||||
| ||||||
Hand tools and fabrication machines | ||||||
 |
| |||||
 |
| |||||
 |
| |||||
 |
| |||||
Plants are living beings that require continuous care, but often people forget to water them at the right time. Overwatering and underwatering are two of the most common reasons why household plants fail to survive. To make plant care easier and more engaging, I designed a Smart Pot that uses modern electronics to show the "mood" of the plant in a fun and interactive way.
The system is built using an analog soil moisture sensor and an M5Stack AtomS3, a compact ESP32-based development board with a colourful display. The soil moisture sensor constantly monitors the water content of the soil. Its readings are then processed by the AtomS3, which classifies the soil condition into three categories: dry, normal, and wet. Instead of displaying plain numbers or text, the Smart Pot conveys the plant’s condition through emojis, making it intuitive and visually appealing.
When the soil is too dry, the display shows an angry emoji (😠), reminding the user that the plant needs immediate watering. If the moisture level is within the healthy range, the display shows a happy emoji (😀), indicating that the plant is in good condition. On the other hand, when the soil is too wet, a cold emoji (🥶) appears, warning that the plant might be overwatered.
Working Explanation
Sensing Moisture
The analog soil moisture sensor outputs a voltage proportional to soil conductivity (higher when wet, lower when dry). This analog voltage appears on the AO pin.
Analog-to-Digital Conversion (ADC)
The AtomS3 reads AO using its ADC pin.
Dry: 0–35% → show 😠 Angry (needs water)
Normal: 36–70% → show 😀 Happy (ideal)
Wet: 71–100% → show 🥶 Cold (overwatered)
Display Emoji on AtomS3 Matrix
For each state, the firmware selects a corresponding image
Dry → 😠
Normal → 😀
Wet → 🥶
Components needed
2. Analog Moisture level sensor
3. 3.7v lithium polymer battery
4. Tp4056 charging module
5. Dot board (common PCB)
6. Male Header pins
7. 3d printed parts.
Preparing common PCB for atom module
Using a small common PCB and some male header pins, I made an adapter to access the GPIO and power pins of ATOM S3
Preparing the soil Senoser
I connected flexible wire to analog soil sensor for easy assembly
Battery and Charger Connection
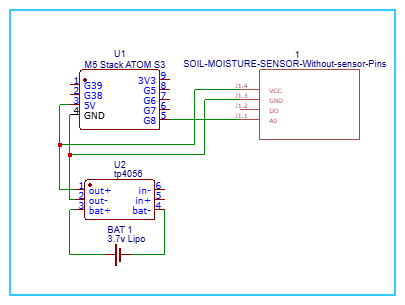
CIRCUIT DIAGRAM
The system is powered by a 3.7V Li-Po battery, which is connected through a TP4056 charging module. The TP4056 allows the battery to be charged safely when connected to a USB charger, and at the same time provides power to the AtomS3. The soil moisture sensor is connected to the AtomS3. It has three pins:
VCC (power) gets 3.3V from the AtomS3,GND goes to ground, and AO (analog output) sends a signal to pin G8 of the AtomS3.
PROGRAMING
The AtomS3 supports multiple development platforms suitable for varying levels of experience, from beginners to advanced developers. Arduino IDE, Platform.io, and UiFlow2 (Graphical Programming Platform). I am going with the Uiflow method.
UiFlow2 (Graphical Programming Platform)
To program the Atoms3 using UIFLOW, first, we need to flash UIFlow 2.0 Firmware with M5Burner. For that,download m5burner from here.
After installing M5Burner, select Atom S3, choose the UIFlow 2.0 firmware, and click Burn. During the process, you'll be asked to provide your Wi-Fi credentials, which allows the Atom S3 to connect to your network. The device will reboot and connect to Wi-Fi automatically once the firmware is successfully installed and configured.
You can find a detailed official tutorial from here
Now visit UiFlow2 Web IDE at the official site.
Log in with the same M5Stack Community account you used in M5Burner. This is important because your device gets tied to this account.Connect Your Atom S3 in the Web IDE. There are two main connection methods:
1. Wi-Fi (Wireless) Mode - Ensure your Atom S3 is connected to the same Wi-Fi network you configured during firmware burning. In the Web IDE, go to Device Management. Your Atom S3 should appear as an online device. Select it to connect.
2. USB (Wired) Mode
Plug your Atom S3 into your computer using a USB-C cable. In UiFlow Web IDE, click the WebTerminal button. A prompt will appear to select the USB-connected device—choose it and click Select. Once connected, you'll see a message like "Connected to Serial Port!", confirming the link is active.
Adding images to display
Click on the top left edit icon and add different images using theimage tool. remember to use 128*128 pixel resolution images, beacuse that is the resolution of our atoms3 display. So I added 3 images.
CODE MAKING
We can use different blocks to generate code. Our code has two main parts, setup and loop.
This is the loop section of our code,
The program starts by reading the analog value from the soil moisture sensor (here it’s connected to ADC8). This value is stored in a variable called moisture. It also prints the moisture value so you can see it in the serial monitor (useful for debugging). The program has three conditions:
Normal/Happy Condition
If the moisture value is between 3500 and 4000, the soil is “just right.”
It loads happy image and shows it on the screen.
Too Wet/Cold Condition
If the moisture value is 2000 or less, the soil is too wet.
It loads cold image and shows it.
Too Dry/Angry Condition
If the moisture value is 4000 or greater, the soil is too dry.
It loads angry image and shows it.
After checking these conditions, the loop repeats endlessly. That means the AtomS3 is always checking the soil moisture and updating the emoji display.
Finally, we can upload the code to Atom S3
CIRCUIT MAKING
I connected all the components according to the circuit diagram and tested it like this
Enclosure 3D printing
i designed an enclosure using tinkerkad and printed it using my 3d printer. This enclosure size i designed according to the pot.
After printing, I placed all components inside the enclosure and finished the pot

_t9PF3orMPd.png?auto=compress%2Cformat&w=40&h=40&fit=fillmax&bg=fff&dpr=2)


Comments