


Hardware components | ||||||
 |
| × | 7 | |||
 |
| × | 1 | |||
 |
| × | 1 | |||
Software apps and online services | ||||||
 |
| |||||
| ||||||
Hand tools and fabrication machines | ||||||
 |
| |||||
Say hello to Otto, a cute and programmable robot you can build from scratch! This comprehensive guide walks you through every detail, from 3D-printed parts and electronics assembly to the Arduino code that brings it to life.
This is a DIY journey for makers of all levels. We'll use a Wemos D1 board, seven SG90 servos, an OLED display, and an ultrasonic sensor to create a robot that can walk, rotate its head, detect obstacles, and even display custom faces on its mini screen.
🧰 Components and ElectronicsAll the structural parts of the robot are 3D-printed. Download the STL files and print them before beginning the assembly process.
- 2x Legs (with slots for hip and knee servos)
- 1x Main Base (for wire routing and mounting)
- 1x Upper Base (for shoulder servos)
- 1x Second Upper Base (for the head servo)
- 1x Top Cover (mounts the ultrasonic sensor)
- Servo clips, arms, and wire passthrough holes
Before you attach any servos to the 3D-printed parts, it's crucial to calibrate each of the seven SG90 servos to a neutral 90-degree position. This step is essential for ensuring proper alignment and smooth movement for the legs, arms, and head.
- Use a servo tester or a simple Arduino sketch to set each servo to exactly 90°.
- Once calibrated, carefully attach the servo horn so that it is perfectly aligned with the robot's limb.
- Repeat this process for all seven servos before proceeding with the main assembly.
This section is your blueprint for building Otto from the ground up.
Step 1: Assemble the LegsAttach two SG90 servos to each leg to create the hip and knee joints. Make sure the rotation is smooth and the screws are secure but not overtightened.
Route the servo wires through the designated holes in the main base. This organized wiring prevents tangles and makes future troubleshooting easier.
Carefully slide the OLED display into its designated slot. This screen will be the robot's face!
OLED Wiring:
- VCC → 3.3V
- GND → GND
- SDA → D2
- SCL → D1
Secure the PCA9685 servo driver board inside the base. This board simplifies the wiring and power management for all your servos. Connect the four leg servos to channels 0-3 on the PCA9685.
Stack the first upper base and attach two more SG90 servos. These will control the robot's arms and can be connected to channels 4 and 5 on the PCA9685.
Mount the final servo in the second upper base to enable head rotation. The ultrasonic sensor is then attached to the top cover to act as the robot’s "eyes." Connect the ultrasonic sensor's Trig and Echo pins to the Wemos D1.
Once the shoulder servos are mounted, attach the 3D-printed arm pieces. Test the movement to ensure there is no obstruction.
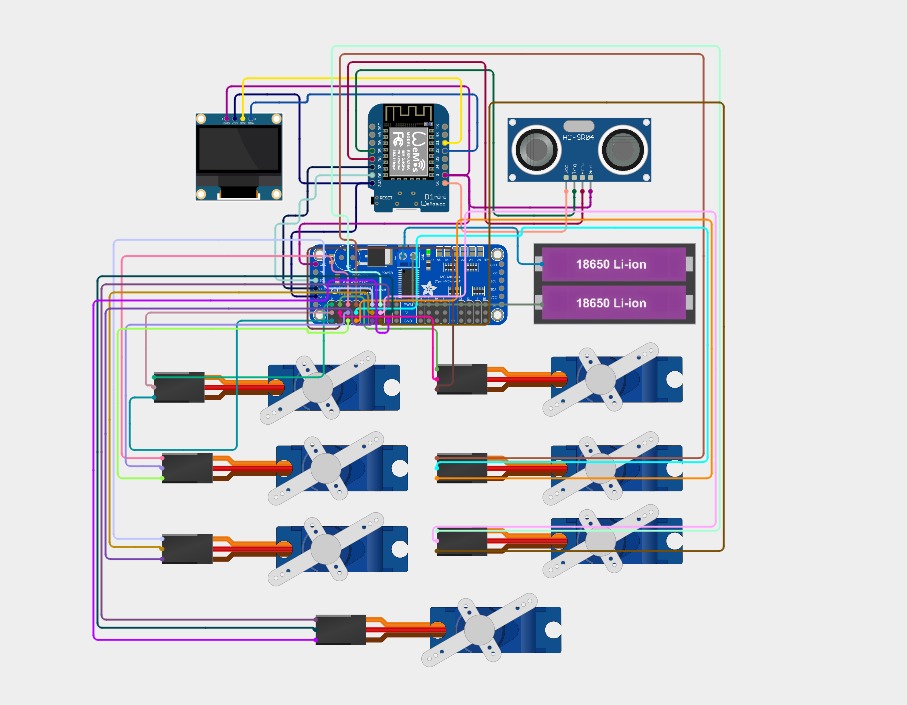
Follow this guide to ensure all your electronics are correctly connected. Proper wiring is the most important step for a functional robot.
PCA9685 to Wemos D1:
- VCC → Wemos 3.3V
- GND → GND
- SDA → D2 (I2C)
- SCL → D1 (I2C)
- V+ → External Battery (5–6V)
- GND (shared) → Battery GND
7 SG90 Servos to PCA9685:
Connect the signal wire from each of the seven servos to channels 0-6 on the PCA9685.
OLED Display to Wemos D1:
- VCC → 3.3V
- GND → GND
- SDA → D2
- SCL → D1
Ultrasonic Sensor (HC-SR04) to Wemos D1:
- Trig → D5
- Echo → D6
- VCC → 5V
- GND → GND
To make your Otto robot move, you will need to upload the code and 3D print the parts.
Arduino Code: The provided code allows Otto to walk, turn, and avoid obstacles using the connected components.
If you're planning to build a similar tank or want STL files, code, or circuit diagram, just drop me a message! 💬✅ DM me on Instagram — I'm always ready to help fellow makers. Or you guys can order it from “JUSTWAY”.
Instagram - @electro__dude
JUSTWAY, your reliable source for custom 3D printing and CNC machining services.
🛠️ Whether you're prototyping parts like the tank chains, wheels, or custom enclosures — JUSTWAY makes it easy with fast turnaround and high-quality prints.
And right now, during their Summer Cashback Event, you can get 15% cashback on your orders placed between June 1 and August 31, 2025!
👉 After your order is completed, simply email marketing03@justway.com with your order number and account info to claim your cashback.
🎁 Bonus: 👉 Get 15% Off Here
🧰 Happy building — and happy saving!Download Arduino Code on GitHub
Download All STL Files on Printables
🎉 Features & Conclusion
This custom Otto robot offers a wide range of features, from realistic movement to interactive feedback, making it an ideal project for learning robotics.
Key Features:
🚶 Walking Movement: Utilizes four leg servos for smooth bipedal motion.
🦾 Head & Arm Movement: Adds a lifelike feel to the robot's actions.
👀 Obstacle Detection: Uses an ultrasonic sensor for real-time awareness of its surroundings.
📟 OLED Screen: Provides a customizable interface for the robot's "face."
🧩 Modular Design: The 3D-printed body allows for easy upgrades and modifications.
This DIY Otto Robot project is an incredible platform for anyone interested in robotics, programming, and 3D printing. With a few components and a bit of effort, you can create a charming and intelligent companion.

_t9PF3orMPd.png?auto=compress%2Cformat&w=40&h=40&fit=fillmax&bg=fff&dpr=2)


Comments