


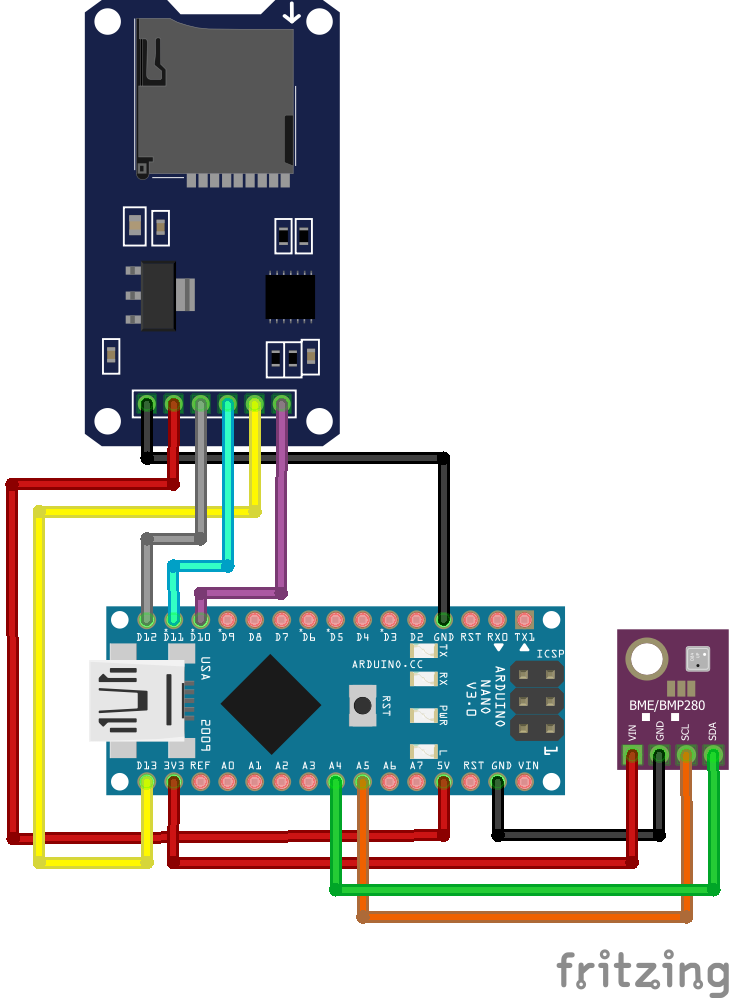
Hardware components | ||||||
 |
| × | 1 | |||
| × | 1 | ||||
| × | 1 | ||||
 |
| × | 1 | |||
 |
| × | 1 | |||
Software apps and online services | ||||||
 |
| |||||
Hand tools and fabrication machines | ||||||
 |
| |||||
Hey! Whether you're launching model rockets into the sky or trekking up your favorite mountain trail, having a way to record your altitude in real-time is both fun and insightful. In this guide, we’ll show you how to build a compact and easy-to-use altitude data logger using affordable components and simple Arduino code.
Perfect for hobbyists, students, and explorers — this little device will let you track your altitude over time and even graph your flight or hike later!
🧭 What Is an Altitude Logger?An altitude logger is a small device that records elevation over time. It typically uses a barometric pressure sensor (or GPS module) to estimate height above sea level and stores the data in memory for later review.
For model rocketry, it helps you analyze flight performance. For hiking, it logs elevation gain, peak height, and terrain profiles.
🪟Format SD Card on Windows✅ Steps:
- Insert the SD card into your PC (via SD slot or USB adapter).
- Open File Explorer → right-click on the SD card drive → click "Format…"
- In the format window:
- File system: Choose FAT32 (not exFAT or NTFS)
- Allocation unit size: Select Default
- Volume label: (Optional) Give your card a name, like ALTLOGGER
- Uncheck "Quick Format" if you want a more thorough wipe
- Click Start and confirm when prompted.
- Once done, safely eject the card.
Note: If FAT32 is not available, use the free tool: GUIFormat (FAT32 Formatter)
Note: For larger cards (>32GB), windows may show exFAT, which may not work with Arduino SD libraries🍎 Format SD Card on macOS
✅ Steps:
- Insert the SD card into your Mac (via slot or adapter).
- Open Disk Utility (search via Spotlight or find in Applications > Utilities).
- In the left sidebar, select your SD card (not just the partition).
- Click "Erase" at the top.
- In the Erase dialog:
- Name: (Optional) e.g., SDLOGGER
- Format: Select MS-DOS (FAT)
- Scheme: Choose Master Boot Record (MBR)
- Click Erase to begin.
- When finished, eject the card safely.
Note: MS-DOS (FAT) = FAT32 (as long as the card is ≤32GB)
Note: For larger cards (>32GB), macOS will default to exFAT, which may not work with Arduino SD libraries💻 Code
🗻 BMP280 Setup
bmp.setSampling(Adafruit_BMP280::MODE_NORMAL,
Adafruit_BMP280::SAMPLING_X2,
Adafruit_BMP280::SAMPLING_X16,
Adafruit_BMP280::FILTER_X16,
Adafruit_BMP280::STANDBY_MS_500);- Sets precise sampling configuration:
- Moderate temperature sampling
- High pressure resolution
- Strong filtering (for stable altitude readings)
- 500 ms delay between readings
💾 SD Card Setup
Serial.println("Initializing SD card...");
if (!SD.begin(chipSelect)) {
    Serial.println("Error: SD init failed");
    while (1);
}- Initializes the SD card. If it fails, the program halts.
File logFile = SD.open("altlog.txt", FILE_WRITE);
if (logFile) {
    logFile.println("Altitude(ft)");
    logFile.close();
    Serial.println("SD card ready, logging started.");
} else {
    Serial.println("Error: Can't create log file");
}- Creates a new log file (or appends to it) and writes the header.
- Closes the file immediately after.
🔁 Loop Function
temp = bmp.readTemperature();
newAlt = bmp.readAltitude(1013.25);
if (newAlt > alt) {
alt = newAlt;
}
float feet = (alt - origAlt) * 3.281;- Tracks the maximum altitude reached so far.
- Converts relative altitude difference from meters to feet (1 meter ≈ 3.281 feet).
if (millis() - lastLogTime >= 1000) {
    lastLogTime = millis();
    File logFile = SD.open("altlog.txt", FILE_WRITE);
    if (logFile) {
        logFile.println(feet, 2);
        logFile.close();
    } else {
        Serial.println("Error: Can't open altlog.txt for writing");
    }
}- Opens the file in append mode.
- Logs the altitude in feet with 2 decimal places.
- Closes the file to ensure data is saved.
A log file on your SD card that looks like:
Altitude(ft)
0.00
3.21
10.45- One entry per second.
- Perfect for plotting graphs in Excel or Google Sheets.
To keep it small:
- Use a Pro Mini instead of a Nano
- Solder components to perf-board or custom PCB.
- Power with a 3.7V LiPo or even a coin cell (low-power mode optional)
- Use heat-shrink tubing or a small 3D-printed case
- Mount it inside your rocket or strap it to your backpack!
Note: Use the Arduino's VIN and GND pins to power the Arduino with an external power source and NOT the 5v pin.


Comments