


Hardware components | ||||||
 |
| × | 1 | |||
 |
| × | 1 | |||
 |
| × | 1 | |||
| × | 1 | ||||
Software apps and online services | ||||||
 |
| |||||
Wireless devices often require special setups or configurations in order to work as the creator would want or simply do a specific task. In this tutorial, we will see how to put the HC-05 Bluetooth Module into Command Mode and customize the HC-05 module to suit our needs.
HardwareThe HC-05 is a popular Bluetooth module commonly used with Arduino boards for wireless communication. It allows you to establish a wireless link between your Arduino project and other devices, such as smartphones, tablets, or other microcontrollers, enabling you to control or exchange data wirelessly.
Here are some key features and details about the HC-05 Bluetooth module:
- Bluetooth Version: The HC-05 module supports Bluetooth version 2.0+EDR (Enhanced Data Rate), providing a relatively stable and reliable connection.
- Serial Communication: The module uses a serial communication interface to communicate with the Arduino. It connects to the Arduino board using the UART pins, labeled as RX (receive) and TX (transmit).
- Operating Modes: The module has two primary operating modes: Command Mode (AT Mode) and Data Mode (Receiving and Sending data). In AT Mode, you can send configuration commands to the module, specifying parameters such as the Bluetooth name, PIN code, and operating mode. In Data Mode, you can send and receive data.
- Power Supply: The HC-05 module requires a power supply of around 3.3V. However, it is usually tolerant of 5V logic levels, making it compatible with most Arduino boards.
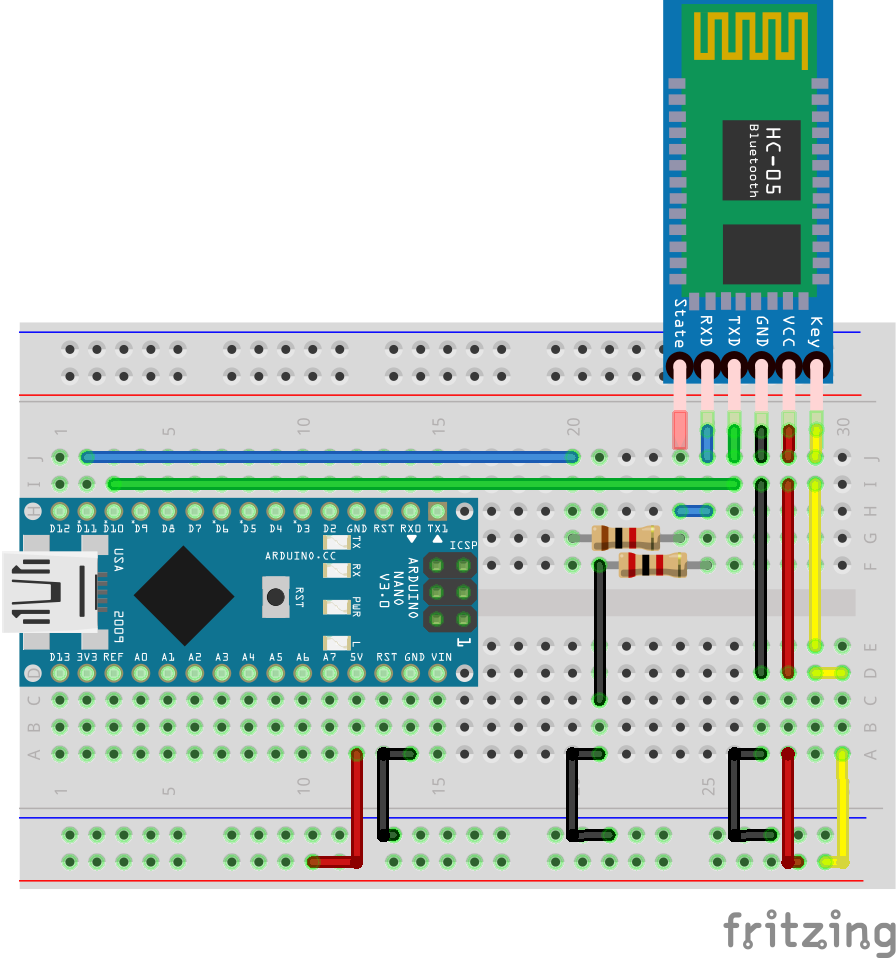
Note: If we look at the schematic, we can see that the HC-05 module's key pin is attached to VCC of the Arduino nano. The key pin should be attached to VCC before powering up the Arduino and must be disconnected once the HC-05 module starts to blink slowly.
Though we are using the HC-05 Bluetooth module for this project which is very cheap and durable, we use a voltage divider circuit to make sure that the RXD pin doesn't get damaged. It is made by attaching a 1k Ω potentiometer across RXD and Pin 11 and a 2k Ω potentiometer across RXD and Ground.
CodeHere's a breakdown of what the code does:
Initializing Variables:
SoftwareSerial Bluetooth(10 , 11); //RX, TX
char c = ' ';- It creates an instance of the SoftwareSerial class called "Bluetooth" using pins 10 and 11 as the RX and TX pins, respectively.
- It declares a character variable "c" to store incoming characters.
Setup function:
void setup()
{
  Serial.begin(9600);
  Serial.println("Enter AT Commands!");
  Bluetooth.begin(38400);
}- It initializes the hardware serial communication via the Serial.begin(9600) statement and sets the baud rate to 9600.
- It initializes the software serial communication via the Bluetooth.begin(38400) statement and sets the baud rate to 38400.
Loop function:
void loop()
{
  if(Bluetooth.available() > 0)
  {
    c = Bluetooth.read();
    Serial.write(c);
  }

  if(Serial.available() > 0)
  {
    c = Serial.read();
    Bluetooth.write(c);
  }
}- It checks if there are any incoming characters available from the Bluetooth device using Bluetooth.available().
- If there are characters available, it reads one character from the Bluetooth module using Bluetooth.read() and stores it in the variable "c".
- It writes the received character to the serial monitor using Serial.write().
- It checks if there are any characters available from the serial monitor using Serial.available().
- If there are characters available, it reads one character from the serial monitor using Serial.read() and stores it in the variable "c".
- It writes the received character to the Bluetooth module using Bluetooth.write().
This code sets up a bidirectional communication between the Arduino and a Bluetooth device, allowing you to send AT commands from the Bluetooth device to the Arduino and vice versa. The received characters are displayed on the serial monitor for debugging purposes.
Note: Make sure you have the required libraries installed. In this case, you need to have the "SoftwareSerial" library installed in your Arduino IDE. You can install it by going to "Sketch > Include Library > Manage Libraries" and searching for "SoftwareSerial".Testing
Once everything is properly setup, you can use the AT Commands via the serial monitor of the Arduino IDE. A list of all useable commands is attached as a pdf file at the bottom of the page.

Comments