


Hardware components | ||||||
 |
| × | 1 | |||
| × | 1 | ||||
 |
| × | 1 | |||
 |
| × | 1 | |||
 |
| × | 1 | |||
Software apps and online services | ||||||
 |
| |||||
| ||||||
One of the major applications of electronics is its use in geolocation. In this tutorial, we'll see how you can send GPS data over the internet to your phone or other devices.
About the NEO-6mThe NEO-6M GPS module is a popular GPS receiver used in electronics and DIY projects because of its affordability. To learn more, check out $ this article $ that I wrote a while back.
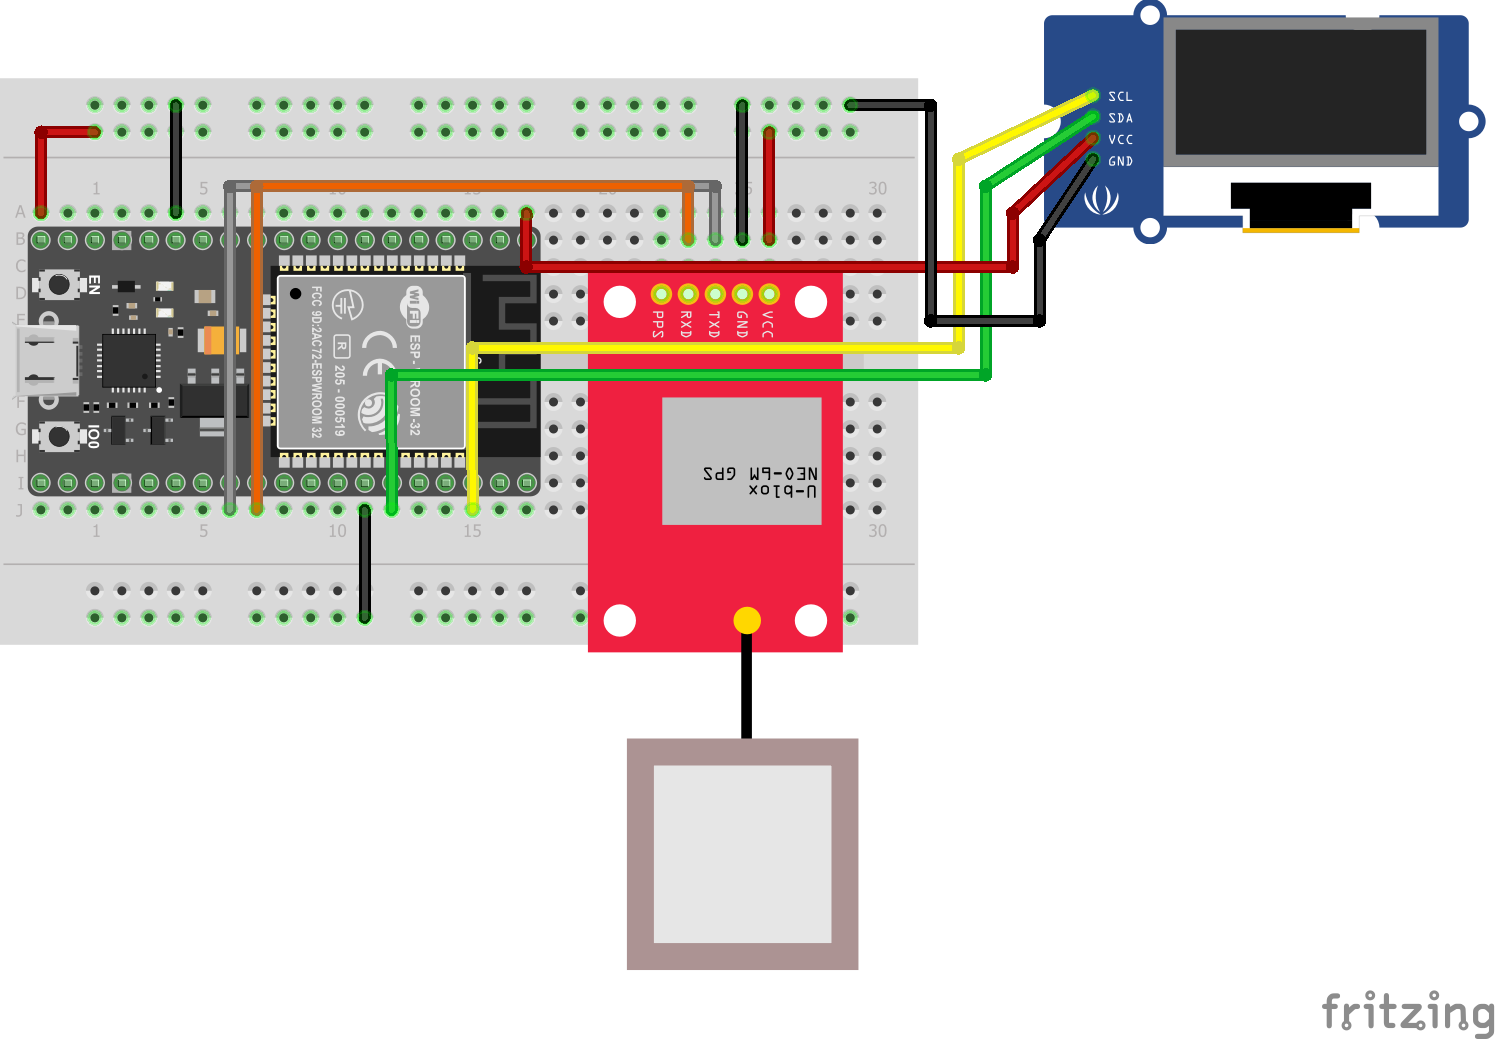
HardwareWire the NEO-6m this way:
Note: In some versions of the ESP32, GPIO 16 & GPIO 17 are labelled as RXD2 & TXD2. Remember that TX on the Neo-6m goes to RXD2 on the ESP32.
You can also wire an OLED Display using I2C interface
Finally, use the Neo-6m in an open area with clear view to the sky (near a window, balcony, outdoors etc.) for the best connection.
Arduino IoT Cloud SetupThe ESP32 module is very versatile and can connect to a wide range of different platform over WiFi to send and receive data. In this tutorial, we'll use Arduino's IoT Cloud platform (which is completely FREE to use) with the ESP32. For a more detailed overview of the Arduino IoT Cloud, checkout this documentation.
🧠 What is a “Thing”?
A Thing in the Arduino IoT Cloud represents a physical device (like an Arduino board) along with the variables and properties that you want to monitor or control over the internet.
🔧 What You’ll Need
- A free Arduino Cloud account
- A compatible board (e.g. Arduino Uno R4 WiFi, MKR1000, Nano 33 IoT, ESP32, or ESP8266)
- Arduino Create Agent installed on your computer (to upload the code)
- Internet connection and a USB cable
🪜 Steps to Create a Thing on Arduino IoT Cloud
1. Log into the Arduino IoT Cloud
- Head over to cloud.arduino.cc and sign in with your Arduino account. If you don’t have one, you can sign up for free.
2. Click “Create Thing”
- Once logged in:
- Go to the IoT Cloud tab.
- Click the “Create Thing” button in the dashboard.
- This will generate a new Thing that you can rename later.
3. Link a Device
- Under the “Device” section:
- Click “Select Device”
- Choose “Set up a new device”
- Pick ESP32
- Save the Device ID & Secret Key
- Follow the prompts to connect your board via USB
Note: If you're using a third-party board, Arduino Cloud will ask you to install a special agent and select the board and port.
4. Add Variables
Variables are the core of your IoT logic. They represent the data your Thing sends or receives.
- Click “Add Variable”, then:
- Name your variable (e.g. temperature)
- Choose a type (e.g. float, bool, int, String)
- Set its permission: Read Only (e.g. sensor value) or Read & Write (e.g. LED state)
- Decide if it’s Update on Change or Periodic
Note: You can add only 5 variables to a Thing on the free version of the IoT Cloud.
Variables for this project
Note: Pick CloudLocation to store latitude & longitude data for this project.
5. Configure Network Credentials
- Select your thing and go to the "Setup Tab"
- Enter your SSID, WiFi password, and Secret key (from device)
- These credentials are uploaded securely to the board during setup.
Note: The SSID is case sensitive so type it out exactly as it is.
6. Write and Edit the Sketch
Arduino Cloud auto-generates a sketch for your Thing. You can:
- Open the “Sketch” tab
- Edit your code directly in the browser (Web Editor).
- You can upload your code directly from here.
7. Monitor with Dashboards
- Go to the “Dashboards” tab.
- Add widgets (like toggles, graphs, maps, gauges, etc.).
- Connect them to the cloud variables in your thing (follow the prompts).
8. Send Data to Phone
- Download the Arduino IoT Cloud Remote (available on iOS and Android)
- Log in with your Arduino IoT Cloud account.
- Select your dashboard & you are ready to go!
Let’s see what the code does section by section:
🔧 Libraries & Initialization
#include <TinyGPS++.h>
#include <U8g2lib.h>
#include <Wire.h>
#include "thingProperties.h"- TinyGPS++: Parses NMEA sentences from the GPS module.
- U8g2lib: Controls the OLED display.
- thingProperties.h: Holds your Arduino IoT Cloud variable and device configuration.
Note: All the Libraries are pre-installed on the IoT Cloud platform.
U8G2_SH1106_128X64_NONAME_1_HW_I2C u8g2(U8G2_R0, U8X8_PIN_NONE);This initializes the SH1106 OLED over I2C (usually the best choice for classic 0.96 OLED Display).
#define RXD2 16
#define TXD2 17
HardwareSerial gpsSerial(2);- Sets up UART2 on ESP32 for GPS communication using GPIO16 and GPIO17.
🚀 setup() Function
gpsSerial.begin(GPS_BAUD, SERIAL_8N1, RXD2, TXD2);
u8g2.begin();- Starts communication with the GPS and OLED.
u8g2.drawStr(5, 25, "GPS Interface 0.2");- Displays a startup message on the OLED.
initProperties();
ArduinoCloud.begin(ArduinoIoTPreferredConnection);- Initializes your IoT cloud variables and connects to the network.
🔁 loop() Function
ArduinoCloud.update();- Keeps the ESP32 connected and synchronized with the cloud dashboard.
🛰️ Reading GPS Data
if (gpsSerial.available() > 0)
{
    if (gps.encode(gpsSerial.read()))
    {
        if (gps.speed.isValid())
        {
            spd_NEW = gps.speed.mps();

            if (spd_NEW != spd)
            {
                spd = spd_NEW;
            }
        }
    }
}- Reads new GPS data and updates internal variables if they're valid.
📡 Reconnection Handling
if ((millis() - lastConnected) > 2000) {
// Show "Reconnecting..." on OLED
}- If no data comes in from the GPS after 2 seconds, the device alerts the user via the OLED screen.
🖥️ OLED Display – printAll()
void printAll()
{
    location = {lat, lon};
    altitude = alt;
    satellites = sat;
    speed = spd;
    heading = gps.cardinal(head);
}
This function does two things:
- Updates cloud variables, like location, altitude, and speed.
- Shows them on the OLED display like this:
Note: The display updates only when new data is available, avoiding flickering or bandwidth use.


Comments