


Hardware components | ||||||
| × | 1 | ||||
 |
| × | 1 | |||
 |
| × | 1 | |||
 |
| × | 1 | |||
Software apps and online services | ||||||
 |
| |||||
About: Hello, the author of the project is an Application Engineer of Seeed Studio. It's great to share this project with the Hackster maker community. I hope you like Seeed Studio, a hardware enabler for IoT applications, which provides services that enable IoT developers to quickly prototype... More information about Seeed Studio »
Last week there're more than a dozen students visit our office at Shenzhen. They came from Xi'an Academy of Fine Arts. Some of our engineers work with them to make something, you can think that it's a combine of Art and Electrical. Finally there're four awesome was completed.
This is an interactive device that looks like a pyramid, which can open and close. At normal time, the pyramid is close, you can clap to make some noise to open it. When it's opened, you can find a smaller pyramid with colorful light.
The idea is came from the students' graduation project, they are planning to make a robot that can can breeding, sounds incredible but awesome. You can think that a big pyramid have a baby pyramid.
If you like it and want to make one yourself, let's go MAKING.
Step 1: Prepare the StuffsFollow is the things we need:
Electrical modulesGrove - Joint v2.0 shares many similarities with Seeeduino Lotus. It is a mini ATMEGA328 Microcontroller development board. It uses an Atmel ATMEGA328P-MU and CH340. ATMEGA328P-MU is a high performance, low power AVR 8-Bit Microcontroller. CH340 is a USB bus converter chip that can realize a USB to serial interface. Grove - Joint v2.0 has two Grove interfaces included I2C port and two digital I/Os. It else support battery powered. You can do some simple applications with it.
WS2812 is an intelligent control LED light source that the control circuit and RGB chip are integrated in a package of 5050 components. It includes intelligent digital port data latch and signal reshaping amplification drive circuit. Also include a precision internal oscillator and a 12V voltage programmable constant current control part, effectively ensuring the pixel point light color height consistent.
The Grove – Mini I2C motor driver is a very tiny motor driver with I2C interface, and it includes two motor driver chips - DRV8830, which helps you control two DC motors or winding of stepper motors on a small board simultaneously.
The Sound sensor module is a simple microphone. Based on the power amplifier LM386 and the electret microphone, it can be used to detect the sound strength of the environment. The value of output can be adjusted by the potentiometer.
Others- hinge x 6
- screw
- AB glue
fishing line
- fishing line
3mm wooden board3mm Lucency AcrylicAs for the Laser cutter, you can find one easily in a Hacker Space, if there's no hacker space near to you, you can try the Laser Cutting Service supply by Seeed.
Add TipAsk QuestionCommentDownload
Step 2: Cut the Wooden Board and AcrylicFirst of all, download the 2D file to cut the wooden board and acrylic. You will get many parts, you can refer to the image.
Step 3: Make a Big PyramidGet the four big triangle boards to make a big pyramid.
Some metal hinges and screw are needed here.
To make the pyramid has a nice looking, you can also print something on it.
Add TipAsk QuestionCommentDownload
Step 4: Install the Small PyramidAfter the pyramid is done. It's time to make its baby, a smaller pyramid.
You need to place 3 WS2812B LED inside the small pyramid before it's fixed.
And do some soldering, connect them together. Finally, there'a Grove cable connect to Din of the LED, and through the hole.
Add TipAsk QuestionCommentDownload
Step 5: Make the BaseWe need to make a base to place the pyramid.
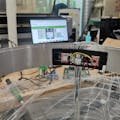
And inside the base, there're the electric modules as well as the gear motor.
Some AB glue or 3M glue will be helpful here.
Add TipAsk QuestionCommentDownload
Step 6: Electronic Module InstallationdConnection as below:
- Joint A0 > Grove - Sound Sensor
- Joint I2C Port > Grove - Mini I2C Motor Driver
- Joint D3 > WS2812 LED
Add TipAsk QuestionCommentDownload
Step 7: Software WorkDownload the code attached.
Here I suppose that you had used Arduino before.
Just chose the right boards - Arduino Pro/Mini (3.3V, 8M)Atmega 328, and the right port number.
Step 8: Final PartSome of the steps is no very detailed, I am really sorry for that.
But if you finally made one yourself, there's something need to notice:
- The motor is important, reduction ratio should > 50
- When power on, it need about 10s to initialize, don't make noise in that time.
Happy MAKING.
Cheers.


Comments