


Hardware components | ||||||
 |
| × | 1 | |||
| × | 1 | ||||
| × | 1 | ||||
| × | 1 | ||||
Software apps and online services | ||||||
 |
| |||||
Hand tools and fabrication machines | ||||||
 |
| |||||
The Challenge: a glance is not enough
In our always-on world, people navigate city streets with an increasing filter. Traditional billboards and static displays, once beacons of information, have become part of the background hum, ignored within a mere second or two. This isn't just about advertising; it's about any kind of public communication losing its ability to truly connect with the audience. The constant barrage of visual stimuli has desensitized us to the familiar, making us instinctively tune out anything that doesn't demand immediate attention. People are, understandably, "done with the boards system" because they know there's nothing of concern.
The Opportunity: harnessing the power of surprise
What if it were possible to re-engage the innate human tendency to notice a change, to pause, and to process something unexpected? What if urban communication could have a pulse, a rhythm that resonates with the walking rhythm of city dwellers? Imagine if a seemingly ordinary pavement could suddenly come alive, compelling observation and engagement for more than a fleeting moment. "Adverse" project aims to transform the passive urban landscape into an active, interactive experience that captures attention and fosters meaningful engagement.
The Technology: Awakening the Street
At the heart of "Adverse" is a simple yet powerful technological concept: a small, concealed trigger mechanism, such as a thin TPU layer embedded within the pavement. This trigger, activated by the pressure of a pedestrian's step or a dynamic movement, wirelessly signals a display powered by a Xiao microcontroller. This system brings the display to life through either the pervasive network of public Wi-Fi or a dedicated LoRa connection for areas lacking infrastructure. The sudden, unexpected burst of information or activity captures attention and compels pedestrians to stop, observe, and engage with the content, allowing the brain to process and retain it.
Beyond the scroll: a symphony of creativity
Why this is worth, let me give you an example when you walk across you suddenly stamp on something you look back to see what it is, the same concept is used here. Similarly sudden changes trigger human attention.
Software ArchitectureThe system's software architecture consists of two main components:
- ESP32 Firmware: Written in C++ using the Arduino IDE framework. This firmware initializes the Wi-Fi connection, hosts a simple web server, monitors a trigger input (representing the pedestrian interaction), and updates the display content dynamically.
- Web Page: A simple HTML webpage served by the ESP32, which includes an image that can be toggled on or off based on the trigger state. To display images on the ESP web server, methods like embedding via URL, storing in the ESP32/ESP8266 filesystem (LittleFS), or converting images to base64 are available.
- Install Arduino IDE: If you haven't already, download and install the Arduino IDE from the official website. You can find it here.
- Add ESP32 board support: Open the Arduino IDE, go to File > Preferences, and in the “Additional Board Manager URLs” field, add theURL: https://dl.espressif.com/dl/package_esp32_index.json.Then, go to Tools > Board > Boards Manager, search for "ESP32" and install the "ESP32 by Espressif Systems" package.
- Connect the ESP32: Plug your ESP32 board into your computer using a micro-USB cable.
- Select the Board and Port: Go to Tools > Board and select your specific ESP32 board. Then, go to Tools > Port and select the serial port connected to your ESP32.
#include <WiFi.h>
#include <WebServer.h>
const char* ssid       = "vivo Y22";
const char* password   = "abc456###";
const int   buttonPin  = D1;  // Make sure D1 maps correctly on your ESP32 board
WebServer server(80);
bool        showImage    = false;
unsigned long releaseTime = 0;
bool        lastState    = HIGH;
String getPage() {
String ip           = WiFi.localIP().toString();
String wifiStatus   = (WiFi.status() == WL_CONNECTED) ? "Connected" : "Disconnected";
String buttonStatus = showImage ? "VISIBLE" : "HIDDEN";
// Choose display property based on showImage
String display = showImage ? "block" : "none";
return R"rawliteral(
<!DOCTYPE html>
<html>
<head>
<title>ESP32 Full-Screen Image</title>
<meta name="viewport" content="width=device-width, initial-scale=1">
<meta http-equiv="refresh" content="1">
<style>
html, body {
margin: 0;
padding: 0;
width: 100vw;
height: 100vh;
background: black;
overflow: hidden;
}
#image {
position: absolute;
top: 0; left: 0;
width: 100vw;
height: 100vh;
object-fit: cover;
display: )rawliteral"
+ display +
R"rawliteral(;
}
.status {
position: absolute;
bottom: 10px;
left: 10px;
color: white;
font-family: sans-serif;
font-size: 1rem;
background: rgba(0,0,0,0.5);
padding: 5px 10px;
border-radius: 4px;
}
</style>
</head>
<body>
<img id="image" src="https://encrypted-tbn0.gstatic.com/images?q=tbn:ANd9GcSnyECOT9jFcgZ_TzeGFTA98etZiq-VDvepGQ&s" />
</body>
</html>
)rawliteral";
}
void handleRoot() {
server.send(200, "text/html", getPage());
}
void setup() {
Serial.begin(115200);
pinMode(buttonPin, INPUT_PULLUP);
WiFi.begin(ssid, password);
Serial.print("Connecting to WiFi");
int retries = 0;
while (WiFi.status() != WL_CONNECTED && retries < 20) {
delay(500);
Serial.print(".");
retries++;
}
if (WiFi.status() == WL_CONNECTED) {
Serial.println("\nConnected, IP: " + WiFi.localIP().toString());
} else {
Serial.println("\nFailed to connect.");
}
server.on("/", handleRoot);
server.begin();
Serial.println("Web server started.");
}
void loop() {
server.handleClient();
bool currentState = digitalRead(buttonPin);
// Button just released?
if (lastState == LOW && currentState == HIGH) {
releaseTime = millis();     // start 5s timer
showImage   = true;         // show immediately on release
}
// Hide after 5 seconds
if (showImage && (millis() - releaseTime > 5000)) {
showImage = false;
}
// If button held down, keep image visible
if (currentState == LOW) {
showImage = true;
}
lastState = currentState;
}- Libraries: The code includes the WiFi.h library for Wi-Fi connectivity and WebServer.h for setting up the web server.
- Credentials: Wi-Fi network credentials (ssid and password) are defined.
- Button Configuration: The buttonPin is set as an input with a pull-up resistor, meaning it will be HIGH normally and LOW when pressed.
- Web Server Initialization: An instance of the WebServer object is created on port 80.
- HTML Generation: The getPage() function generates the HTML content for the webpage, including a fullscreen image with a dynamic display property that is based on the state of the showImage variable.
- Button Interaction: The loop() function constantly monitors the state of the button. When a press is detected, the image visibility is toggled and the press time is recorded.
- Image Timeout: A 5-second timer is used to automatically hide the image if no further interaction is detected.
- Upload the Code: Upload the provided code to your ESP32 board using the Arduino IDE.
- Access the Web Page: Open the Serial Monitor in the Arduino IDE and note the IP address printed. In a web browser connected to the same Wi-Fi network as the ESP32, enter the IP address to access the webpage.
- Experience the Interaction: Press the limit switch connected to pin D1 (GPIO pin 1, confirm the mapping on your ESP32 board) to see the image appear on the web page.
- SeedStudio XIAO ESP32S3: This compact development board serves as the brain of the interactive display. It features a powerful RISC-V processor, Wi-Fi and Bluetooth capabilities, and a range of I/O pins for connecting to sensors and actuators.
- Limit Switch: This acts as the physical trigger for the interactive display, sensing the presence or weight of a pedestrian.
- Rocker Switch: A simple on/off switch for controlling the power to the circuit.
- 3D Printed Case: A custom-designed enclosure that houses and protects the electronics, providing a sleek and robust form factor.
- Battery: Provides power for the circuit.
- TPU Layer: A layer of thermoplastic polyurethane (TPU) for providing a compressible and tactile surface over the limit switch, enhancing the user experience and ensuring sensor protection.
Step 1: Prepare the case
- 3D Print the case: Print the custom-designed case with a slight tolerance to allow for a snug fit of the components.
- Press-fit components: Carefully press-fit the limit switch and rocker switch into the designated slots in the case. The slight tolerance in the design should ensure a secure fit without the need for additional fasteners.
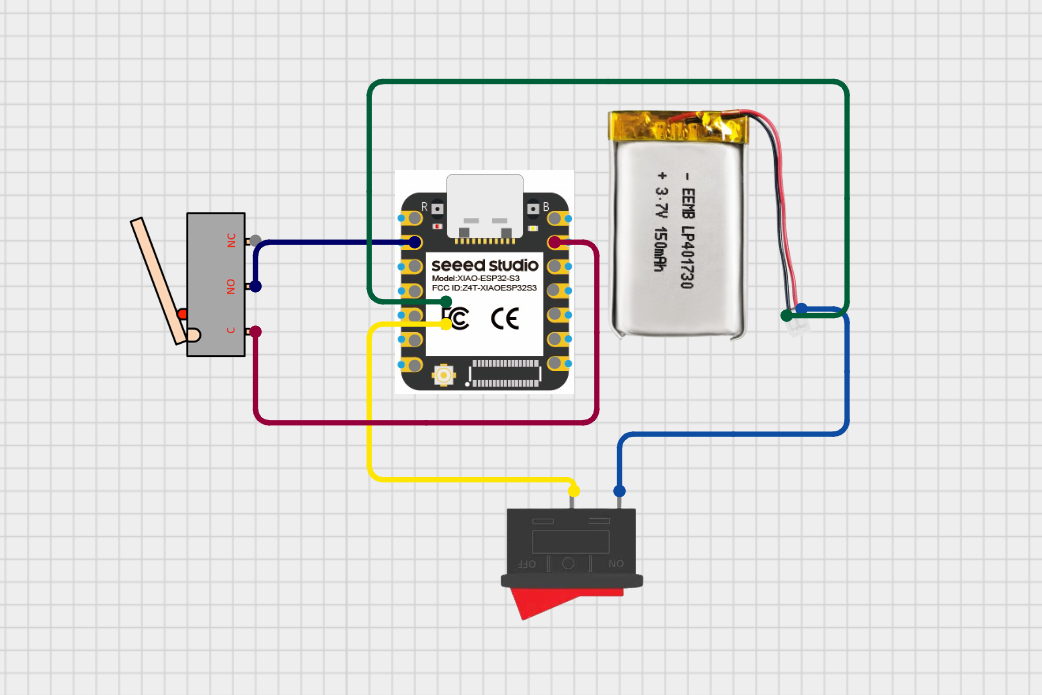
Step 2: Wiring the power circuit
- Rocker switch to battery: Connect one terminal of the rocker switch to the positive (+) terminal of the battery.
- Rocker switch to XIAO: Connect the other terminal of the rocker switch to the
BAT+pin on the XIAO ESP32S3 board. - Battery to XIAO: Connect the negative (-) terminal of the battery to the
BAT-pin on the back of the XIAO ESP32S3, near the battery connector.
Step 3: Wiring the limit switch
- Limit switch to GND: Connect the common terminal (center point) of the limit switch to the
GNDpin (ground) of the XIAO ESP32S3. - Limit switch to D1: Connect the normally open (NO) terminal (far end) of the limit switch to the
D1(GPIO 1) pin on the XIAO ESP32S3 board. - Now place everything inside the box.
Step 4: Integrating the TPU layer
- Apply the TPU layer: Affix the TPU layer on top of the 3D printed case, directly covering the limit switch. The TPU layer should be secured to the case in a way that allows the limit switch to still be compressed by the TPU. You could use an adhesive suitable for bonding TPU and the case material, or design the case to include a frame or groove to hold the TPU layer in place. The compressible nature of the TPU will absorb impact forces, protecting the limit switch and providing a more pleasant user experience.
- Safety: Ensure all connections are secure and properly insulated to prevent short circuits.
- Pin mapping: Double-check the specific pin mapping for D1 on your XIAO ESP32S3 board, as it might vary slightly between different ESP32 development boards.
- TPU layer considerations: Ensure the TPU layer chosen is sufficiently durable for the expected use environment (e.g., pedestrian traffic) while still offering the required compressibility for the limit switch to function effectively. Different grades of TPU offer varying degrees of flexibility and hardness, so selecting an appropriate grade is important.
- Testing: After assembly, use the provided software and follow the instructions to open the ip address and trigger the switch to see the interactive display.
- Invisible immersion: Embedding the TPU layer directly into the sidewalk tiles makes the interactive elements indistinguishable from the ordinary. This enhances the surprise and ensures unfiltered engagement with the displayed content.
- ESP-NOW or LoRa Integration: Implement ESP-NOW or LoRa for direct device-to-device communication, bypassing the need for a Wi-Fi router in specific scenarios.
- Gamified interaction: Stepping on a specific tile designed like the big buttons in the games like mario could trigger the display, even a "punching bag" can be done with a few design changes, for each punch there will be new content on the screen also a meter can be added so that they can compare the strength making it entertainment for people and for urban stress relief.
- Laser-like projections: Laser projection could cut and form objects in the air as you walk by, creating interactive scenarios that demand a second look.
"
"Adverse" is about breaking free from the predictable and creating a dynamic urban experience that encourages people to look up from their phones, engage with their surroundings, something Beyond Advertising A Platform for Connection giving out some space for people to interact. It's a system designed to give urban environments a voice, allowing them to tell stories, convey information, and inspire interaction in new ways.
The future of urban interaction is not just about what is seen, but how it is experienced. With this project, the very ground beneath your feet can be transformed into a canvas of engagement, curiosity, and unexpected delight.
We would like to extend our sincere gratitude to Seeed Studio for their amazing products helping us make our imaginations to products.
Probable QuestionsWhy not motion sensor?
Because motion sensor detects the motion alone. Let me make it simple. imagine walking and you stamp on something suddenly, and natural instinct makes us look back to see what it was leaving whatever we were doing, so that gets the attention of the people towards our billboard
The Power issue!
Kinetic charging tiles. We can custom fit our product with a kinetic charging tile custom made and there by charging the battery instantly.


Comments