


Hardware components | ||||||
| × | 1 | ||||
| × | 1 | ||||
| × | 1 | ||||
| × | 7 | ||||
 |
| × | 2 | |||
| × | 1 | ||||
| × | 2 | ||||
| × | 1 | ||||
| × | 1 | ||||
| × | 1 | ||||
| × | 1 | ||||
| × | 1 | ||||
| × | 1 | ||||
| × | 1 | ||||
| × | 1 | ||||
| × | 1 | ||||
| × | 1 | ||||
| × | 1 | ||||
| × | 1 | ||||
| × | 1 | ||||
| × | 1 | ||||
| × | 32 | ||||
| × | 45 | ||||
| × | 1 | ||||
| × | 1 | ||||
| × | 1 | ||||
| × | 1 | ||||
 |
| × | 4 | |||
| × | 1 | ||||
Software apps and online services | ||||||
 |
| |||||
| ||||||
Hand tools and fabrication machines | ||||||
 |
| |||||
 |
| |||||
 |
| |||||
NanoVault is a portable, high-speed storage Computer designed for travelers, vloggers, and photographers who need a laptop-free solution to transfer and back up data. With support for NVMe SSDs, external SSDs, and cloud storage, it ensures seamless, high-speed file transfers—anytime, anywhere.
NanoVault Uses Raspberry Pi Compute 5, which interfaces with SD Card Reader IC GL3224 and also it interfaces with PCIe NVMe SSD Cards for internal Data storage, It also has USB Type-C 3.0 Connector where u can connect External SSD and Transfers Data at speed in the range of Gbps. It is Portable with Formfactor Less than Size of iPhone, So that you carry Anywhere you Go. It has a interactive 2.8 inch Touch Display which Displaying Transfer Speeds and Custom GUI interaction.
😎Story behind Mission:It all started with a conversation—a simple, everyday exchange with my brother. a passionate photographer with a love for capturing the world through his DSLR, and the other, a curious and technically inclined thinker.
“Why do you need a laptop while traveling?” I asked my brother as he packed his bag yet again for another photography trip.
He replied with something that stuck with me:“I need to back up my photos and videos—store them somewhere safe, send them to the cloud, and keep a local copy too.”
That answer lingered in my mind long after the conversation ended. I began to question the necessity of carrying a bulky laptop just for backup purposes. Isn't there a smarter, lighter, more efficient way to do this?
The thought sparked an idea. Why can't we build a portable device—something compact, smart, and dedicated solely to storing and backing up media? A kind of portable NAS, tailored for creators on the go. I imagined a device where photographers, filmmakers, and content creators could plug in their SD cards or cameras, offload their files safely, and even sync them to the cloud—all without needing a laptop.
Driven by curiosity, I dove into research. I scoured forums, tech blogs, and e-commerce platforms. To my surprise, there was no specific device built exactly for this purpose. Sure, there were bulky NAS systems for home use, and a few rugged drives with limited functionality. But nothing truly portable. Nothing creator-friendly. Nothing smart enough to handle local and cloud sync, while fitting in your pocket.
And that's when it hit me:This isn’t just an idea—it’s a mission.
That day marked the birth of NanoVault.
🖊️How Does It Work?1️⃣ Insert Storage: Connect an NVMe SSD or external SSD.2️⃣ Transfer Data: Use USB3.0, Dedicated SD Connector to store files at high speed (Gbps) in Local Storage.3️⃣ Cloud Sync: With dual-band Wi-Fi, automatically upload files to Google Drive, Dropbox, or private servers.4️⃣ Portable & Power-Efficient: Runs on an internal battery, eliminating the need for external power.
Key Features:- +12V DC Power Input
- Compatible with Raspberry Pi CM5 (All Variants)
- USB-C 3.0 Port with ESD Protection
- SDHC/SDXC Card Slot
- HDMI-A Output with ESD Protection
- Micro USB-A Port with ESD Protection
- M.2 NVMe SSD Support (2230 Form Factor)
- DSI Touch Display Connector
- +5V Fan Interface
- On-board Power On/Off Switch
- Tactile Shutdown Button
- Compact Size: 100mm x 80mm
KICAD SOFTWARE is chosen for Schematic and layout Design
⚡Architecture:Processor - After Thoroughly researching All SoC on Market, I have concluded Raspberry pi CM5 Because of following Features
- Smallest Formfactor, Available in Breakout Board (COTS)
- 2 x USB 3.0 interface (Useful for Card Reader IC interface,External USB 3.0)
- 1 x Gen 3 PCIe Interface (Useful for NVMe SSD Interface)
- MIPI Dual DSI Interface with Touch Screen Support
- 2 x HDMI connector
- Operating with +5V itself, no External power Sequencing is required
- Generates +3.3V, +1.8V from +5V For IO Interfaces
- FAN Speed Control
SD Card reader IC - SD card Reader IC is Chosen in a incredible way, After researching Multiple Source in internet, I am not satisifed with resources. Hence I got a idea, to reverse engineer commercial USB 3.0 Card Reader and Teardown it, I have identified the IC part number, it was IC from Genesys Logic
Then, I Checked Genesys logic Website for other Variants of Card reader IC, I Finalised GL3224, This IC is chosen based on following Features
- USB 3.1 Interface
- Supports SDXC / SDHC Upto 1TB
- On-Board Power Regulators
- QFN-32 Package (3x3mm)
Power Supply section - Primary Voltages required for the Board is +5V & +3.3V
- Raspberry pi Consumes 5V@ 900mA
- NVMe SSD Consumes +3.3V@ 2000mA
Hence, I decided to Choose two Buck Converters with +5V & +3.3V Generating Separately, Because Load Current increases the Inductor size
The Buck Converter is Chosen from Texas Instruments LMR33630ADDAR Which has Wide input Voltage Range and 3A Load Current and small Form Factor
I have Used WEBENCH Power Designer Software for Designing Power Supplies for +5V & +3.3V
+12V to +5V Webench Reports are Found in the link : NanoVault_Ver1.0/12v_5V_reg_Simulation.pdf at master · Angu21/NanoVault_Ver1.0
+12V to +3.3V Webench Reports are Found in the Link : NanoVault_Ver1.0/12v_3.3V_reg_Simulation.pdf at master · Angu21/NanoVault_Ver1.0
ESD Protection - Since USB_C and HDMI Connector are Constantly mated with hands, There is high risk of device being Damaged by means of ESD. Hence, To mitigate this ESD diodes are implemented in Board. The ESD Diodes are Selected Based on Following Application note :
USB 3.0 ESD Protection Diode : ESD and Surge Protection for USB Interfaces (Rev. B), The Following Diodes are Selected
- TPD4E02B04DQAR
- ESD122DMYR
Impedance Controlled Board
Signal - GND -GND - Signal
Layer 2 & Layer 3 are chosen as Ground Because of Continuous Return path for High Speed Signals present at Layer 1 & Layer 4.
Single ended & Differential Tracewidth calculation are done using Saturn PCB Calculator
90ohm Differential Impedance with Length Matching Should be Less than 0.1mm / 4mils(Very Tight Constraint)
100ohm Differential Impedance with Length Matching Should be less than 0.15mm / 6mils(Very Tight Constraint)
🔌⚡USB 3.0:
90ohm Differential Impdance with length matching should be less than 0.1mm / 4mils
The Following Routing Guidelines are Strictly Followed for High Speed PCB Design
- No Test points on any high-speed differential signal is placed.
- High-speed traces are not routed under or near crystals, oscillators, clock signal generators, switching power regulators, mounting holes
- Routed high-speed differential pair signals on the top or bottom layer of the PCB with an adjacent GND layer.
- No Split Planes are Allowed
After Routing, DRC is being Checked and Cleared all Errors and Warnings.
After that, Gerber, Drill Files Are generated and Uploaded to PCBWAY.
🟩PCB FABRICATION (PCBWAY)I have Chosen Impedance Controlled Board, Since High Speed Signals Require Careful impedance Controlled PCB with +/-10% Tolerance with Surface Finish Immersion Gold.
🟩PCB Assembly (PCBWAY)Since Board has QFN, high Density Connector on board, I Preferred Component Assembly at PCBWAY itself for quality Assembling.
I have used TURN-KEY, in which PCBWAY buys components from Electronic Distributor like Digikey/ mouser and assemble themselves, which is preferable for me.
BOM Cost is 91.41US Dollars
Total Cost of Board Fabrication including Assembly is 289.35US Dollars
Huge Thanks to Hackster IO for Sponsoring 200 Dollars Coupon, So that I paidAdditionally 89.35US Dollars only.
🟩Arrival of PCBsAfter lot of excitement, I Finally received PCBs after a lot of Process from Customs india and paying Custom Charges (Thanks to Hackster IO for Refunding Custom Charges)
Board Looks Clean with Perfect Soldering. After Board Arrival, Board Bring up Started, The Following Steps are taken.
- Step1:Visual Inspection - Ensuring No Physical Damages and NPC Component Check and also Orientiation of Component Check - PASS✅
- Step2 : Impedance measurement - Measuring Resistance Across Power Supplies ensuring no Short Circuit is present - PASS✅
- Step 3 :First power on - Powering on the Board with Connecting +12V to DC jack Present on board (no Raspberry pi Connected) - PASS✅
- Step4:Power on with RPI CM5 - After Voltage Check, which Seemed to be normal, Then I mated Raspberry pi CM5 on board, Powered on the Bench for 1min and powered off - PASS✅
- Step 5 :Thermal Check - I dont have thermal Camera, after 1min, I sensed any abnormal Heat Produced by components - PASS✅
- Step 6 :Booting - I have Connected DSI Display, Hurraahhhhhh!, Raspberry pi Started Booting and I can see in Display, I was so Happy after seeing this.- PASS✅
⚙️USB 3.0 Interface check😀 - PASS✅
I have Connected USB hub to USB_C Connector, In the USB hub, I have Connected Keyboard, Mouse. the interface detected, by checking "lsusb" command.
⚙️HDMI interface check😀 - PASS✅
I have Connected HDMI Monitor to HDMI Port, HDMI Display is detected, it displayed the picture. Though HDMI is optional and it will be removed in Ver 2.0
⚙️PCIe Interface and Speed Check (2.59Gbps)🚀 - PASS✅I have bought 256GB M.2 Mkey NVMe SSD (2230 Form Factor) and Connected to NVMe Connector, To Check the Memory mounted, I typed "lsblk" and then it displayed - nvme0n1 Partition below in terminal. Hurrah!!!😀 My ssd Got Detected!,
Then I copied file from on board eMMC Flash memory to SSD
Wowww!!, Transfer speeds at 323.9MBytes/sec, Which 2.59Gbps😀 Speed and 1.3GB file copied in 4.4Secs, which is Pretty Fast
This validates my impedance Controlled Design is neatly matched with less reflections
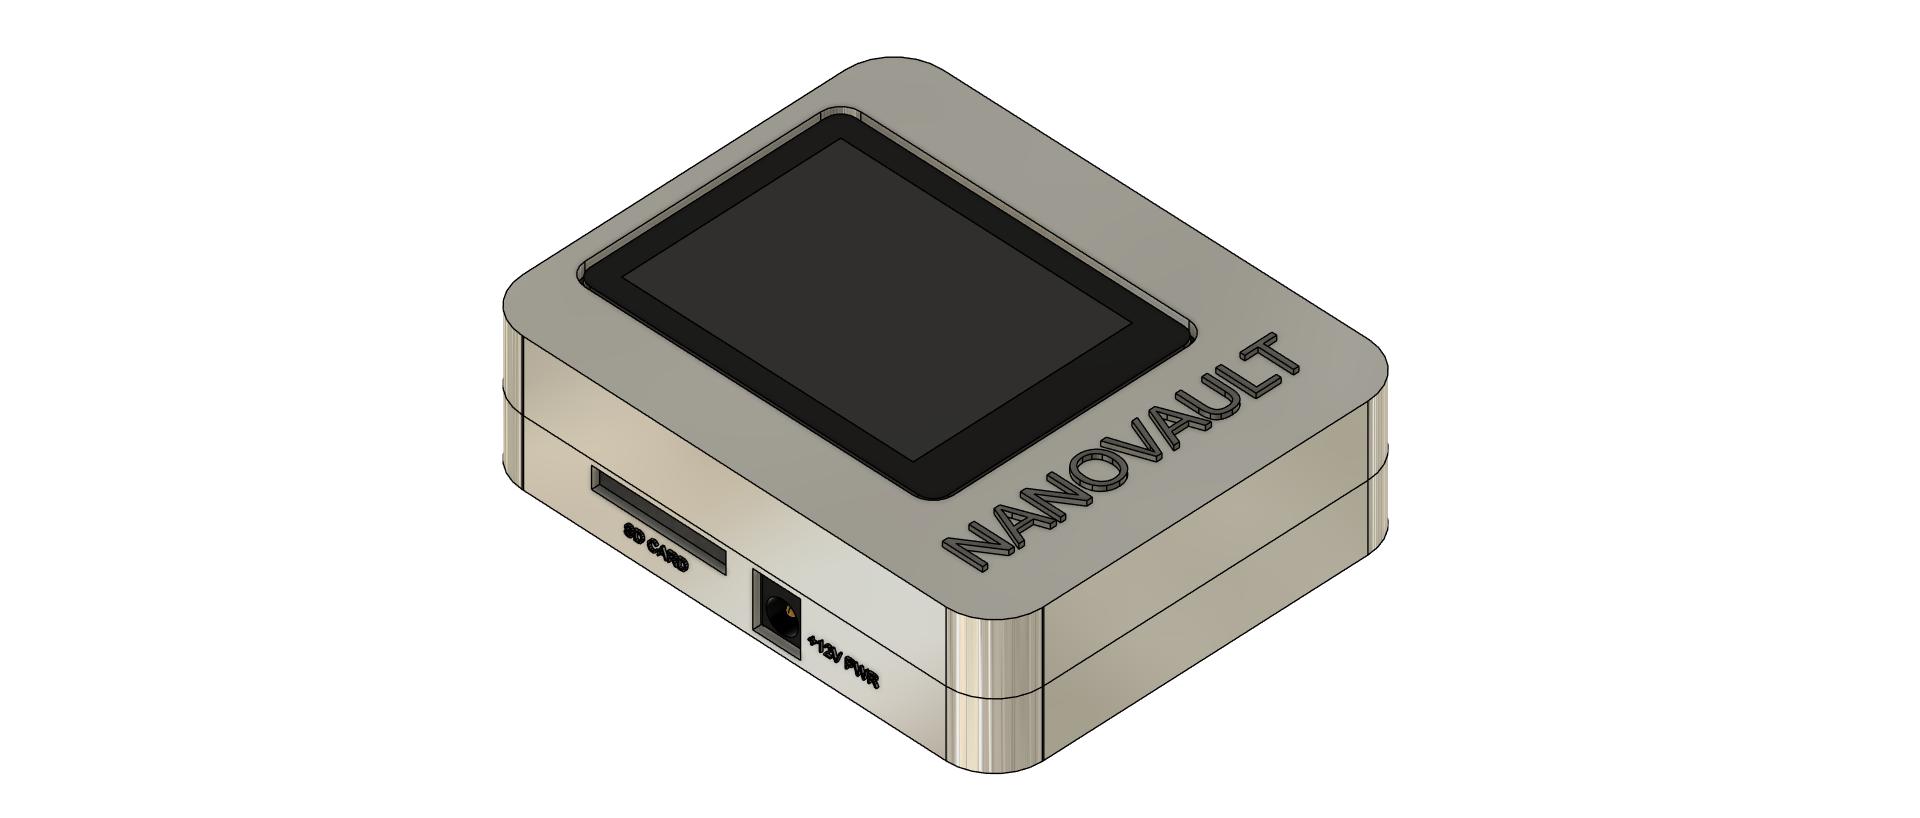
⚙️Mechanical Enclosure DesignI have AutoDesk Fusion 360 For Enclosure Design
Two Faces - Top & Bottom Faces.
After 3D Printing:
The product is completely Closed and mechanically Fitted with Perfection
After Placing Order in PCBWAY, I Started Preparing Firmware for the Nanovault
I Flashed Raspbian OS for Raspberry pi CM5 and installed CustomtKinter for GUI interface. I used Pycharm for CustomTkinter GUI Development.
Program is Written in Python Language and UI looks like:
Cloud backup button is to backup Data from Removable device to Cloud Platforms like Dropbox, Google Drive etc. In My design, I have configured Device to Backup the Data in Dropbox.
Cloud Backup is done using the Command "Rclone", When we click on the button "Cloud backup" Raspberry pi initaties File to be transferred and start Uploading to Cloud as shown below. Upload Speed depends on the WIFI bandwidth, Since my home has 10Mbps, I have achieved upto 3.5Mbps upload Speed.
When Wifi bandwidth is more, in terms of Gbps, then Upload Speed will be close to that.
The Below Image Displays the Uploading of file DCIM.zip (1.3GB) from Local to cloud
After Uploading is complete, I cross checked it Dropbox. Yesss! the File DCIM.zip is uploaded😎.
Local Backup Copies the Data from removable device to SSD. By Clicking on Local Backup, it Copies the Files from USB drive to SSD with Progress Bar Showing.
- Smaller Carrier Board design in Ver 2.0
- Solar Powered battery Charging systems, So that Battery are charged during Traveling, specially useful for Wildlife Vloggers / Photographers
- HDMI interface Removal, Since it is not required for Future Designs
- For power Consumption optimization, DSI Display may be Removed, device can be controlled by Bluetooth Connected Smartphone
- Robust Environment Enclosure to withstand Vibration, shock, waterproof etc.
I have plan of Taking this Product to Further to Production with thorough Optimization by raising Crowd Funding using Platforms like Kickstarter
Product Features that Stands out Crowd:- Small and portable, easy to Carry in pockets
- Battery powered
- Alternative option to laptops which is used for backup the data
- Sleek and attractive design
📦PCB Assembly and Manufacturing Files - Contains Gerber files, pick-and-place data, and other necessary files for fabrication and assembly.
🧾 Schematic DiagramElectrical circuit diagrams in standard SCH format for reference and editing
🧾+5V Power Supply Design Report
Webench +5V Power Supply design Report
🧾+3.3V Power Supply Design Report
Webench +3.3V Power Supply design Report
📋 BOMA complete Bill of Materials listing all electronic components used.
🧱 3D Files (Top)STEP files for 3D-printing the enclosure
🧱3D Files (Bottom)STEP files for 3D-printing the enclosure


Comments