


Hardware components | ||||||
_ztBMuBhMHo.jpg?auto=compress%2Cformat&w=48&h=48&fit=fill&bg=ffffff) |
| × | 1 | |||
| × | 1 | ||||
| × | 1 | ||||
 |
| × | 1 | |||
Software apps and online services | ||||||
 |
| |||||
I bought a car after working all summer and found out it had a minor problem when the rain started: a leaky sunroof. I discovered this through the musty smell, foggy windows, and wet carpets which had incredibly not been obvious when I bought the car in August! After some t-shooting, I learned that if I parked backwards on a hill, that the leak did not happen. Of course all engineering solutions are a trade-off in features, and I came to understand that parking backwards limited me to a small area where I could park and 1. be out of the street, and 2. not run over the birdbath. To solve this problem, I designed ParkingwithLasers! The system I built indicates when the car has reached the necessary distance from the street, but keeps from exceeding the distance and running over the birdbath.
Getting StartedI had only done one small cut-and-paste RFID project with Arduino prior to this one, but I had learned the IDE and thought Arduino was the way to go. Intiailly I was trying to accomplish this with the RFID sensor modules, but I couldnt find a good way to get the RFID tag on the car close enough reader in the parking spot, so I googled some Arduino modules and ended up finding the KY-008 Laser Modules and the receiver sensors that I thought would work.
The HardwareThese modules were extremely EASY to work with. I found good documentation HERE. They are just simple modules which read a high or low and don't even need a library to run. NOTE: I did find that some of the modules seemed to be wired opposite to what the circuit board said (which isn't much anyway!). I was connecting the "-" pin to ground and +5V to the "S" pin in my lab setup, but found when I switched to my outside setup, that the connections had to be reversed.UPDATE: while the modules were simple to work with, the "receiving" sensors were inconsistent. I ended up having to buy another set of 6 before I found two which would work consistently.
Software DevThis project definitely pushed my coding skills. My previous projects involved basic reads and lighting LED's. What began as something along the same lines quickly grew complicated as I realized the number of factors I had to deal with.
Power Conservation: I wanted to run the project off of batteries to avoid having to run power from the house. I found a great power conservation library, but I realized that to avoid false-positives and longer run times, I was going to have to add a triggering laser at the bottom of the driveway to start the system and then a detecting laser at the top of the driveway to read when the car was in the right place and notify me. With this addition, I added the power saving step which basically made the board run only once every 8 seconds, which was a huge savings..
A stable power source: I wasn't sure how much power the board and sensors were going to need, so I started by connecting the board to a battery pack I had for my phone which said it was 4000 mAh capacity and 5V/2.4A out. The specs on the Arduino UNO said it needed a minimum of 7V, but I didn't have anything else to test with so I hooked this it. Amazingly it worked for about 24 hours before the battery died.
Based on the test, I bought this 6-pack of AA batteries and a harness, but they didn't really work out. At this time, the setup is running off of a power supply.
Juggling Variables: Managing both lasers pushed me to try to find a way to have one activate off of the other. I came up with an AWESOME for-loop which linked the two (its awesome now that it works, but is was pretty not-so-great while I was coding it!). The basic conditions are 1. "if the lower sensor sees the laser, there is no car, go back to sleep", 2. "if the lower sensor doesn't see the laser, the car is there, activate the higher sensor". 3. "if the lower and the higher sensor cant see their paired lasers, the car is approaching the birdbath (and blocking both lasers from reaching the sensors), so light the LED so I know to stop the car".
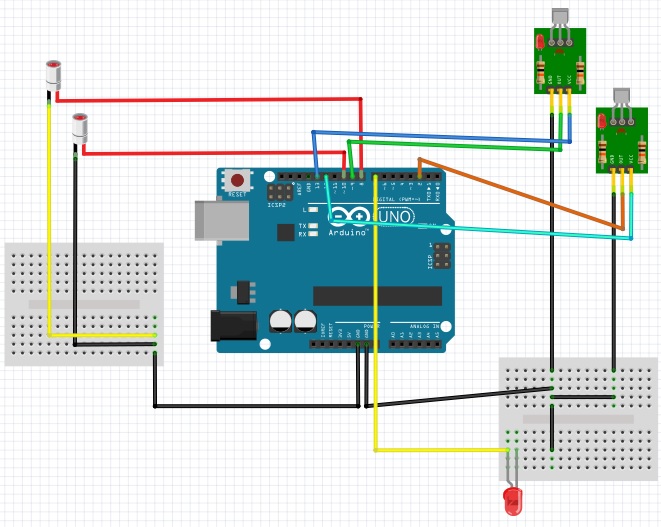
Labbing it outThis was my breadboard setup. the laser modules are on the yellow breadboard and the sensors are in the lower right across from them. This let me check the conditions and see if I had coded for the right things. All of the modules needed a ground and the UNO only has 3, so I ran the ground through the bigger breadboard to split it out.
Real-world Work
Once I got it all working in the lab. I started getting the driveway setup. The stakes and containers weren't that hard, but the cable stripping, soldering, and laser alignment were tough!
After all of the hardware was installed, the coding worked perfectly and now I can park my car without hitting the birdbath!

Comments