


Hardware components | ||||||
 |
| × | 1 | |||
Software apps and online services | ||||||
 |
| |||||
 |
| |||||
====================================================================
IntroductionThe term “drone” usually refers to any unpiloted aircraft. Sometimes referred to as “Unmanned Aerial Vehicles" (UAVs), these crafts can carry out an impressive range of tasks, ranging from military operations to package delivery. Drones can be as large as an aircraft or as small as the palm of your hand. Originally developed for the military and aerospace industries, drones have found their way into the mainstream because of the enhanced levels of safety and efficiency they bring. These robotic UAVs operate without a pilot on board and with different levels of autonomy. A drone’s autonomy level can range from remotely piloted (a human controls its movements) to advanced autonomy, which means that it relies on a system of sensors and detectors to calculate its movement.
Because drones can be controlled remotely and can be flown at varying distances and heights, they make the perfect candidates for taking on some of the toughest jobs in the world. They can be found assisting in a search for survivors after a hurricane, giving law enforcement and the military an eye-in-the-sky during terrorist situations, and advancing scientific research in some of the most extreme climates on the planet. Drones have even made their way into our homes and serve as entertainment for hobbyists and a vital tool for photographers.
Drones are used for various purposes:
- Military
- Delivery
- Emergency Rescue
- Outer Space
- Wildlife and Historical Conservation
- Medicine
- Photography etc.
====================================================================
MotivationThe main motivation behind this project is my curiosity to explore the various control schemes for small-scale drones. The paper "Design and Development of Voice Control System for Micro Unmanned Aerial Vehicles" talks about various drone control methodologies such as Radio, GCS, Gesture, Voice, Joystick, PC, FPV, and Autonomous. In the paper Design and Development of an Android Application for Voice Control of Micro Unmanned Aerial vehicles, it is observed that situational awareness is at a medium level for Radio and Gesture UAV control methods, whereas situational awareness is high for the voice control method. In this project, we will work on voice control, and later we will go up to vision-based control and also other advanced controls and systems.
The motivation for this project also raised from the need to implement these different control methods in a low-cost portable and scalable embedded platform with computation at the edge, without relying on external resources for its working.
====================================================================
Methodology====================================================================
DJI Tello DroneThe DJI Tello is a small-sized drone that combines powerful technology from DJI and Intel into a very tiny package. It is a lightweight, fun, and easy-to-use drone that is the perfect tool for learning the ropes of drone piloting before investing in a more expensive option. Tello boasts a 14-core processor from Intel that includes an onboard Movidius Myriad 2 VPU (Video Processing Unit) for advanced imaging and vision processing. It is equipped with a high-quality image processor, for shooting photos and videos. The camera features 5MP (2592x1936) photos and HD720 videos. The drone has a maximum flight time of 13 minutes. This incredibly small drone fits in your palm and only weighs approximately 80g (propellers and battery included). You can control Tello directly via the Tello app or with a supported Bluetooth remote controller connected to the Tello app. The drone is programmable via Python, C++, Scratch, and DroneBlocks.
Specs
- Weight: Approximately 80 g (with propellers and battery)
- Dimensions: 98mm*92.5mm*41mm
- Propeller: 3 inch
- Built-In Functions: Range Finder, Barometer, LED, Vision System, WIFI 802.11n 2.4G, 720P Live View
- Port: Micro USB Charging Port
- Max Flight Distance: 100m
- Max Speed: 8m/s
- Max Flight Time: 13min
- Detachable Battery: 1.1Ah/3.8V
- Photo: 5MP (2592×1936)
- FOV: 82.6°
- Video: HD720P30
- Format: JPG(Photo); MP4(Video)
- Electronic Image Stabilization: Yes
Preparing Tello Drone for the project
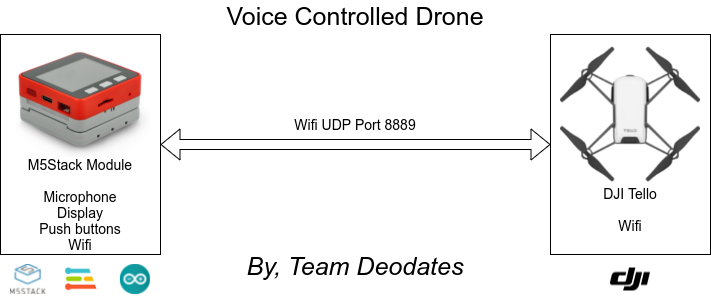
The Tello drone SDK provides ample information on how to program the drone to achieve the tasks via Tello commands, but are somewhat limited in the features. The Tello SDK connects to the aircraft through a Wi-Fi UDP port, allowing users to control the aircraft with text commands. We use Wi-Fi to establish a connection between the Tello and the M5Stack module. Once powered on Tello acts as Soft AP Wi-Fi (192.168.10.1) to accept commands via port 8889.
The Tello SDK includes three basic command types.
Control Commands (xxx)
Returns “ok” if the command was successful.
Returns “error” or an informational result code if the command failed.
Set Command (xxx a) to set new sub-parameter values
Returns “ok” if the command was successful.
Returns “error” or an informational result code if the command failed.
Read Commands (xxx?)
Returns the current value of the sub-parameters.
Even though Tello is pretty maneuverable, with a number of different axes on which we can control the drone, in this project, we will use the following commands.
- takeoff : Auto takeoff.
- land : Auto landing.
- up x : Ascend to “x” cm.
- down x : Descend to “x” cm.
- left x : Fly left for “x” cm.
- right x : Fly right for “x” cm.
- forward x : Fly forward for “x” cm.
- back x : Fly backward for “x” cm.
Please refer to the SDK for a full set of commands.
As a safety feature, if there is no command for 15 seconds, the Tello will land automatically.
Tello API
As we are using Arduino as the platform, we need an API that can translate our commands to UDP packets to be sent using the Arduino program. TelloArduino is an Arduino library for controlling DJI Tello through ESP32 Module. This library controls the Tello by sending commands via UDP as mentioned in the SDK documentation.
- Click the "DOWNLOAD ZIP" button.
- Place the "tello" folder in your Arduino sketch folder/libraries/ folder. Now Restart the IDE.
- In your Arduino IDE, go to Sketch > Include Library > choose "tello" to include this library in your sketch.
====================================================================
M5Stack Fire ModuleM5Stack FIRE is one of the M5Stack developing kits, providing 9-Axis IMU sensor (6-Axis posture acceleration measurement + 3-Axis magnetic measurement), microphone, buzzer, 16M Flash + 4M PSRAM, enhanced Base, larger battery, etc. With an IMU posture sensor, there are a lot of situations to which you can apply this kit, like detecting acceleration, angulation, and trajectory. You can make relative products like sports data collectors, 3D remote gesture controllers, etc. It is a modular, stackable, scalable, and portable device is powered with an ESP-32 core, which makes it open-source, low cost, full-function, and easy for developers to handle new product development on all stages include circuit design, PCB design, software, mold design, and production.
M5Stack Fire comes with three separable parts. The top part has the processors, chips, sockets, 2.4G antenna, ESP32, power management IC, an LCD screen, and some other interface components.
The middle part is called the M5GO base which provides a lithium battery, M-BUS socket, LED bar, and three more GROVE Ports. The bottom part is a charge table, which can be connected to the M5GO base via POGO pins.
M5Stack development boards are highly efficient, covered with industrial-grade case and ESP32-based development board. It integrates with Wi-Fi & Bluetooth modules and contains a dual-core and 16MB of SPI Flash. Together with 30+ M5Stack stackable modules, 40+ extendable units, and different levels of program language, you can create and verify your IoT product in a very short time.
It supports programming in Arduino, Blockly language with UIFlow, Micropython.
====================================================================
Preparing M5StackFIRE for the project
Download Arduino IDE
- Open up your browser, and visit Arduino's official website.
- Download and install the version according to your operating system.
Install ESP32 Boards Manager
- Open up the Arduino IDE, and navigate to File -> Preferences -> Settings
- Add the following ESP32 Boards Manager URL to Additional Boards Manager: https://dl.espressif.com/dl/package_esp32_index.json
- Hit OK
- Navigate to Tools -> Board: -> Boards Manager
- Search ESP32 in the Boards Manager window, and click Install
Install M5Stack Library
- Open Arduino IDE, then Select Sketch->Include Library->Manage Libraries
- Search M5Stack and install it
For Windows machines, an additional USB to serial Driver needs to be installed.
Arduino port Configuration
- Choose the correct board, baud rate, and serial port.
- Once set up, you can try an example sketch to verify if everything is working.
- Click Upload, to flash the code to the device
- Once successfully flashed, the M5Stack module will show the corresponding output on its display as well as Arduino Serial Monitor.
====================================================================
Voice Control MethodJan Jongboom has a very nice tutorial on how to implement keyword spotting using EdgeImpulse Studio.
We will be referring to this for developing our keyword spotting for voice command control.
Keyword Spotting
Keyword spotting in general is a part of speech processing. A special case of keyword spotting is the wake word (also called hot word) detection that is used by personal digital assistants such as Alexa or Siri to "wake up" when their name is spoken. The most important algorithm used in keyword spotting is based on Mel-frequency cepstrum coefficients. It is basically a way of turning raw audio that contains a large amount of redundant information into a simplified form.
As per Aalto University, Wake-word and keyword spotting refer to small-vocabulary speech recognition tasks. They are used either in very simple applications where proper speech recognition is unnecessarily complex (keyword spotting) and in pre-processing tasks, where we want to save resources by waiting for a "Hey computer!". In the latter task, wake-word spotting is thus a trigger for more complex speech processing tasks. Though the two tasks have rather different objectives, the underlying technology is very similar and they will here be discussed jointly.
Most typically wake-word and keyword spotting algorithms run on devices with limited resources. They can be limited in memory footprint and in computation resources (CPU power) or often both. An increasing amount of memory or using a larger CPU would both increase the cost of the device (investment cost), but would also require more power (maintenance cost). In small devices, such marginal costs are a very significant part of the overall cost of the device.
MFCC
The "MFCC" is great for dealing with human speech. It is a representation of the short-term power spectrum of a sound, based on a linear cosine transform of a log power spectrum on a nonlinear Mel scale of frequency. Mel-frequency cepstral coefficients (MFCCs) are coefficients that collectively make up an MFC. They are derived from a type of cepstral representation of the audio clip (a nonlinear "spectrum-of-a-spectrum"). The difference between the cepstrum and the Mel-frequency cepstrum is that in the MFC, the frequency bands are equally spaced on the Mel scale, which approximates the human auditory system's response more closely than the linearly-spaced frequency bands used in the normal spectrum. This frequency warping can allow for better representation of sound, for example, in audio compression.
MFCCs are commonly derived as follows:
- Take the Fourier transform of (a windowed excerpt of) a signal.
- Map the powers of the spectrum obtained above onto the Mel scale, using triangular overlapping windows or alternatively, cosine overlapping windows.
- Take the logs of the powers at each of the mel frequencies.
- Take the discrete cosine transform of the list of mel log powers, as if it were a signal.
- The MFCCs are the amplitudes of the resulting spectrum.
Keyword spotting using MFCC
The overall structure of keyword-spotting algorithms is depicted below.
The input speech signal is first converted to a feature representation, such as MFCCs, which are fed to a neural network, and the output is the likelihood of each keyword.
In other words, keyword and wake-word spotters have a small set of accepted keywords, which are hard-coded into the software. If we have N possible keywords, then the neural network has N outputs corresponding to the probability that the input is each of those keywords. The output is then thresholded such that that keyword is chosen which has the largest probability.
A central challenge in training keyword spotting algorithms is finding and choosing training data. To get good quality, you would typically need several tens of thousands of utterances of the keywords, spoken by a large range of different speakers and in different environments. For example, the "Speech Commands Dataset" by Google has 65.000 utterances of 30 short words. However, the choice of keywords is naturally dependent on those functions that the keyword spotter should activate, or the desired wake-word. For real-world applications, we therefore often cannot use pre-collected datasets but have to collect our own. You can just imagine the workload required to collect 65.000 utterances from over a thousand speakers!
====================================================================
Voice Recognition using Edge ImpulseWe will use machine learning to build a voice recognition system that runs on a microcontroller, with the help of Edge Impulse Studio.
Preparing Edge Impulse Studio for the project
- Log in to https://www.edgeimpulse.com/
- Click Create Project.
- Give Project name and click Create.
- Head over to the "Devices" tab from the left menu and choose "Connect a new device".
- You will be greeted with a variety of device options.
- To make things simple, let's connect our smartphone device. Since all smartphones have onboard microphones, it will be easy-peasy.
- Next, you will be given a QR code and a link to allow the collection of data from your smartphone.
- Scan this QR code or open the link via your smartphone device.
- Once the link is opened via your smartphone, the smartphone will show up in the "Devices" section.
====================================================================
Data collection
For collecting the data for our machine learning model, we will use the onboard microphone present onboard our smartphone.
work in progress
====================================================================
Interfacingwork in progress
====================================================================
TestingLet us now test the gesture control and see how well it works.
work in progress
====================================================================
Conclusionwork in progress
====================================================================
What next !!work in progress
====================================================================
Reference
Design and Development of Voice Control System for Micro Unmanned Aerial Vehicles
Hello Edge: Keyword Spotting on Microcontrollers
https://ai.googleblog.com/2017/08/launching-speech-commands-dataset.html


Comments