Introduction
This project about the Dashboard and button box like use for games. Sometimes, we need some information while playing a game and we need to see it immediately. And we need more real controls, the keyboard is not enough for this. I have this problems, too and I want to make a project to solve it.
Step 1 : Required Parts & SoftwaresYou need some parts to this project.
- Arduino Leonardo : Leonardo will be the controller of our project. You can change it a Arduino model supported by SimHub. If you will init Arduino like a game controller, you need Leonardo / Micro / Pro Micro.
- SimHub : SimHub gives us the necessary software support. You can change the settings of part in here. It has a lot of game support.
- LCD Display with I2C Module : I used a 4x20 LCD Display, you can use 2x16 or Nokia 5110 screen. If you use 4x20 or 2x16 LCD Display, you need a I2C module to work LCD.
- Neopixel Stick : I used two neopixels in this project. You can increase or decrase it. The advantage of Neopixel is that you can control all the LEDs with just one pin.
- Rotary Encoder : We have a lot of information, we can't show all info together. LCD display has pages, you can change the pages with Rotary Encoder.
- DC184 Push Button : We use buttons for Button Box. But we have a problem in here; more button needs more pins, but we have just 14 digital and 6 analog pins! And we'll use most pins to other parts. We'll solve it with Matrix circuit. Matrix circuit like a table, it has rows and columns. It helps us save pin count. I described it on Step 2.
- LED Dot Matrix Display : We use this part to show gear information. You need a PCB card to work it.
- Mini Breadboard, Jumper Cable, Screw, Clip Nut
If you change anything in project, don't forget change settings on SimHub and DXF file for best experience.
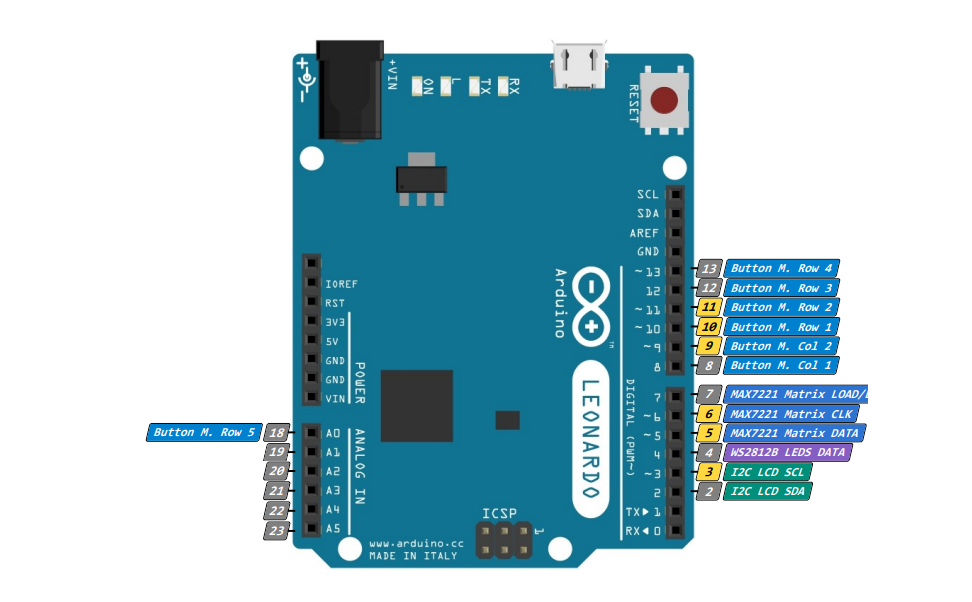
Step 2) Setup the CircuitI setup the circuit as follows:
You can see texts in nearly to pins. Let's describe this.
I2C : LCD Module with I2C (SCL and SDA pins)
WS2812 : Neopixel sticks (Input pin)
MAX7221 : 8x8 Dot Matrix and its PCB (CLK, DATA and DIN pins)
Button : We used the buttons with Matrix circuit. I used 2 columns and 5 rows. I gived a simple example for use :
If you have setup, let's go to Step 3.
Step 3) Upload Software to LeonardoOpen SimHub App. Click Arduino, go to My Hardware tab. If you running SimHub first time, you have two choices in here. We use "Single Arduino" in this project. Select it and click "Open Arduino Setup Tool". A new window will show and we init the circuit to SimHub in here.
In left side, you can init your parts and pins. You can't use two things in one pin. You can init the arduino as a gamepad, but don't forget. You need Leonardo/Micro/Pro Micro.
In right and bottom side, you can see the circuit. You can save or write it.
In right and top side, you can change the card settings. In board list, you can selecet your Arduino Card. You can select Port number. When you complete your circuit on software, tick the "I understand that uploading this sketch will replace any existing firmware on the arduino and I've made sure that I'm using the correct serial port.". When you ticked it, Upload button will be active and you can upload the firmware to Arduino module.
Step 4) PCBWay Custom PCB I order PCBs from PCBWay. PCBWay, a global company for produce own PCBs. They have also PCBA, 3D, CNC services. They ship to more 170 countries. It has also cheap prices! I recommend it to everyone.


Comments