


Hardware components | ||||||
 |
| × | 1 | |||
 |
| × | 1 | |||
Software apps and online services | ||||||
| ||||||
Hand tools and fabrication machines | ||||||
 |
| |||||
 |
| |||||
 |
| |||||
I've been obsessed at building keyboard recently. Already build various kind of mechanical keyboard and also a lot of it end up in my junk box due to limited time I have to make them.
When I saw the Junk Drawer contest here on hackster, it motivate me to get back to build another one this holiday season.
1. Picking the JunkI have many keyboard project on hold and ends up in this box, but there is one keyboard that I am eager to build. And that is the Skeletyl Keyboard From BastardKB
Not only this keyboard is very cool looking but it also seems ergonomically comfortable.
I just want to a huge thank you to bastardkb for making this keyboard open source down to the PCB design.
2. State of the ProjectAt the time of writing this project, the keyboard is already 60% finished. I already finished the case build and switches mount. For the switch I use Kisstefall's SU-120 pcb design as mount and make it hot swappable. There are already PCB design specifically made for the Skeletyl keyboard but the idea of soldering the switches directly to PCB kinda hard for me to accept because sometimes I reuse my switches for other keyboard project.
The only thing left to finish this project is to mount the MCU, solder the switches to MCU and configure the firmware for it.
The thing that made me stop building this is when I printed the mcu Mounting, the part just can't fit to the case and I don't have the time to adjust the print for that part.
3. Picking up where I left offTo continue this project I decided to print the pcb for the mcu part only.
My original plan is to edit the PCB using this new Colourful Silkcreen PCB option at JLCPCB that was added to EasyEDA PRO. But it seems it will take sometime to make. So I decided to go use the standard way.
This is also took quite some time to arrive to my country. But after 2 weeks of waiting, it finally arrive and it doesn't disappoint.
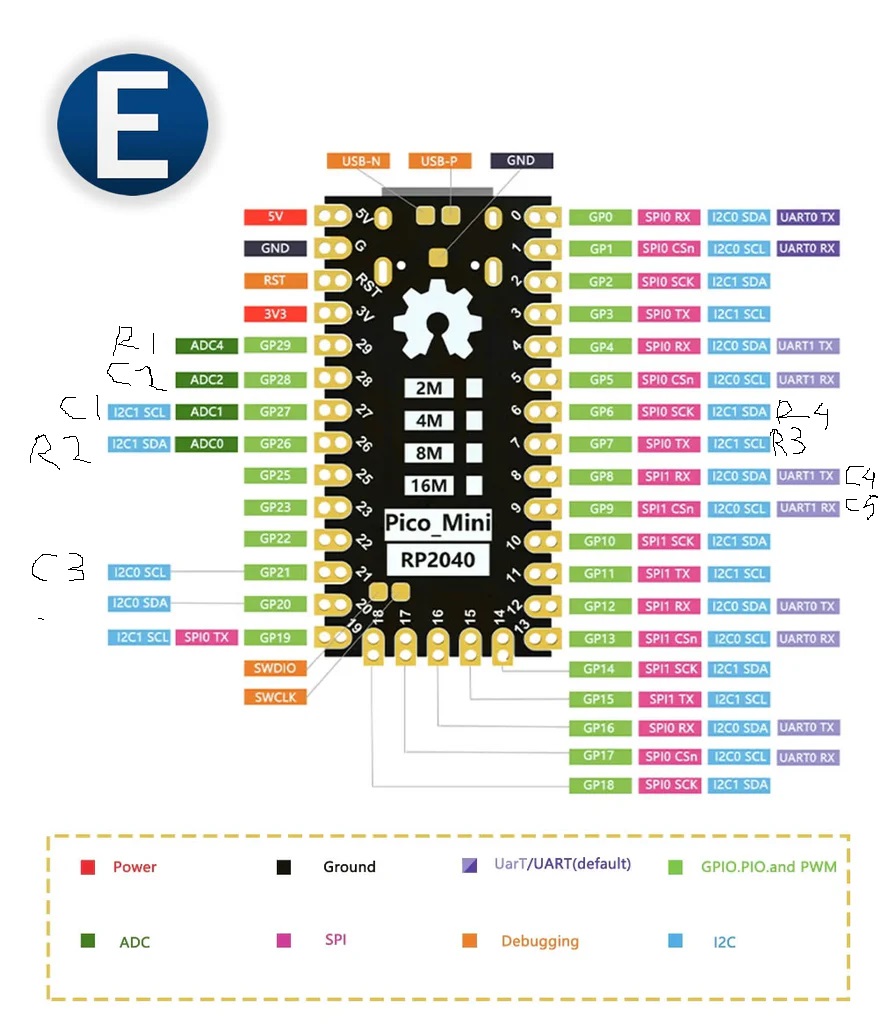
For the MCU, I already have a few RP2040 dev board but since the PCB is based on elite c or Arduino Pro Micro footprint I decided to use the RP2040 that has almost similar foot print.
After finished with soldering the MCU, I continue to solder the wire from the switches to mcu pcb.
The dev Board MCU that I use turned out don"t have the same foot print with the arduino pro micro/elite C that is commonly use for building custom mechanical keyboard. So a little wiring need to be done.
After doing the minor wiring modification, then the electronical part for this project is done.
After screwing up the bottom plate, it is time to put some keycap for the keyboard. And for that part I also use my 3D printed keycap from my previous keyboard project. And this is the result.
And this is alongside my other split keyboards
For this keyboard I choose to use KMK firmware because it is easy for me to configure without disassembling the case.
Here some sampe for my config file.
import board

from kmk.kmk_keyboard import KMKKeyboard as _KMKKeyboard
#from kmk.quickpin.pro_micro.boardsource_blok import pinout as pins
from kmk.scanners import DiodeOrientation


class KMKKeyboard(_KMKKeyboard):
    col_pins = (
        board.A1,
        board.A2,
        board.GP21,
        board.GP8,
        board.GP9,
    )
    row_pins = (
        board.GP7,
        board.A0,
        board.A3,
        board.GP6,
    )
    diode_orientation = DiodeOrientation.ROWS
    data_pin = board.GP1
    #rgb_pixel_pin = pins[0]
    #i2c = board.I2C

    # fmt: off
    coord_mapping = [
         0,  1,  2,  3,  4,  20, 21, 22, 23, 24,
         5,  6,  7,  8,  9,  25, 26, 27, 28, 29,
        10, 11, 12, 13, 14,  30, 31, 32, 33, 34,
                17, 18, 19,  35, 36, 37,
    ]
    # fmt:on
And this is the main code for the keyboard
print("Hello World!")
from kb import KMKKeyboard,board

#from kmk.extensions.rgb import RGB
from kmk.keys import KC
from kmk.modules.layers import Layers
from kmk.modules.holdtap import HoldTap
from kmk.modules.split import Split, SplitSide, SplitType

keyboard = KMKKeyboard()


# TODO Comment one of these on each side
#split_side = SplitSide.LEFT
split_side = SplitSide.RIGHT
split = Split(data_pin=board.GP1, split_side=None, use_pio=True)

layers = Layers()
holdtap = HoldTap()
keyboard.modules = [layers, split, holdtap]
#keyboard.extensions = [rgb]
#
# Cleaner key names
_______ = KC.TRNS
XXXXXXX = KC.NO

LOWER = KC.LT(1, KC.LEFT)
RAISE = KC.LT(2, KC.RIGHT)
ADJUST = KC.LT(3, KC.SPC)

SPC_L7 = KC.LT(7, KC.SPC)

D_CTL = KC.HT(KC.D, KC.LCTRL)
Z_SHF = KC.HT(KC.Z, KC.LSFT)
S_ALT = KC.HT(KC.S, KC.LALT)
ENT_SHF = KC.HT(KC.ENT, KC.LSFT)

# fmt:off
keyboard.keymap = [
    [  #QWERTY
        KC.Q,    KC.W,    KC.E,    KC.R,    KC.T,                         KC.Y,    KC.U,    KC.I,    KC.O,   KC.P,
        KC.A,    S_ALT,    D_CTL,    KC.F,    KC.G,                       KC.H,    KC.J,    KC.K,    KC.L, KC.BSPC,
        Z_SHF,    KC.X,    KC.C,    KC.V,    KC.B,                        KC.N,    KC.M, KC.COMM,  KC.DOT, ENT_SHF,
                                KC.LGUI,   LOWER,  ADJUST,     KC.SPC,   RAISE,  KC.TAB,
    ],
    [  #LOWER
        KC.N1,   KC.N2,   KC.N3,   KC.N4,   KC.N5,                         KC.N6,   KC.N7,  KC.N8,   KC.N9,   KC.N0,
        KC.DEL, KC.CAPS, KC.PSCR, _______, _______,                       KC.LEFT, KC.DOWN, KC.UP,   KC.RIGHT, _______,
        KC.LSFT, _______, _______, _______, _______,                       _______, _______, _______, _______, _______,
                                KC.LGUI,   LOWER,  ADJUST,     KC.SPC,   RAISE,  KC.RALT,
    ],
    [  #RAISE
        KC.EXLM,   KC.AT, KC.HASH,  KC.DLR, KC.PERC,                       KC.CIRC, KC.AMPR, KC.ASTR, KC.LPRN, KC.RPRN,
        KC.QUOT,KC.LCBR, KC.LBRC, KC.LPRN, XXXXXXX,                        KC.MINS,  KC.EQL, KC.PIPE, KC.SCLN, KC.COLN,
        KC.DQT, KC.RCBR, KC.RBRC, KC.RPRN, XXXXXXX,                       KC.UNDS, KC.PLUS,KC.SLSH , KC.BSLS, KC.QUES,
                                KC.LGUI,   LOWER,  ADJUST,     KC.SPC,   RAISE,  KC.RALT,
    ],
    [  #ADJUST
        KC.EXLM,   KC.AT, KC.HASH,  KC.DLR, KC.PERC,                        XXXXXXX, XXXXXXX, XXXXXXX, XXXXXXX, XXXXXXX,
        KC.LCTL, KC.LGUI, KC.AMPR, XXXXXXX, XXXXXXX,                        XXXXXXX, XXXXXXX, XXXXXXX, XXXXXXX, XXXXXXX,
        XXXXXXX, XXXXXXX, XXXXXXX, XXXXXXX, XXXXXXX,                        XXXXXXX, XXXXXXX, XXXXXXX, XXXXXXX, XXXXXXX,
                                KC.LGUI,   LOWER,  ADJUST,     KC.SPC,   RAISE,  KC.RALT,
    ]
]
# fmt:on

if __name__ == '__main__':
    keyboard.go()
I don't use many layer and this configuration is already enough for my daily needs.
5. ConclusionI just use this keyboard for 2 days and already see some potential to become my daily driver but my journey to find the best comfortable keyboard doesn't end with this keyboard. I still have few other form factor that I still want to try.
Huge thanks to BastardKB for the amazing design of this keyboad and sharing all the files needed to build this keyboard. All the case and pcb you can find on BastardKB github repo (Links Below).
If you don't want the hassle building this on your own but still want to try the awesomeness of this keyboard, you can buy the assembled keyboard at BastardKB's web store here.
Not very important fact:
I am writing this page using this very own keyboard
Typing test video:


Comments