


Hardware components | ||||||
 |
| × | 1 | |||
 |
| × | 1 | |||
 |
| × | 1 | |||
 |
| × | 1 | |||
 |
| × | 1 | |||
Software apps and online services | ||||||
 |
| |||||
Hand tools and fabrication machines | ||||||
 |
| |||||
 |
| |||||
Modern digital labs require not just computing power, but also real-time awareness of the environment. In this project, you'll build a wireless temperature and humidity display system using two ESP32 boards, a SHT40 sensor, and a MAX7219 LED matrix.
But here’s the twist — it doesn’t need Wi-Fi or an internet connection.
We use ESP-NOW, a fast, connectionless communication protocol built into the ESP32, to send live sensor data from one device to another. That makes it perfect for use in a classroom, university digital lab, or any isolated IoT setup where reliability and simplicity are key.
The receiver unit displays the environmental data on a large LED matrix, alternating between temperature, humidity, and a scrolling label like “DIGITAL LAB MONITOR.”
This system helps visualize your lab's real-time climate conditions in a clean, readable, and fully offline manner.
Whether you're teaching embedded systems, building a smart environment, or upgrading your digital lab infrastructure, this project blends sensor integration, wireless communication, and visual feedback in a powerful way.
How It Works- Sender ESP32 reads temperature and humidity from the SHT40 sensor.
- It then sends that data using ESP-NOW, a fast and connectionless protocol for ESP32 devices.
- Receiver ESP32 gets the data and shows it on a scrolling MAX7219 matrix display, alternating between temperature, humidity, and a custom message.
No Wi-Fi, no MQTT, just fast peer-to-peer wireless communication.
Display ModesThe LED matrix cycles through:
- Current Temperature (e.g.
26.4C) - Current Humidity (e.g.
61.2%) - Custom scrolling message:
DIGITAL LAB MONITOR
Each display stays for 12 seconds before switching.
SHT40 uses I2C (SDA/SCL)
Connect as per your board’s pinout (usually GPIO 21/22)
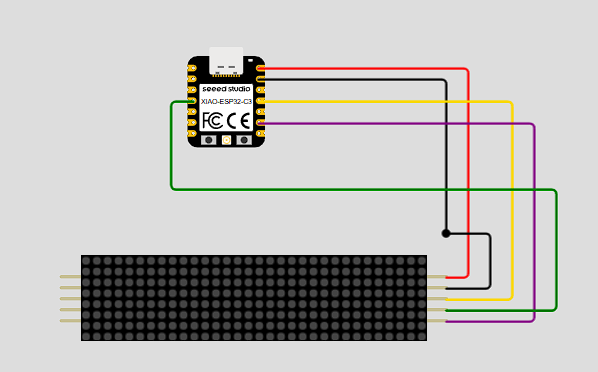
MAX7219 uses SPI (DIN, CS, CLK)
- DIN → GPIO 10
- CS → GPIO 5
- CLK → GPIO 8
- Upload sender code to one ESP32 and connect the SHT40
- Upload receiver code to another ESP32 and wire up the MAX7219
- Power both boards
- Watch the temperature and humidity scroll across the display!
Make sure to update the MAC address of the receiver in the sender sketch!
use this code to get the mac address for the receiver side
#include <WiFi.h>
#include <esp_wifi.h>

void readMacAddress(){
  uint8_t baseMac[6];
  esp_err_t ret = esp_wifi_get_mac(WIFI_IF_STA, baseMac);
  if (ret == ESP_OK) {
    Serial.printf("%02x:%02x:%02x:%02x:%02x:%02x\n",
                  baseMac[0], baseMac[1], baseMac[2],
                  baseMac[3], baseMac[4], baseMac[5]);
  } else {
    Serial.println("Failed to read MAC address");
  }
}

void setup(){
  Serial.begin(115200);

  WiFi.mode(WIFI_STA);
  WiFi.STA.begin();

  Serial.print("[DEFAULT] ESP32 Board MAC Address: ");
  readMacAddress();
}

void loop(){

}- Add a buzzer to the receiver to alert high temperatures
- Display data on an OLED instead of matrix
- Add more sensors (e.g., CO₂, light, motion)
- Send to multiple displays at once
This project is a great way to explore ESP-NOW, sensor data collection, and LED display output — all without relying on internet access. Whether for labs, classrooms, or fun DIY experiments, this setup makes wireless monitoring simple and eye-catching.


Comments