

Hardware components | ||||||
_ztBMuBhMHo.jpg?auto=compress%2Cformat&w=48&h=48&fit=fill&bg=ffffff) |
| × | 1 | |||
| × | 1 | ||||
 |
| × | 3 | |||
 |
| × | 1 | |||
| × | 1 | ||||
Software apps and online services | ||||||
 |
| |||||
Credits go to Lucky Larryon
http://luckylarry.co.uk/arduino-projects/arduino-using-a-sharp-ir-sensor-for-distance-calculation/
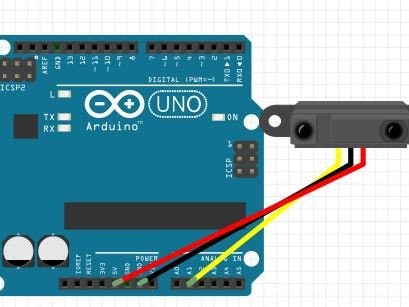
This project's hardware and software side is by sure, the most simplest and straight-forward. There are only three connection wires to the Arduino and 13 lines of code. The Sharp Infrared Range Sensor (2Y0A21) works for long distances, up to 80cm and the sensor has a minimum measurement of 10cm as the sensor won't be accurate because of its suited environment conditions its made for. Applications for this project would be for: reverse sensors, robots, touch-less switches, etc.. Four components will be needed including:
- 1 Arduino (the Keyestudio Uno is used in this example)
- 1 Sharp IR Range Sensor (2Y0A21)
- 3 Jumper Wires (Male to Male)
- 1 USB Data Cable (depends on the Arduino)
Please visit this link here for NextPCB's special offers.
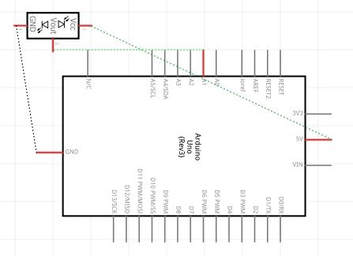
This circuit consists of three connections. Before starting, turn of all power from your Arduino board to prevent any electrical hazards. Now let's get onto the wiring of this proximity sensor. First, connect the positive pin (red wire) of the sensor to 5v (+5 volts) on the Arduino. Second, connect the ground pin (black wire) of your sensor toGND (-) on your Arduino. Lastly, connect the data pin of your sensor to digital pin 1 on your Arduino. The hardware is now complete.
About the codeThis code may seem short to write, but has a complicated explanation. It starts with defining the pin number (digital pin 1) of the variable; IRpin. After that, the next line immediately is the void setup of the code where we begin serial communication in the baud rate of 9600. After we end the void setup, we move onto the starting of the void loop. Then, in the loop section, we use a data type (float) in the first and second line to calculate measurements we need. First, we calculate the volts, which is a variable under float, where we read the data from the IRpin (which we declared) and multiply the readings given from the sensor by 0.0048828125 to produce the volts. The second line declares another float variable named distance which combined the volts with some mathematical terms. It also uses the pow function which calculates the value of a number raised to a power. The pow function uses the rule of pow(base, exponent) where the variable volts is the base and -1.10 is the exponent. On top of that we multiply the result with 65 to create the float variable, distance. Next, we print the distance we calculated to the serial monitor and add "cm" to the end to identify the unit of measurement. Lastly, we wait 100 milliseconds and start again giving us data every 100 milliseconds.
Amazing opportunitiesUTSource.net Reviews
It is a trustworthy website for ordering electronic components with cheap price and excellent quality.
Also, be sure to check out PCBWay, a leading manufacturer and distributor in PCB design and manufacturing. They have amazing prices and excellent quality in their services, so don't miss out on them! Plus, PCBWay has an amazing website, online Gerber viewer function and a gift shop so make sure to check out their links below:
PCBWay Free Online Gerber Viewer Function: https://www.pcbway.com/project/OnlineGerberViewer.html
PCBWay Gift Shop: https://www.pcbway.com/project/gifts.html
Make sure you check out the review for this meter by clicking here.
Enjoy! Contact us for any inquiries!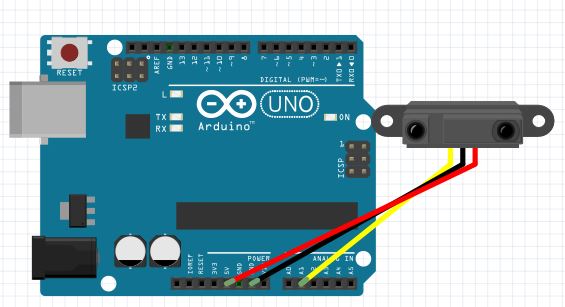


_3u05Tpwasz.png?auto=compress%2Cformat&w=40&h=40&fit=fillmax&bg=fff&dpr=2)
Comments