


Hardware components | ||||||
| × | 1 | ||||
 |
| × | 1 | |||
| × | 1 | ||||
| × | 1 | ||||
| × | 1 | ||||
Software apps and online services | ||||||
 |
| |||||
https://www.donluc.com/?p=4504
Facebookhttps://www.facebook.com/share/v/16rgj5NAbb/
YouTubeFacebookhttps://www.facebook.com/share/p/1FPktYA2bF/
DFRobothttps://learn.dfrobot.com/makelog-314999.html
#DonLucElectronics #DonLuc #MagneticSensor #UNIHIKER #Display #IoT #Project #DFRobot #Fritzing #Programming #Electronics #Microcontrollers #Consultant
Detect nearby magnetic objects with this digital magnetic sensor, offering a 3.3 Volt-5 Volt range, easy interfaces, high quality connector, and compact size.
DL2507Mk011 x UNIHIKER K10
1 x Gravity: Digital Magnetic Sensor
1 x Lithium Ion Battery - 1000mAh
1 x Switch
1 x USB 3.1 Cable A to C
DL2507Mk01pDL2507Mk01p.mp
People can contact us:http://www.donluc.com/?page_id=1927
Electronics, IoT, Teacher, Instructor, R&D and Consulting- Programming Language
- Microcontrollers (PIC, Arduino, Raspberry Pi, Arm, Silicon Labs, Espressif, Etc...)
- IoT
- Wireless (Radio Frequency, Bluetooth, WiFi, Etc...)
- Robotics
- Automation
- Camera and Video Capture Receiver Stationary, Wheel/Tank and Underwater Vehicle
- Unmanned Vehicles Terrestrial and Marine
- Machine Learning
- Artificial Intelligence (AI)
- RTOS
- Sensors, eHealth Sensors, Biosensor, and Biometric
- Research & Development (R & D)
- Consulting
- Etc...
Facebook: https://www.facebook.com/neosteam.labs.9/
YouTube:https://www.youtube.com/@thesass2063
Twitter:https://twitter.com/labs_steam
Pinterest:https://www.pinterest.com/NeoSteamLabs/
Instagram: https://www.instagram.com/neosteamlabs/
Patreon:https://patreon.com/DonLucElectronics59
DFRobot:https://learn.dfrobot.com/user-10186.html
Elecrow:https://www.elecrow.com/share/sharepj/center/no/760816d385ebb1edc0732fd873bfbf13
TikTok:https://www.tiktok.com/@luc.paquin8
Twitch: https://www.twitch.tv/lucpaquin
Hackster:https://www.hackster.io/luc-paquin
LinkedIn:https://www.linkedin.com/in/jlucpaquin/
Don Luc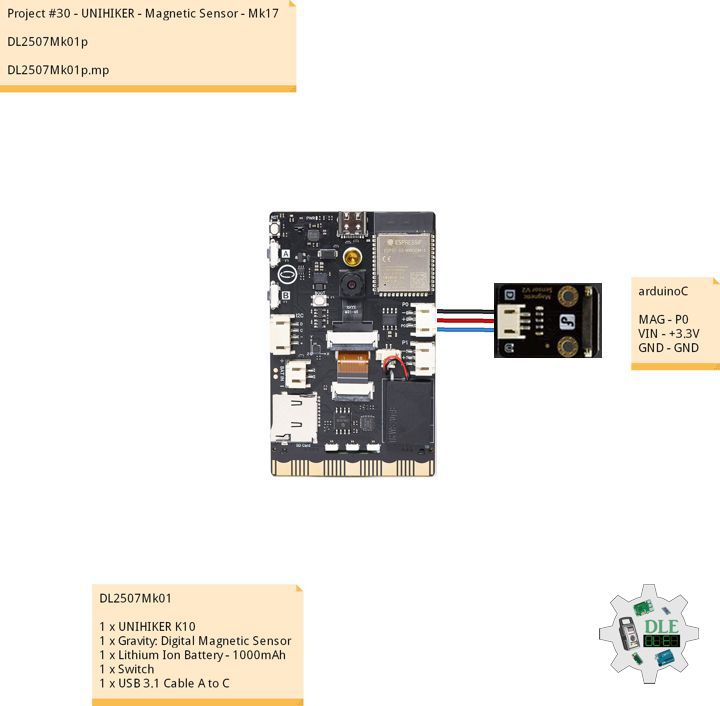


_3u05Tpwasz.png?auto=compress%2Cformat&w=40&h=40&fit=fillmax&bg=fff&dpr=2)
Comments