This microcontroller focuses on providing a quick review of basic electronic components using electronics wiring.
Demonstration of our project
Why?
We created this as our project because we wanted to review electronics components for our quizzes and unit while also using components to power the project itself. It was a review and learning experience all in one, and it broadened our understanding a lot more than what we had initially grasped.
Examples of the electronics components used, from left to right: transistor, resistor, capacitor
How it Works
Our Electronics Component mini-dictionary is designed to first show the title “electronics components” when the program is started. Buttons are placed in front of electronic components to indicate what each component is and what they are used for. When someone presses the button, the screen will show the name of the component and how it is used in a circuit.
Benefits
Some benefits of this type of dictionary is the visibility of components that correctly fit in the breadboard and the ease in which the person would be able to relate the component to the definition or name shown by the LCD. They can also use those definitions to help them understand the role of those components in making the microcontroller actually work, so they can see those parts in action and correctly relate definition to function.
Constructing the Project
Step 1: While constructing the project, we referenced other starter lessons and starter projects that helped us figure out the code. One particularly helpful project was the “ask the crystal ball” lesson (in the Arduino Starter Kit guidebook) that used the LCD to show the responses of the “crystal ball."
Wiring and schematics of the "Crystal Ball" Project in the Arduino Starter Kit guidebook
Step 2: After copying the wiring and the coding of that project, we adapted parts of it to fit our expectations for our own project; such as replacing the tilt sensor, which guided the random commands of the crystal ball, with a button, which had a specific command attached to it which was shown on the LCD when it was pressed.
An example of our button that spells out the name and function of the transistor
Step 3: After wiring and coding one button to read out a component and definition, we expanded to three more buttons, refining our setup as we went.
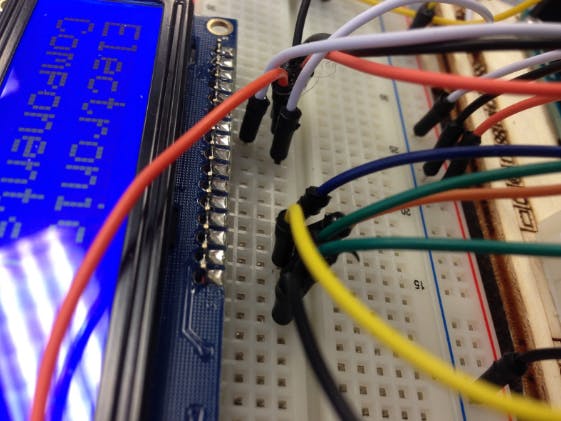
Our final microcontroller
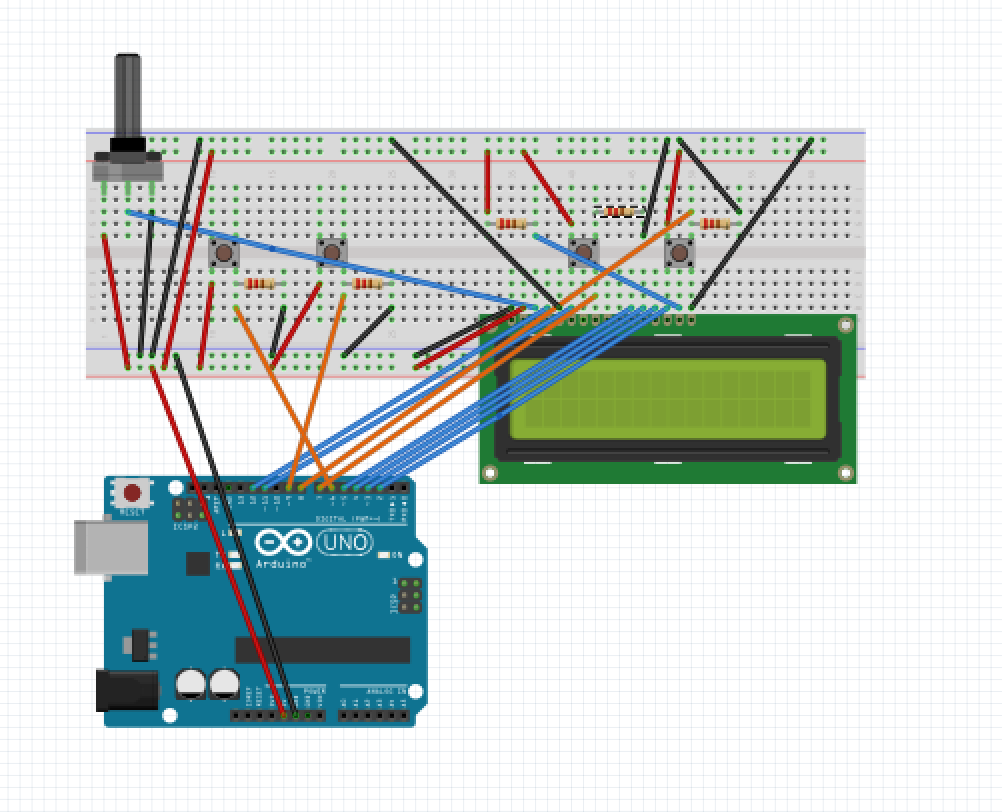
Step 4: Eventually, we ended up with four functioning buttons and corresponding commands on the LCD. Simplified diagrams of the wiring and code are shown below, respectively.
The wires on the breadboard are color-coded to match the connections made. Red wires represent the positive current going through the circuit and black shows the negative current. The blue wires show connections from different areas on the breadboard that connect with the Liquid Crystal Display. Orange wires demonstrate how the Arduino board is connected to different buttons.
//download the LCD library in your code
#include <LiquidCrystal.h> LiquidCrystal lcd(12, 11, 5, 4, 3, 2);// name your variables
const int button1=6;const int button2=7;const int button3=8;const int button4=9;int switchState=0;int prevSwitchState=0;int reply; void setup(){ // put your setup code here, to run once:
lcd.begin(16, 2); // identify your buttons
pinMode(button1, INPUT); pinMode(button2, INPUT); pinMode(button3, INPUT); pinMode(button4, INPUT); // determine what you want the start screen to say
lcd.print ("Electronic"); lcd.setCursor(0,1); lcd.print("Components!");}void loop(){ // put your main code here, to run repeatedly:
switchState= digitalRead(button1); // this is the button placed at 19e on the small breadboard
if(switchState != prevSwitchState){ // if button1 is pressed...
if(switchState== LOW){ lcd.clear(); // get rid of the start screen
lcd.setCursor(0,0);{ // set your cursor at the first space on the first line
lcd.print("Resistor"); // the display will write "Resistor" lcd.setCursor(0,1); // reset your cursor position to the first space on the second line
lcd.print("Control current"); // the display will write "Control current"}}prevSwitchState= switchState; // assign switchState's value to the variable prevSwitchState. // This enables you to track changes in the switch the next time the loop runs } switchState = digitalRead(button2); // this is the button placed at 10e on the small breadboard if (switchState != prevSwitchState) { // if button2 is pressed... if (switchState == LOW) { lcd.clear(); // get rid of the start screen lcd.setCursor(0,0);{ // set your cursor at the first space on the first line lcd.print("Transistor"); // the display will write "Transistor" lcd.setCursor(0,1); // reset your cursor position to the first space on the second line lcd.print("Switch signal"); // the display will write "Switch signal" } } prevSwitchState = switchState; // assign switchState's value to the variable prevSwitchState.
// This enables you to track changes in the switch the next time the loop runs
}switchState= digitalRead(button3); // this is the button placed at 40E on the big breadboard
if(switchState != prevSwitchState){ // if button3 is pressed...
if(switchState== LOW){ lcd.clear(); // get rid of the start screen
lcd.setCursor(0,0);{ // set your cursor at the first space on the first line
lcd.print("Capacitor"); // the display will write "Capacitor" lcd.setCursor(0,1); // reset your cursor position to the first space on the second line
lcd.print("Stores current"); // the display will write "Stores current"}}prevSwitchState= switchState; // assign switchState's value to the variable prevSwitchState. // This enables you to track changes in the switch the next time the loop runs } switchState = digitalRead(button4); // this is the button placed at 49E on the big breadboard if (switchState != prevSwitchState) { // if button4 is pressed... if (switchState == LOW) { lcd.clear(); // get rid of the start screen lcd.setCursor(0,0);{ // set your cursor at the first space on the first line lcd.print("Battery"); // the display will write "Battery" lcd.setCursor(0,1); // reset your cursor position to the first space on the second line lcd.print("Provides current"); // the display will write "Provides current" } } prevSwitchState = switchState; // assign switchState's value to the variable prevSwitchState.
// This enables you to track changes in the switch the next time the loop runs
}}


_ztBMuBhMHo.jpg?auto=compress%2Cformat&w=48&h=48&fit=fill&bg=ffffff)


_3u05Tpwasz.png?auto=compress%2Cformat&w=40&h=40&fit=fillmax&bg=fff&dpr=2)
Comments