

Hardware components | ||||||
_wzec989qrF.jpg?auto=compress%2Cformat&w=48&h=48&fit=fill&bg=ffffff) |
| × | 1 | |||
Warning: be extremely careful when working with high voltage devices (up to 60 volts in this case). The risks of sparks, damage, fire and death are present.
Work-in-progress: this project is in development. I will be sharing updates after each hardware, software or data progress. This is my first Arduino project, and numbers are approximations (uncalibrated). Thanks for reading!
BackgroundWe installed about 12 solar street-lamps inside our farm as a first step to improve security, where only the main house in connected to the electric-grid.
Recently, security became a priority and we are aiming to install cameras and sensors on key points in the land; all solar powered.
We realized that we have many of these street-lamps available (installed and still-boxed), and we wonder if we could use them as solar-storage systems, in-addition-to or instead-of the lamp functionality.
About usI'm a professional software/app developer with a lot of C background. I have been learning Arduino and microcontrollers for about three weeks before this project, and I'm finding this world very exciting to keep me busy at home between professional projects.
The owner of the property is the investor in this project. I'm using "we" and "us" to refer to him and me.
We are located in Central America; where the sun says "hello" from 6am to 6pm all year.
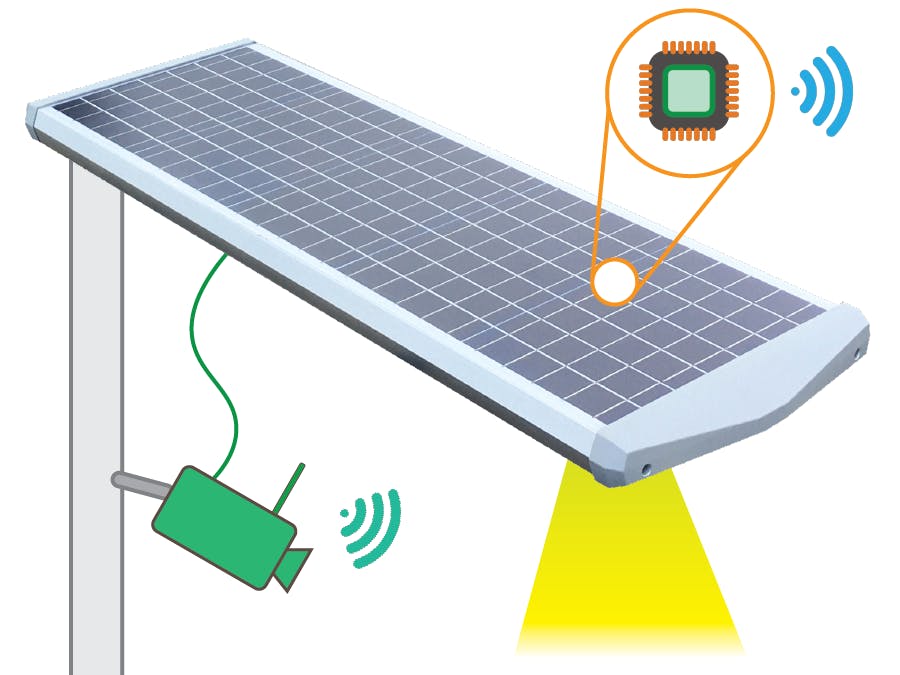
Our final goalWe want to insert into the lamps small, waterproof and removable Arduino devices for monitoring and data-transmission from Arduino, to Arduino, to server; in short, monitor and use the lamps as a transmission network.
We want to stream security footage to be stored in a local server and in the cloud; by attaching IP-cameras and wired/wireless network devices using the lamp's panel or battery as power source.
We hope the data collected by the Arduino network help us to understand if we are compromising too much the autonomy of the solar street-lamps; and how much solar power is not getting collected due to abundant sun-hours in our location.
First stepThe first step is to collect data, so we need to build an Arduino module to monitor the voltage and current of a lamp; in other words, the charge and discharge behaviors of the battery and the panel.
The next step will be to add RF communication to pass the data to a central server for storage and remote monitoring.
The lamps and their internalsThe lamps were imported from China by us. Luckily (or unluckily) the provider billed and sent the double amount of lamps, but we were ok with it since we find them very useful.
Their price is around U$250 each; and the manual states they can run up to 3 days without sun; IP66 waterproof; 5W of average consumption; 2 illumination levels, up to 100W when motion detected; solar panel should live 25 years; recommends the cleaning of the LEDs every 2-3 years; and mentions battery failure is possible after 2 years of usage.
The aluminum body is heavy and strong. The internals of the lamps can be easily accessed after removing two screws in the sensor plate. Luckily for us, the design is simple and modular, and the controller can be detached from the system with enough cable length to work with.
These were the first numbers with a multimeter:
- Battery: 13-15V
- Array of LEDs: 60V (high illumination mode)
- Panel: 20V x2A when not charging; 15V x2.2A when charging; this means ~30W panel.
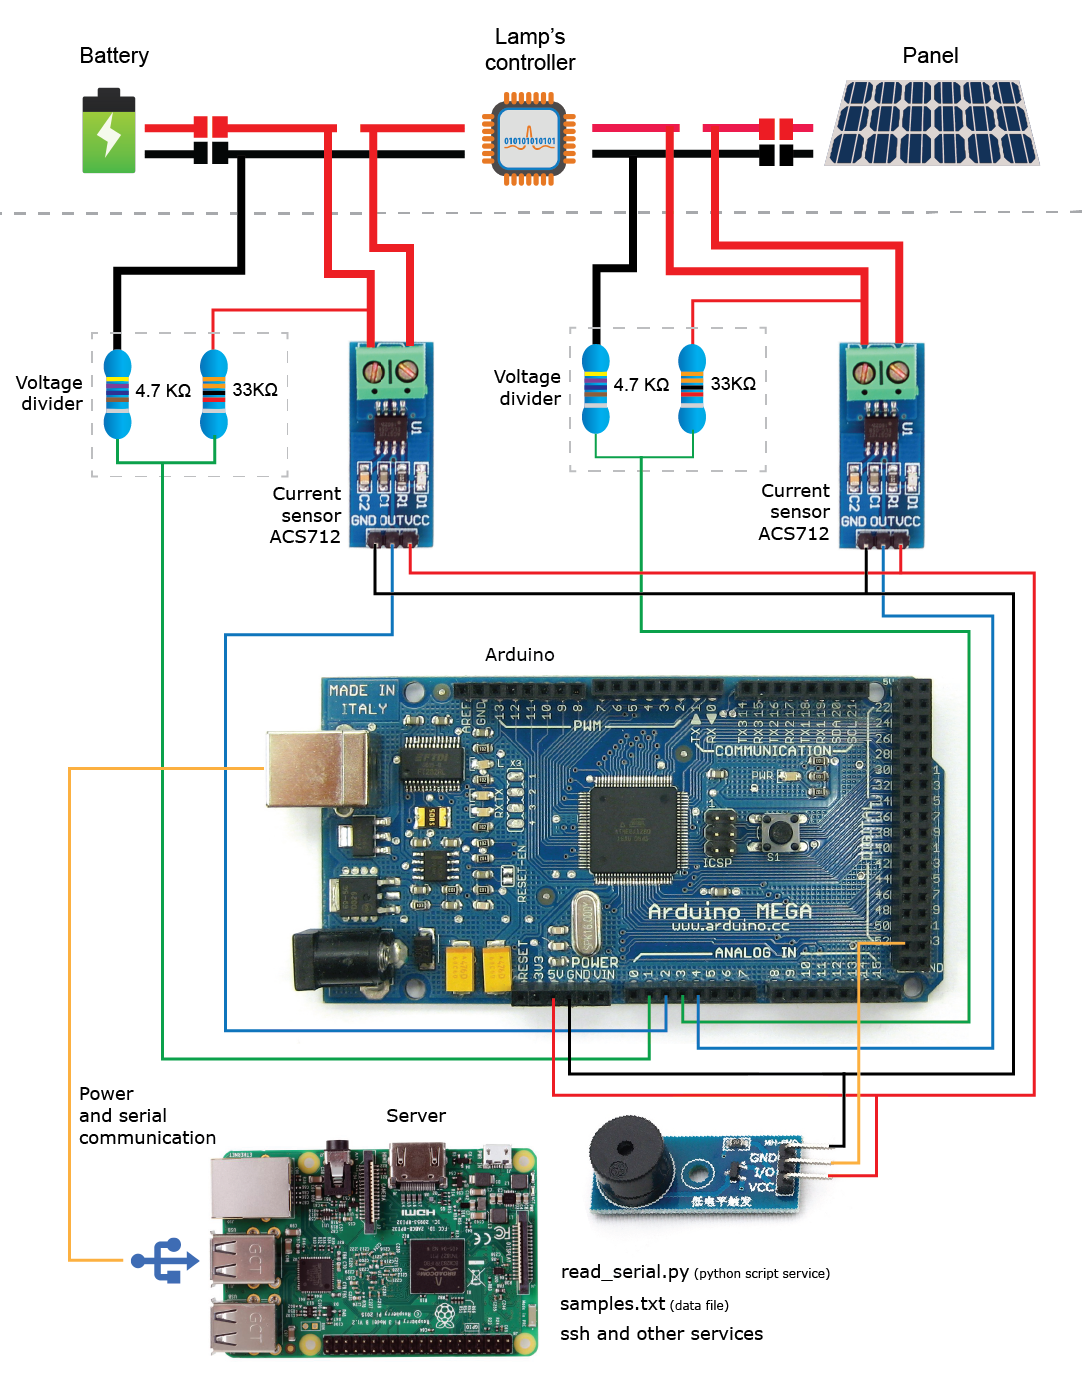
After setting up a controlled environment; cutting, peeling, joining and protecting the cables the best I could, this was the first monitoring prototype:
The Arduino output is send each second via serial communications to the server device, in my case, my Mac or my Raspberry Pi, but you could use other.
I added a buzzer to the prototype, just to make sure the system is running, since from time to time the power device was turning off due to a bad USB cable, and due to my initial fear of possibly burning the house. Every 3 seconds I hear a small "beep" or get worried about its absence.
The server device is running a python script to capture the serial input and append the lines to an output text-file, including the current date and time on each line. Each line has the values separated by a tabulation and can be copy-pasted or opened in any spreadsheet program for post-processing, like Excel or Open/LibreOffice.
The Arduino code is below, in the Software section of this project.
For the local server this python program "read_serial.py" was added to the home folder of our RaspberryPi:
#!/usr/bin/env python3
import datetime
import serial
import sys
if __name__ == '__main__':
   ser = serial.Serial('/dev/ttyACM0', 9600, timeout=1)
   ser.flush()
   while True:
       if ser.in_waiting > 0:
           line = ser.readline().decode('utf-8').rstrip()
           now = datetime.datetime.now()
           file_object = open('/home/pi/samples.txt', 'a')
           file_object.write(now.strftime("%Y-%m-%d %H:%M:%S"))
           file_object.write("\t")
           file_object.write(line)
           file_object.write("\n")
           file_object.close()
This script can be executed from terminal for testing, like this:
./read_serial.py >> samples.txt
The output will be appended to the file "samples.txt", and the program can be interrupted by pressing Ctrl+C. You can monitor the growth of the "samples.txt" file with this command from other terminal:
tail -f samples.txt
Also can be interrupted by pressing Ctrl+C.
For a more long-term run, is better to create a system service that will start automatically with the server and will stop before the server is turned off:
cd /lib/systemd/system/
sudo nano read_serial.service
The "read_serial.service" file will have this body:
[Unit]
Description=Read Serial Arduino
After=multi-user.target
[Service]
Type=simple
ExecStart=/usr/bin/python /home/pi/read_serial.py
Restart=on-abort
[Install]
WantedBy=multi-user.target
Now lets set permissions, enable and start the service:
sudo chmod 644 /lib/systemd/system/read_serial.service
chmod +x /home/pi/read_serial.py
sudo systemctl daemon-reload
sudo systemctl enable read_serial.service
sudo systemctl start read_serial.service
Here a couple of useful commands:
sudo systemctl status read_serial.service
sudo systemctl stop read_serial.service
After setting up the local server and confirming the software is running as intended, was time to set up the panel on the roof, connect it to our monitoring prototype with long cables and wait for the first batch of data.
This is the representation of the first batch of data collected with the Arduino:
- Normal operation data: collect data of another couple of days.
- Full discharge data: cover the solar panel and collect data until the battery is discharged.
- Full charge data: turn off the lamp during the night and collect data until the battery is fully charged.
- External/parasitic load data: attach my router (12V 2A) and modem (9V 1A) to the lamp's battery and collect data for 3 or more days.
- RF communication: implement grid communication between Arduinos; I'm interested into implementing something from scratch; with focus on reduce collision and energy consumption.
- Final modules: build miniature, waterproof and removable modules; and install them into the lamps.
- App: build the app and services for remote monitoring, including alerts via push notifications.
Thanks for reading, I expect to update this project after completing each step.


Comments