


Hardware components | ||||||
_MsQPLY30wm.png?auto=compress%2Cformat&w=48&h=48&fit=fill&bg=ffffff) |
| × | 1 | |||
| × | 1 | ||||
Have you ever missed a bus by just a few minutes? Or got to the bus stop way too early?
My bus stop is 5 minutes away from my apartment. It is super convenient however, because it is that close, I often think that I have more time than I really do.
I would check on Google maps, see that I have 20 spare minutes before the next bus, and then check back way too late leading to me running downstairs or in the worst case, missing it by a few minutes.
This is the principal motivation of creating a Bus o'clock project, which is a bus tracker pulling data from the CTA Chicago API and showing the time remaining in a gauge format for a visual person like me. That and wanting to experiment with the really cool round display from Waveshare :).
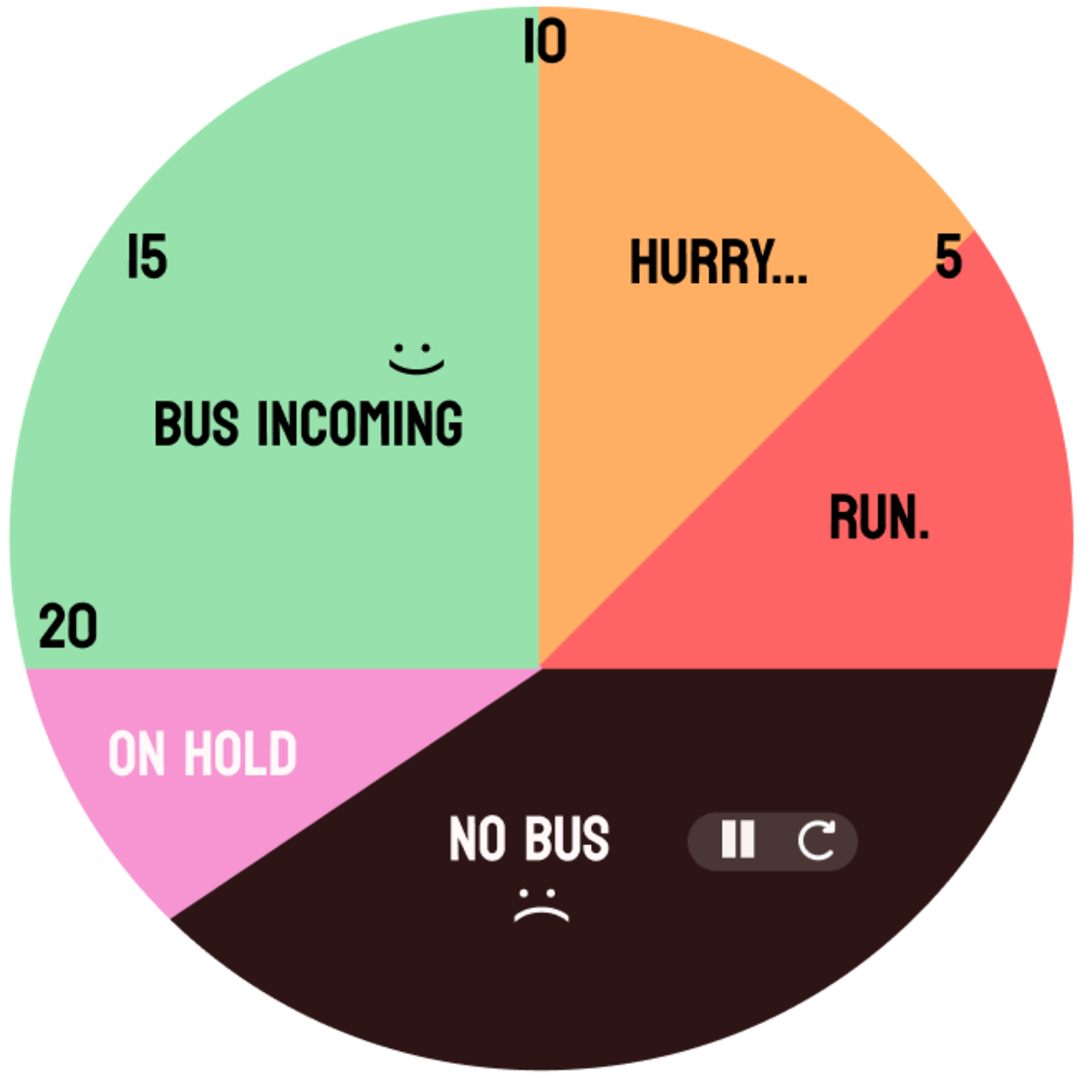
Demo / How it works?When the reset button is pressed, the time remaining before the next bus arrival at my bus stop is pulled from the CTA server. The needle position is updated accordingly to point to the minutes remaining. The time remaining will be pulled once every minute. This allows me to have a visual indication on how fast the bus is approaching, and thus how soon should I go.
The green zone means that I have more than 10 minutes to get ready. The orange zone means that I am not late, but I probably should grab my bag and go. The red zone means that the bus is in less than 5 minutes. If the needle is close to 5, I might catch the bus by running, if it is closer to 0, I will probably miss it even if I run.
The pause button stops the bus requests, and the position of the needle is updated to point to the on-hold region.
In the demo below, I am pressing the reset button: it shows the next bus is in around 12 minutes. If I let it run the gauge will update every minute until it reaches 0. In the video, I am then pressing the pause button which stop the requests. The quality of the image is downgraded due to its format, but the image and colors are crisp.
The CTA (Chicago Transportation Authority) provides an API to access bus tracking information such as routes, positions and estimated arrival times. Information is pretty accurate when using the API as it relies on the GPS inside buses directly to estimate the bus arrivals which decreases the risk of a "ghost bus". A ghost bus is when a scheduled bus is shown on Google maps but doesn't really exist or match any of the actual buses coming that day.
The first step for using this API is requesting an API key. There is a transaction limit of 100, 000 transactions/day. The requests to the bus tracker server are HTTPS requests.
In python the requests library can be used.
To get the estimated arrival time of the next bus, first you need the present time:
params = {'format' : 'json', 'key' : key}
time = requests.get('http://www.ctabustracker.com/bustime/api/v3/gettime',params)
Then you need 2 information:- The route number- The ID number of the stop
params = {'format' : 'json', 'key' : key, 'stpid': stpid, 'rt': rt}
x = requests.get('http://www.ctabustracker.com/bustime/api/v3/getpredictions', params)
To find the ID number of your stop, you can use the getstops() command with your route and direction as parameters.
To get the minutes remaining, the estimated arrival time is subtracted from the present time in the CTA server.
All the commands available are documented in the API below:CTA Developer Center: Bus Tracker API - CTA
User interface designThe goal of the gauge is to catch my eyes and indicate if I should be hurrying or not to catch the bus. Minutes ranges are classified in green/orange/red zones. In addition, a no-bus and on-hold zones are delimited.
I added 2 buttons because I don't want to monitor the buses incoming constantly, just when I want to catch the next bus. The reset button starts the requests, data will be updated every minute. Then, I can simply touch the pause button to stop the requests as shown in the demo. If I don't press the pause button and the needle reaches 0, the program will catch the next upcoming bus.
The design is simple but effective. I used the Tkinter library. The frame contains a background image, a needle image that is rotated and 2 buttons.
For this project, I am using a Raspberry Pi Zero 2W. This project doesn't require a lot of resources in terms of processor and memory size. Also, the small size is more convenient to blend or hide for home applications. And, it is budget-friendly (15$), the project constraints don't justify using a more expensive board such as the Raspberry Pi 5. However, if you have a more powerful board, it will also work.
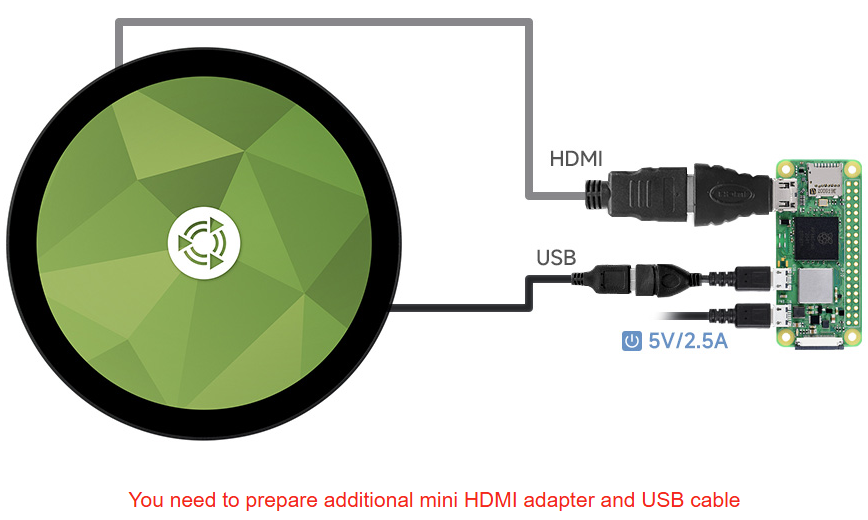
Now, what is really cool is the round 5" display. It has a resolution of 1080 pixels which allows a sharp image. The colors are nice and the 5 inches size makes it perfect for viewing at a certain distance. The driver is pre-installed and you just need an HDMI to micro-HDMI connector to plug into the RPI Zero 2W. To enable the touch feature a few additional lines are required in the config.txt file of the root folder of the SD card. Instructions are available in the display wiki.
hdmi_group=2
hdmi_mode=87
hdmi_pixel_freq_limit=356000000
hdmi_timings=1080 0 68 32 100 1080 0 12 4 16 0 0 0 60 0 85500000 0
Thanks for checking out this project!


Comments