


Hardware components | ||||||
 |
| × | 1 | |||
 |
| × | 1 | |||
 |
| × | 1 | |||
Software apps and online services | ||||||
 |
| |||||
 |
| |||||
Go-On Pico (五音ピコ) is an original chiptune sound module I created specifically for the M5Stack Core2! My goal was to make it easy for anyone to produce retro game-like sounds and, ultimately, to experiment with vocal synthesis using formant techniques. While MIDI synthesizers and external sound modules exist, there wasn’t a module designed for the M5Stack Core that could generate chiptune sounds or mimic vocal synthesis in a fun, accessible way—so I decided to build one!
- 8bit style Piko Piko sounds (2CH Square wave, 1CH Triangle wave, 1CH Noise, 1CH Wave memory) *Note1
- Easy control via serial port
- Module for M5Stack core2
Note1: Wave memory will be available soon.
How it works?Here’s how you can use Go-On Pico to create chiptune sounds!
Chiptune Sounds from Go-On PicoControlling Go-On Pico from the M5Stack Core2 is super simple!
Open pins 13 and 14 with Serial.begin on the M5Stack Core2. Then, send commands by writing to the serial interface.
Control CommandsThe command format is:
command,ch,note,velocity- Play a sound: 1,0,60,127
Plays a note on the specified channel with MIDI note 60 and velocity 127. - Stop a sound: 0,0,60,127
Stops the note on the specified channel
- CH0: Square wave
- CH1: Square wave
- CH2: Triangle wave
- CH3: Noise
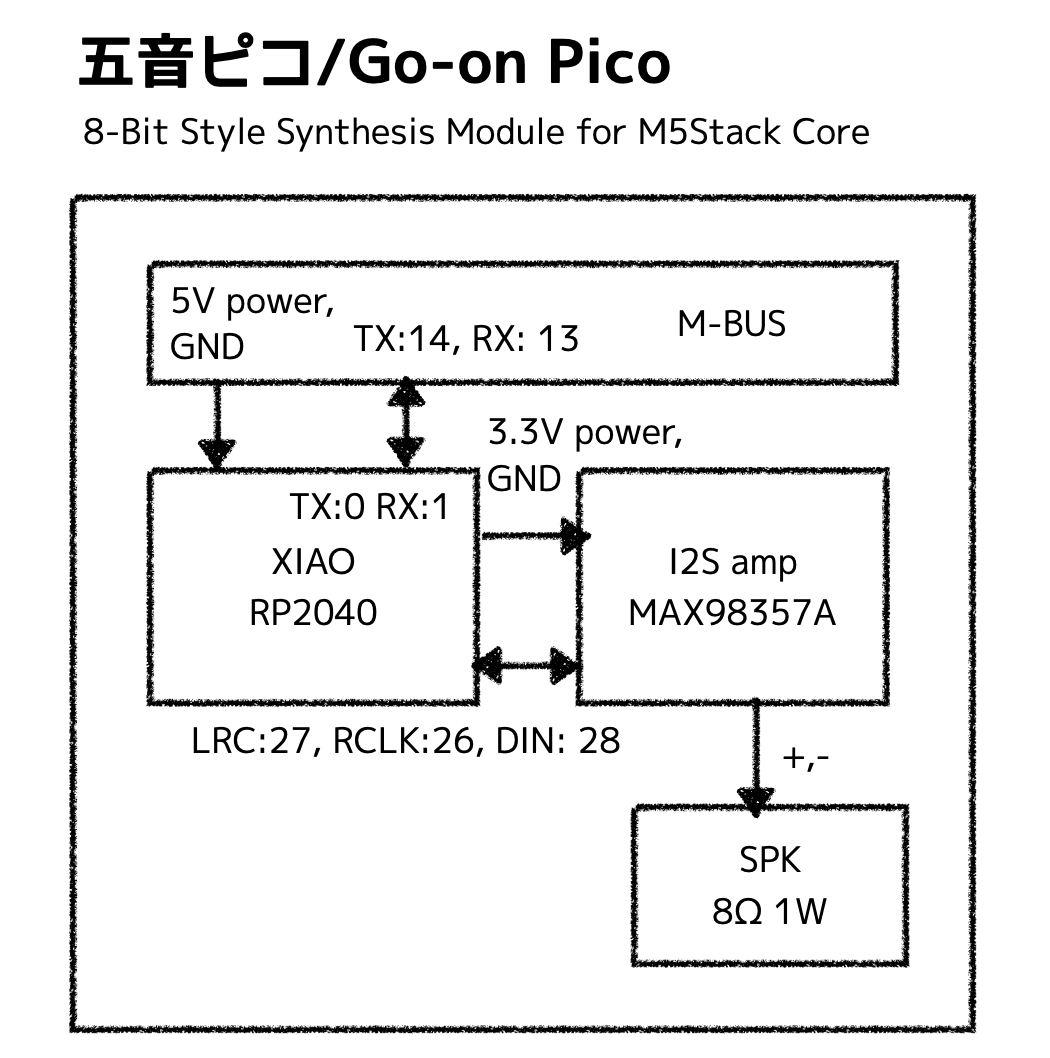
Microcontroller: Seeed Studio XIAO RP2040 (based on Raspberry Pi RP2040 chip, compact form factor for easy integration)
Audio Amplifier: MAX98357A I2S Amp (handles generated digital audio input from XIAO RP2040).
Speaker: 8Ω 1W speaker (small, low-power unit; sourced from an M5Stack Synth Unit in the prototype).
M5Stack BUS moudle: Mount XIAO RP2040, MAX98357A and the speaker.
Host Device: M5Stack Core2 (provides UART communication, power supply, and touch interface for control).
Additional Components:
Wires/jumpers for connections (UART, power).
Optional: Volume control potentiometer (connected via ADC for analog volume adjustment).
Key LibrariesMozzi: An Arduino library for waveform synthesis. In Go-On Pico, it’s used on the XIAO RP2040 to generate sound.
Build InstructionsThe prototype is built by assembling the necessary components onto an M5Stack BUS module.
Refer to the circuit diagram for component connections.
1. Attach pin headers to the XIAO RP2040 and mount it onto the BUS module.
2. Attach pin headers to the I2S amplifier (MAX98357A) and mount it onto the BUS module.
3. Connect the XIAO RP2040’s GPIO, 3.3V, and GND pins to the I2S amplifier.
4. Connect the speaker to the I2S amplifier.
5. Connect MBUS pins 13 and 14 to the XIAO RP2040 for UART communication.
6. Connect MBUS 5V and GND to the XIAO RP2040 for power.
7. Verify all wiring for accuracy.
8. Connect the XIAO RP2040 to a PC via USB cable.
9. Clone Go-On Pico core from Github and put XIAO RP2040 into boot mode and flash the firmware.
Done!
Why I Made ThisWith high-performance microcontrollers and peripherals making voice synthesis easier than ever, something felt off to me. I believe microcontrollers are at their most exciting when they’re pushed to their limits with constrained resources. Perfection isn’t the goal—there’s beauty in creating something that feels "just right" despite those limitations! That’s what I love about this approach.
For Go-On Pico, I drew inspiration from projects like AquesTalk Pico, a voice synthesis chip/library that achieves impressive results on a humble ATMega328P (the same chip in an Arduino Uno). I was also inspired by YouTube videos showcasing people making Game Boy hardware "sing" by cleverly manipulating its sound chip. These examples fueled my desire to craft a retro-inspired audio module that captures the charm of chiptune sounds using minimal resources.
What’s Next?- Vocal Synthesis: Tune formant synthesis capabilities to mimic singing voices more effectively.
- Envelope: Add envelope control for dynamic sound shaping (e.g., attack, decay, sustain, release).
- Waveform Memory: Implement waveform memory channel for custom or sampled sounds.
The name "Go-On Pico" derives from "five sounds" (五音[go-on] in Japanese), referencing the M5Stack's "5" and the planned 5-channel audio setup (square wave x2, triangle wave x1, noise x1, waveform memory x1).


Comments