


Hardware components | ||||||
_ztBMuBhMHo.jpg?auto=compress%2Cformat&w=48&h=48&fit=fill&bg=ffffff) |
| × | 1 | |||
 |
| × | 1 | |||
 |
| × | 1 | |||
 |
| × | 1 | |||
 |
| × | 1 | |||
 |
| × | 2 | |||
Software apps and online services | ||||||
 |
| |||||
Hand tools and fabrication machines | ||||||
 |
| |||||
 |
| |||||
 |
| |||||
This project taught me the fundamentals of robotics: motor control, sensor integration, and decision-making algorithms. I'm excited to share this project so you can build your own obstacle avoiding robot and perhaps even expand on it with your unique ideas!
Step 1: Prepare the Chassis- Mount the DC Motors: Attach the two DC motors to the sides of your chassis using screws or adhesive.
- Attach the Wheels: Secure the wheels onto the motor shafts.
- Add Support: Attach a caster wheel or sliding support at the front or back for stability.
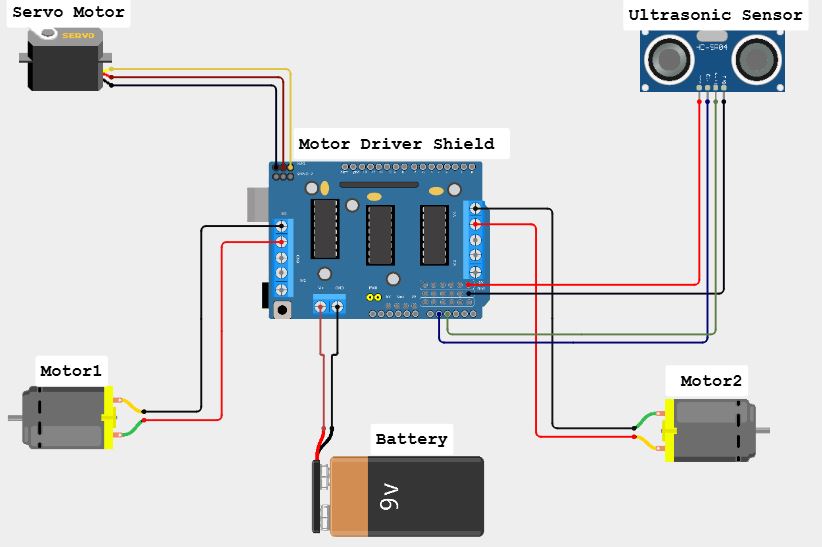
- Stack the Shield: Plug the L293D Motor Driver Shield onto the Arduino microcontroller.
- Position on Chassis: Place the Arduino and shield onto the chassis, ensuring easy access to the USB port for programming.
Connect Motors to Shield:
Motor 1 (Left Motor):
- Connect one wire to one of the M1 terminals.
- Connect the other wire to the other M1 terminal.
Motor 2 (Right Motor):
- Connect one wire to one of the M4 terminals.
- Connect the other wire to the other M4 terminal.
Attach Sensor to Servo:
- Use adhesive or a custom bracket to fix the ultrasonic sensor onto the mini servo motor's horn.
Mount Assembly on Chassis:
- Secure the servo motor at the front center of the chassis.
- Ensure the servo can rotate freely without obstruction.
Ultrasonic Sensor:
- VCC to 5V on Arduino.
- GND to GND on Arduino.
- Trig to digital pin A1.
- Echo to digital pin A2.
Servo Motor:
- Locate the Servo Pin: Find the servo motor pins ( SER1 or SER2) on the L293D motor shield.
- Attach the Servo Motor: Connect the control signal (yellow/orange) to the servo pin, power (red) to 5V, and ground (brown/black) to GND on the shield.
Power Supply:
- Connect the combined batteries (1.5V x 4 = 6V) to the motor power terminals on the shield.
- Plug the USB cable: Connect one end of the USB cable to the Arduino board on your car.
- Connect to PC or Laptop: Insert the other end of the USB cable into a USB port on your PC or laptop.
Upload the code: Open the Arduino IDE on your computer, select the correct COM port, and click the upload button to transfer your code to the Arduino.

13 projects • 4 followers
AI Convergence Engineering, Software Engineering, ML, deep learning, image processing, computer vision, circuit design, and Edge AI devices.


_3u05Tpwasz.png?auto=compress%2Cformat&w=40&h=40&fit=fillmax&bg=fff&dpr=2)

Comments