


Hardware components | ||||||
| × | 1 | ||||
Software apps and online services | ||||||
 |
| |||||
Most existing “smart bird feeders” rely on access to the internet to either perform the classification remotely, or to transmit the results of the classification to the end user. Flockr is a smart feeder project capable of identifying the species of a bird from a video feed without network access. The classification happens directly on the host Tachyon SBC. The application uses a TensorFlow Lite model fine tuned for bird species identification. The Tachyon then hosts a publicly accesible webpage over its 5G connection where users can view the live feed any classifications. Ideally, Flockr can be deployed remotely, running on the built in battery, while still sending information about what kind of birds are visiting the feeder over the cellular connection.
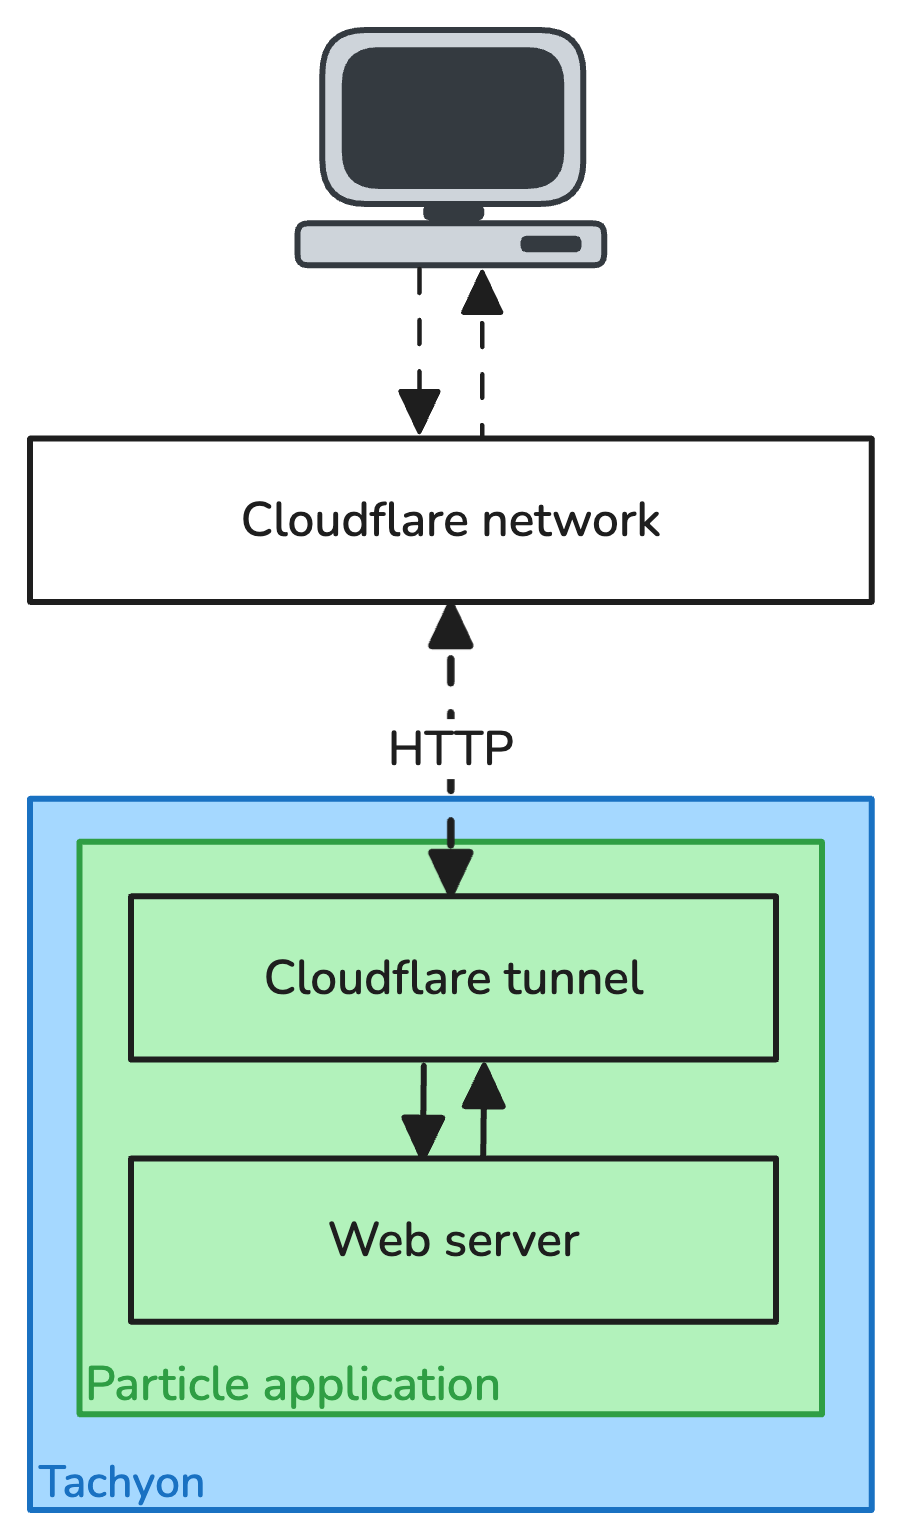
Cloudflare TunnelWe’ll first walk through how to set up a Cloudflare tunnel into your Flockr app. This will serve a webpage to anyone who visits the public facing URL.
We have a USB camera connected to the Tachyon that’s running a Flask server. A user can log in to the webpage served by Flask and monitor the live camera feed.
First you’ll need a base domain. In this example, we’ll be using Namecheap as the domain registrar. Purchase a domain that makes sense for your project — the example project uses flockr.xyz (because it was cheap).
Now, head over to Cloudflare and create an account if you haven’t already. From “Account Home, ” add your domain.
Luckily, this configuration will fall under Cloudflare’s free tier usage limits.
Next, on the “Review your DNS records” step, keep the defaults. Scroll to the bottom, and choose “Continue to activation, ” Choose “confirm” in the “Add records later” modal.
On the following page, scroll to step three: “Add Cloudflare’s nameservers” and make note of the two assigned Cloudflare nameservers.
Head back to Namecheap (or your chosen domain provider) to edit to your domain’s configuration. Update the domain’s nameservers with the values provided by Cloudflare in the previous step.
Once complete, go back to your Cloudflare console and choose “Continue, ” You’ll be notified that it may take up to 24 hours to process these changes. We’ve found that it typically takes much less time.
Once it completes, you’ll receive an email notifying you that the nameservers have been successfully updated.
Once the domain has been properly configured, we can move on to setting up the tunnel that will route traffic to the Particle application serving the webpage. In Cloudflare, navigate to Access > Launch Zero Trust.
If this is your first time in the Zero Trust portal, choose a team name for your account.
Navigate to Networks > Tunnels and choose “Add a tunnel.”
Choose “Cloudflared” for the tunnel type:
Give your tunnel a name and save it:
In “Choose your environment type, ” select the Docker option and copy the run command. We’ll use this to add another service to our Particle application running on the Tachyon.
The following steps will assume you’ve already got a Tachyon set up and running. Once your Tachyon is online, navigate to the Particle Console’s device details view and select the terminal tab. Open a new shell into your Tachyon.
Switch the active user to the profile you configured during set up and navigate to the home directory. In this case, we’re using the default particle user.
sudo su particle
cd ~
Clone the flockr-app-2.0 repository into a directory of your choice:
mkdir Documents/projects
git clone https://github.com/epietrowicz/flockr-app-2.0.git
Now, we’ll need to add the Cloudflare token from the previous step to our project’s docker-compose.yaml file.
To update your Cloudflare device token, run:
cd flockr-app-2.0
nano flockr/docker-compose.yml
Find the line under the cloudflared service that contains the command. Replace the text after --token with the token provided in the “Route tunnel” step back in the Cloudflare configuration.
To save your changes and exit nano type: ctrl + o and ctrl + x
The next steps will assume you have Particle for Linux version 0.20.2 or above and the Particle CLI version 3.42.1 or above.
From here, run particle container run to build and start the Cloudflared and app containers.
You should be greeted with output that indicates the Flask server is up and running. Look for the following lines and make note of the IP address that the server is running on. http://172.27.0.2:5001in this case.
flask-webcam   |  * Serving Flask app 'src/main.py'
flask-webcam   |  * Debug mode: off
cloudflared-1  | 2025-07-24T15:28:55Z INF Generated Connector ID: b1036e18-8f19-4173-b6ed-b4936e8b9164
flask-webcam   | WARNING: This is a development server. Do not use it in a production deployment. Use a production WSGI server instead.
flask-webcam   |  * Running on all addresses (0.0.0.0)
flask-webcam   |  * Running on <http://127.0.0.1:5001>
flask-webcam   |  * Running on <http://172.27.0.2:5001>
flask-webcam   | Press CTRL+C to quit
flask-webcam | * Restarting with statHead back to the Cloudflare console and navigate to the tunnel you configured before: Zero Trust > Networks > Tunnels > YourTunnelName. Select the tunnel and click “Edit.”
Navigate to the “Public hostnames” section of your tunnel’s configuration page. Choose “+ Add a public hostname.”
Fill in your hostname details. You can choose any subdomain, but make sure to select HTTP and provide the URL from the container’s output. This could easily be adapted to use HTTPS, however, you’ll need to modify the project to use a production grade Flask server such as guincorn.
And that’s it! In this case, navigating to http://bird.flockr.xyz should pull up your Flask webpage with a video feed from the webcam.


Comments