


Hardware components | ||||||
 |
| × | 1 | |||
 |
| × | 1 | |||
| × | 1 | ||||
| × | 1 | ||||
| × | 1 | ||||
 |
| × | 1 | |||
Software apps and online services | ||||||
| ||||||
Hand tools and fabrication machines | ||||||
 |
| |||||
Do you remember the magic of bedtime stories? Imagine building a device that creates unique, new stories for your children at the touch of a card. In this project, you'll learn how to create your very own AI-powered Storyteller using a Raspberry Pi, an RFID reader, and a NeoPixel LED Ring.
This device allows children to choose the heroes of their next adventure by placing RFID cards, each representing an animal, onto a reader. A locally-run AI then writes a unique, child-friendly story featuring the selected animals, which appears on a simple web interface. It's a wonderful blend of tangible interaction and creative technology.
How the Storyteller WorksThe concept is simple and intuitive, making it perfect for kids:
- Select an Animal: The child chooses one or more cards, each with an animal sticker on it.
- Tap the Reader: They place the cards on the RFID reader. The Storyteller recognizes the animals.
- Watch the Lights: A ring of LEDs begins to glow, indicating that the AI is "thinking" and crafting a new tale.
- Read the Story: A few seconds later, a brand-new story featuring the chosen animals appears on the screen of a tablet, phone, or computer for you to read aloud.
The AI-Storyteller is an interplay of several components:
- Raspberry Pi 5: The Heart of the ProjectThe Raspberry Pi 5 acts as the brain of the entire system. It processes inputs from the RFID reader, controls the LED ring, has the AI generate stories, and hosts the web server through which the stories are presented.
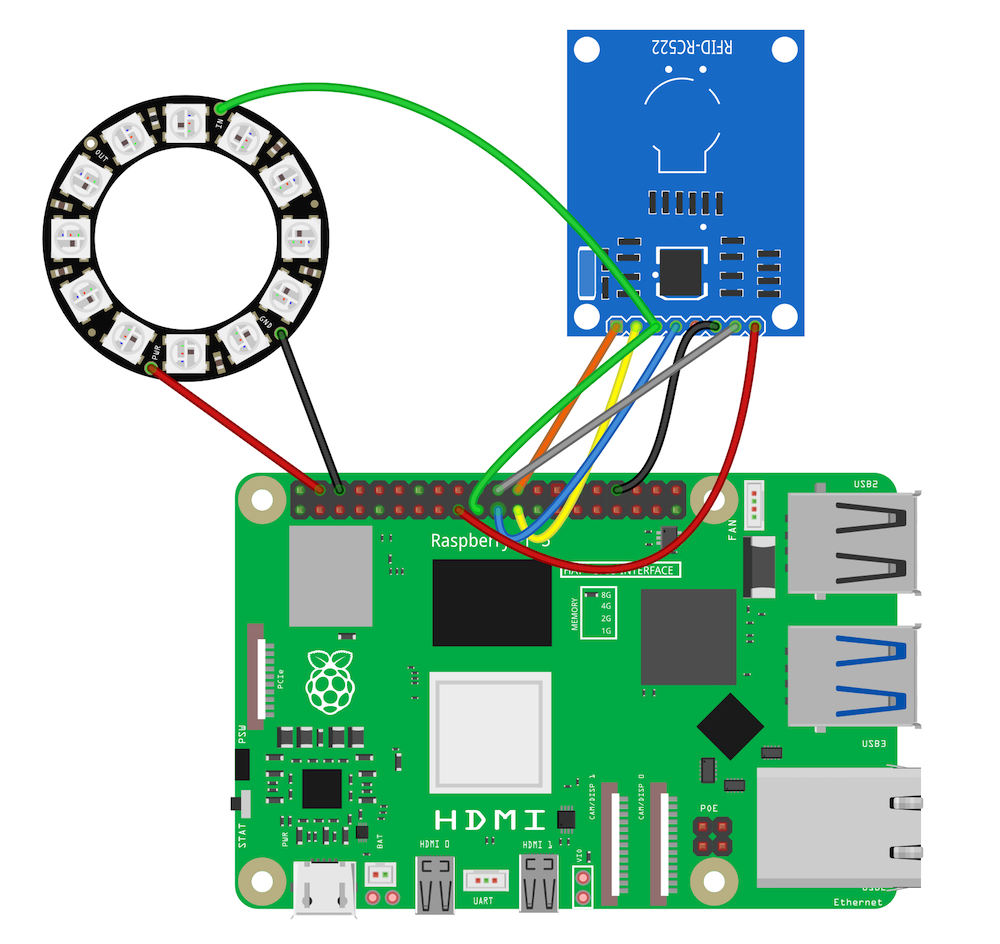
- RC522 RFID Reader: The Magical Animal CardsThe RFID reader is the interface between the physical animal card and the digital world of the Raspberry Pi. When an RFID card, adorned with an animal sticker, is held up to the reader, it reads a unique identifier (UID). Communication between the reader and the Raspberry Pi occurs via the SPI interface.
- Ollama and Gemma: The AI That Writes StoriesOnce one or more animal cards are recognized, the most exciting part begins: Artificial intelligence generates a story. We use Ollama, a platform that allows large language models to be run locally on the Raspberry Pi – yes, your Pi 5 can do this. The model used is gemma3:1b.
- LED Ring: Visual FeedbackAn LED ring provides visual feedback. When a card is detected, it briefly lights up. While the AI generates the story, a "thinking animation" indicates that something is in progress. Upon success, the ring lights up green; in case of an error, it turns red.
- Flask Webserver: The Interface for Reading and ManagingAll generated stories and card management are handled via a simple yet effective web interface built with Flask. index.html displays the current story, while manage.html allows new RFID cards to be linked with animal names or existing assignments to be deleted. The website automatically updates to show the selectedanimals and the generated story.
Take a look at the wiring diagram to learn how to connect the RFID reader and the LED ring to the Raspberry Pi. You can, of course, build everything on a breadboard first. If you want to use a permanent enclosure later, I recommend soldering everything together. Speaking of an enclosure: I used a children's night light that had stopped working. It offers enough space and is made of a semi-transparent material that shows off the LED ring well.
A library for the RC522 RFID ReaderTo enable the RC522 to communicate with the Raspberry Pi 5, you need a library. Unfortunately, the well-knownMFRC522 library does not work with the Pi 5 model, which is why you'll use a new one. You can find it for download, along with further information about the library, in this tutorial on Pollux Labs.
The Software SetupEnable the SPI interface on your Raspberry Pi:u can connect your Raspberry Pi to a monitor and execute the commands in a terminal. Or, you can connect to your Raspberry Pi via SSH and execute them remotely.
Enable SPI
If you haven't already, enable the SPI interface on your Raspberry Pi:
sudo raspi-configNavigate to 3 Interface Options -> I4 SPI and enable the interface.
Install Software Dependencies
Update System and Install Core Libraries:
sudo apt update
sudo apt upgrade -y
sudo apt install python3-spidev python3-libgpiod python3-venv -y
python3-spidev and python3-libgpiod are used for SPI communication and GPIO control on the Raspberry Pi 5. python3-venv is used for virtual environments.
Set up Ollama and Download Model:
The project uses Ollama to run the Gemma AI model.
Install Ollama: Use this single command to install Ollama on your Raspberry Pi:
curl -fsSL https://ollama.com/install.sh | shDownload the Gemma Model: After installing Ollama, download the gemma3:1b model that the storyteller script uses:
ollama pull gemma3:1bPlace Project Files & Set up Virtual Environment
Create a Project Directory, for example named like this:
mkdir raspi_storyteller
cd raspi_storyteller
mkdir templates
The you need to download the project files plus the RC522 library and put them into your directory. The.html files live in the templates folder.
Create and Activate a Python Virtual Environment: A virtual environment avoids conflicts with system-wide packages.
python3 -m venv venv
source venv/bin/activate
You'll see (venv) prepended to your terminal prompt, indicating the virtual environment is active.
Install Python Dependencies: With your virtual environment activated, install the required Python libraries:
pip install flask pi5neo ollama spidevThis will install flask, pi5neo, ollama, gpiod, and spidev into your virtual environment.
Run the Raspi Storyteller
Ensure your virtual environment is still active (you should see (venv) in your prompt). In your raspi_storyteller directory, run the main Python script:
python3 raspi-storyteller.pyThis will start the Flask web server on port 5000 and the RFID reading loop.
Find Your Raspberry Pi's IP Address : Before accessing the web interface, you'll need the IP address of your Raspberry Pi:
hostname -IThis command (executed in a new terminal window) will output your Pi's IP address.
Access the Web Interface: Open a web browser on a device connected to the same network as your Raspberry Pi.
To manage cards: Go to http://<YOUR_RASPI_IP_ADDRESS>:5000/manage
Hold an unknown RFID card to the reader. Its UID will appear in the "Card UID" field on the webpage.
Enter an animal name and click "Save Card" to link the UID to the animal.
To generate stories: Go to http://<YOUR_RASPI_IP_ADDRESS>:5000/
Hold one or more of your registered animal cards to the reader. A moment later, the complete story will appear on the webpage, ready to be read aloud!
Did you enjoy this project? Awesome!
If you want to dive deeper, visit this project on Pollux Labs. As a subscriber you will find more details as well as future developments for the project there.
Happy building and storytelling!


Comments