

Hardware components | ||||||
 |
| × | 1 | |||
| × | 1 | ||||
| × | 1 | ||||
| × | 1 | ||||
_ztBMuBhMHo.jpg?auto=compress%2Cformat&w=48&h=48&fit=fill&bg=ffffff) |
| × | 1 | |||
Software apps and online services | ||||||
 |
| |||||
| ||||||
In this tutorial we will use the RFIDuino Logger Program to log basic data from the RFIDuino/Geekduino. This sort of system is useful for Time Clocks and Access Doors. When an RFID tag is swiped, Record of the Tag ID, Date, and Time is taken. This can be exported as a .csv and opened with any spreadsheet program, such as Microsoft Excel or LibreOffice. Let's get started!
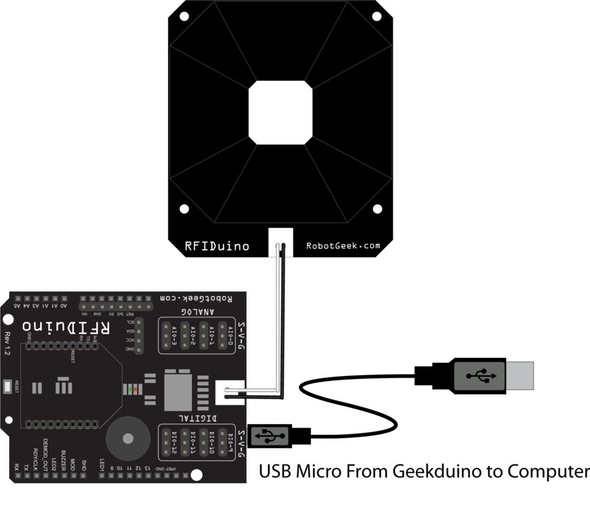
Step 1: Hardware Setup- If you don't already have the Chrome Browser installed on your computer, Go Here to install it
- In Chrome, go to this page on the Chrome Webstore.
- Click
+ Add To Chrometo install the RobotGeek RFIDuino Logger
- Allow Access for the Chrome App to your system
- You can always type
chrome://apps/in your browser to get to your Chrome App launcher page. From This page just Click theRobotGeekicon to launch the program
- From the Drop-Down menu, pick the serial port that you used to program your Geekduino.
- Click 'Connect' to open a connection
- Every time you swipe a tag, the computer will record the tag ID and append the current time
- Click
Clear Logto clear the records
- Click
Export to Diskto save the records as a .csv file. You can open this file in Excel / other spreadsheet programs.
This code is a modified version of the RFIDuino_helloworld
code. This time however, instead of displaying tag IDs as the 5-bytes that make up the tag ID, we're only using the lower 4 bytes of the Tag ID. This is for two reasons:
- The first byte, the 'Vendor ID' is often ignored as similar cards usually have the same first byte
- Using a 4-byte number allows us to store the tag id in a single
longvariable.
This code uses the <<
(Bitshift Left) operator to move shift the higher 3 bytes, and then adds all of the bytes together into a single long
variable.
The source code for the Chrome App can be found here. You can modify the look and function of the app to suit your needs. The App is very simple, but you could add features like database functionality (to associate names to ID numbers) or live updates to online data storage (dropbox, google sheets)
You can also use a RFIduino Wireless Upgrade Kit to wirelessly send data from the RFIduino to your computer.
It is also possible to make the RFIduino a standalone logger, and then save the logs back to the computer at a later time. For storing the data you can use EEPROM for small logs (~100 ID/Timestamp entries) or an SD card for larger entries.
One of the biggest difficulties with standalone loggers is an effective timestamp. The Geekduino can count time since the beginning of its operation using the millis()
function. But the Geekduino doesn't have a true idea of when it started in time. Also, the crystal in the Geekduino will lose a few seconds over a week. This problem is usually overcome with a piece of hardware called a Real Time Clock(RTC). This device is battery operated and keeps track of time very accurately. The Geekduino can query the RTC to get a time to associate with the log.
Now that you have the logger functioning, maybe you could add it to your RFID Door Lock, Garage Door Opener, or Lockbox! Can you think of other projects that might benefit from RFID Logging? Let us know what you come up with!


Comments