


Hardware components | ||||||
| × | 1 | ||||
| × | 1 | ||||
 |
| × | 1 | |||
 |
| × | 1 | |||
Software apps and online services | ||||||
 |
| |||||
| ||||||
This demo extends the functionality of the Send Sensor Data to Sensirion's MyAmbience App with Zephyr example. For a detailed overview of the Zephyr RTOS and BLE advertisement mechanisms, please refer to the original article.
In this sample, the BLE advertisement remains identical to the previous implementation. However, it adds visualization of sensor data via an attached display module of the TTGO T-Display. The S1 button can be used to cycle through and display readings from the different sensors.
Note: This sample only works with the TTGO T-Display v1.
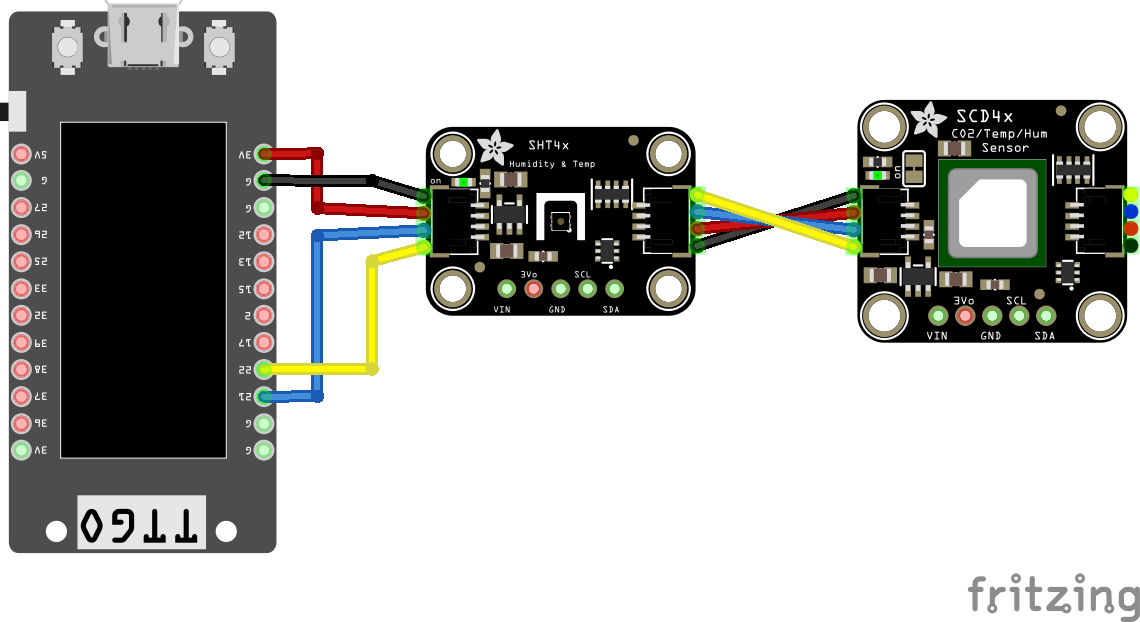
Connect the SCD41 and SHT41 sensor together with a QWIIC-cable. Afterwards connect the SHT41 with an other QWIIC-cable to the T-Display:
- Black (GND) goes to GND
- Red (VDD) goes to 3V3
- Blue (SDA) goes to pin 21
- Yellow (SCL) goes to pin 22
Be careful to get the wiring correct. Please note, that using the wrong wiring could damage your sensor!Build
The setup for zephyr and the building process is exactly the same as in the other tutorial.To build the project open your terminal, navigate to the ble_display project and run these commands:
SET ZEPHYR_BASE=%HOMEPATH%\zephyrprojects\zephyr_repo\zephyr
west build -b esp32_devkitc/esp32/procpu app
west flashThis project uses 3 threads, each responsible for a specific task. These threads operate mostly independently from each other. The only interaction occurs when the sensor threads update the shared UI variables used by the display thread.
The main reason using separate threads lies in the differing update frequencies required for each component:
- Display Thread (
display()): Updates the UI and handles button input. It runs at a 100 ms interval to ensure responsive user interaction and smooth UI updates. - SCD4x Sensor Thread (
scd()): Reads out the CO2 concentration data every 6 seconds to ensure that a new measurement is available, as 5 seconds is the specified measurement time of the sensor. - SHT4x Sensor Thread (
sht()): Polls the ambient temperature and humidity every 500 ms to provide accurate data and not overload the BLE advertisement.
Each thread handles its own timing using k_msleep() to delay execution between iterations. This design ensures deterministic and isolated operation per module, improving modularity and maintainability.
To get the display to work properly, we need to add the display to our app.overlay file. For more detailed informations, please visit this tutorial from Jumptuck.
Note: The led-node is for the background led.
Devicetree:
#include <zephyr/dt-bindings/mipi_dbi/mipi_dbi.h>

/ {
	chosen {
		zephyr,display = &st7789v;
	};

	leds {
		compatible = "gpio-leds";
		led0: led_0 {
			gpios = <&gpio0 4 GPIO_ACTIVE_HIGH>;
			label = "Background LED";
		};
	};

	mipi_dbi {
		compatible = "zephyr,mipi-dbi-spi";
		spi-dev = <&spi3>;
		dc-gpios = <&gpio0 16 GPIO_ACTIVE_HIGH>;
		reset-gpios = <&gpio0 23 GPIO_ACTIVE_LOW>;
		write-only;
		#address-cells = <1>;
		#size-cells = <0>;

		st7789v: st7789v@0 {
			compatible = "sitronix,st7789v";
			reg = <0>;
			mipi-max-frequency = <20000000>;

			width = <240>;
			height = <135>;
			x-offset = <40>;
			y-offset = <52>;

			vcom = <0x28>;
			gctrl = <0x35>;
			vrhs = <0x10>;
			vdvs = <0x20>;
			mdac = <0xA8>;
			gamma = <0x01>;
			colmod = <0x55>;
			lcm = <0x0c>;
			porch-param = [0c 0c 00 33 33];
			cmd2en-param = [5a 69 02 01];
			pwctrl1-param = [a4 a1];
			pvgam-param = [d0 00 02 07 0a 28 32 44 42 06 0e 12 14 17];
			nvgam-param = [d0 00 02 07 0a 28 31 54 47 0e 1c 17 1b 1e];
			ram-param = [00 E0];
			rgb-param = [CD 08 14];
			mipi-mode = <MIPI_DBI_MODE_SPI_4WIRE>;
		};
	};
};

&pinctrl {
	spim3_default: spim3_default {
		group1 {
			pinmux = <SPIM3_SCLK_GPIO18>,
				 <SPIM3_CSEL_GPIO5>;
		};
		group2 {
			pinmux = <SPIM3_MOSI_GPIO19>;
			output-low;
		};
	};
};We use LVGL as the display library.LVGL is an open-source graphics library designed for embedded systems, particularly those with limited resources like microcontrollers. It provides a lightweight, efficient way to create graphical user interfaces.
It is very powerful with it's building blocks and animations. The graphic elements are customizable with CSS-like styles. An other important thing is that it's already integrated in Zephyr and therefore easy to use in our project.
The LVGL version used in zephyr 4.2 is LVGL 9.3.
EEZ StudioYou can design a UI very well without any kind of design software, but you probably need more time and need to know all the features. With EEZ Studio you can just drag and drop the LVGL building blocks and you can see every style parameter in one place.
During designing you can simulate the UI and therefore you can see very fast if it's working or not.
After you are done with the design you can build it and copy the source files into your project and the UI should work. But in order to get it to work with Zephyr you need to change some settings.
- Display size:Navigate to Settings > General and set the display size to width: 240 and height: 135.Additionally, update the display size for each individual page by adjusting their properties to match these dimensions.
- Navigate to Settings > Build and change the
LVGL includesetting tolvgl.h. - The last change is under Settings > Files > screens.c. Add
#define MAX_STRING_LEN 10after all the includes.
Unfortunately, variables do not work in the generated code. However, there is a workaround. You can modify the line where new_val is initialized.
In our case, the required change is in the in every tick_screen function located in the screens.c file. For example for the void tick_screen_co2()) function update the following line:
const char *new_val = get_var_co2_val();to:
char new_val[MAX_STRING_LEN];
snprintf(new_val, sizeof(new_val), "%d", get_var_co2_val());
Repeat this for every other variable.


_3u05Tpwasz.png?auto=compress%2Cformat&w=40&h=40&fit=fillmax&bg=fff&dpr=2)
_SPmZ63wPgQ.png?auto=compress%2Cformat&w=40&h=40&fit=fillmax&bg=fff&dpr=2)
Comments