UI
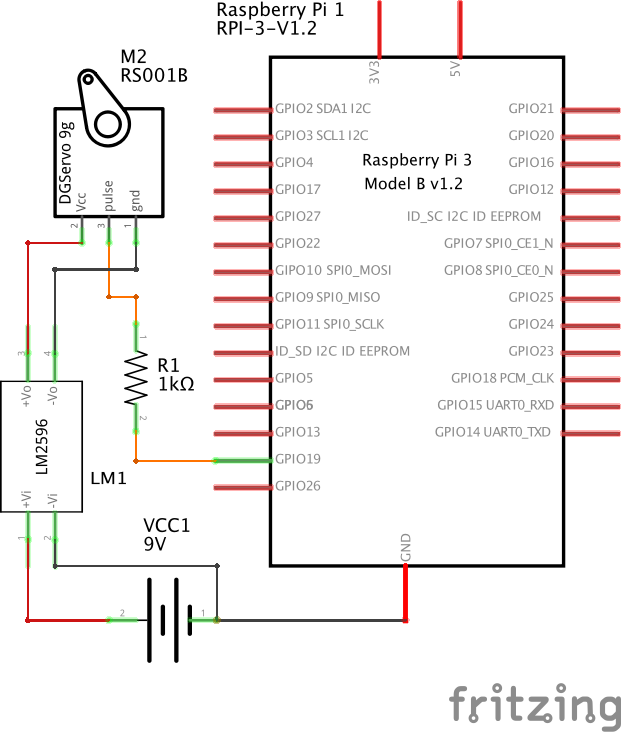
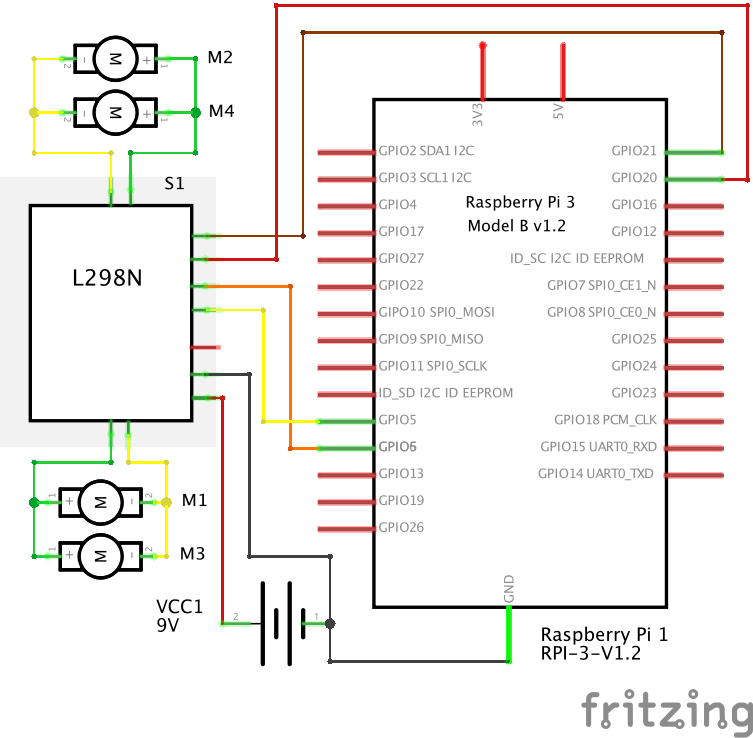
Circuit DiagramMotor Driver and MotorsThe "9v" battery is actually two 3.7v 18650 batteries.
ServoThe "9v" battery is actually two 3.7v 18650 batteries.
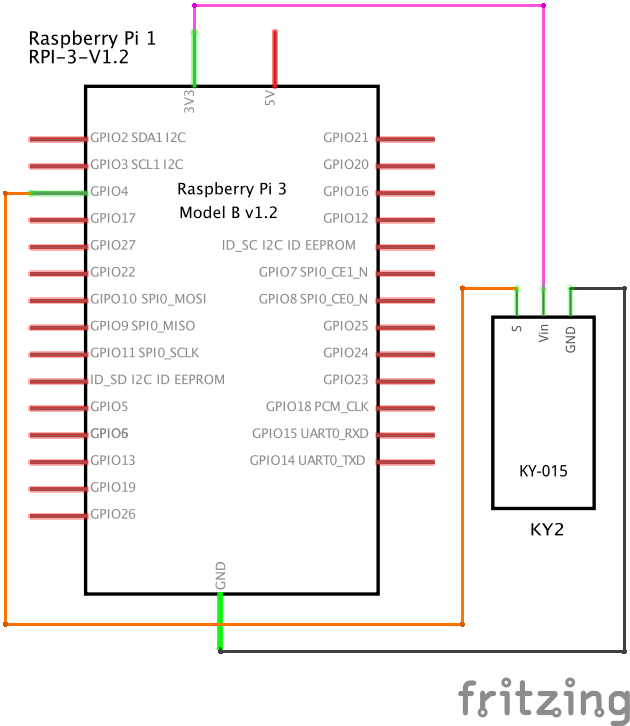
Temperature and Humidity Sensor
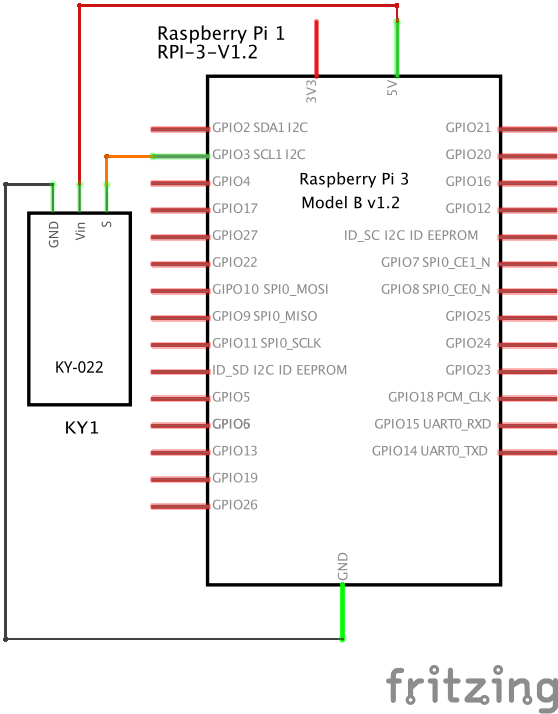
IR Receiver
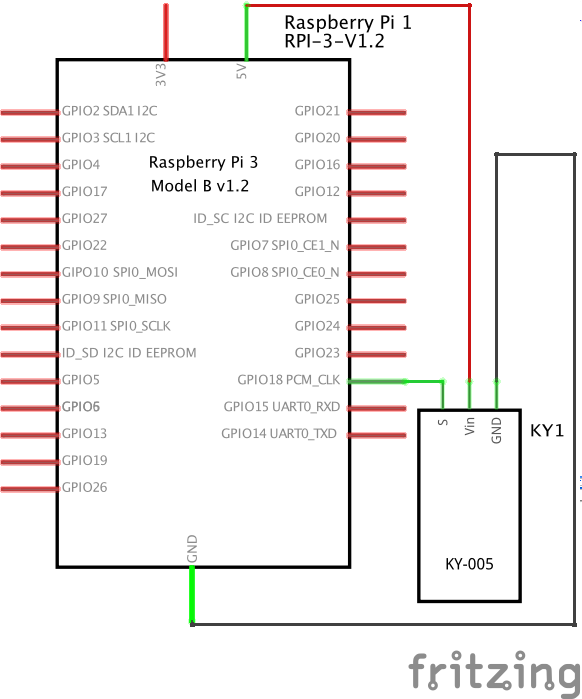
IR Transmitter
Install Prerequisites1) Python 3.xIf which python3
returns nothing, run sudo apt-get install python3
2) NodeJs 8.xcurl -sL https://deb.nodesource.com/setup_8.x | sudo -E bash -
sudo apt install nodejs
node -v
3) Nginx ServerInstall the nginx package sudo apt-get install nginx
and start the server sudo /etc/init.d/nginx start
4) Audio & Video relatedInstall the library for ALSA applications development files: sudo apt-get install libasound2-dev
. If you got 404 Not Found, run sudo apt-get upgrade --fix-missing
avconv is needed for converting recorded videos to .mp4 format: sudo apt-get install libav-tools
mpg123 is used for playing .mp3 format music: sudo apt-get install mpg123
5) Clone the repocd ~
git clone https://github.com/shaqian/PiBot.git
Set up and Test Hardware Components1) Motor driver and motorsDo not install the wheels when testing.
- Refer to the circuit diagram and connect the wires.
- Install rpio, run
npm install rpio
var rpio = require('rpio');
rpio.open(29, rpio.OUTPUT, rpio.LOW);
rpio.open(31, rpio.OUTPUT, rpio.LOW);
rpio.open(38, rpio.OUTPUT, rpio.LOW);
rpio.open(40, rpio.OUTPUT, rpio.LOW);
rpio.write(29, rpio.LOW);
rpio.write(31, rpio.HIGH);
rpio.write(38, rpio.LOW);
rpio.write(40, rpio.HIGH);
rpio.write(29, rpio.HIGH);
rpio.write(31, rpio.LOW);
rpio.write(38, rpio.HIGH);
rpio.write(40, rpio.LOW);
rpio.write(29, rpio.LOW);
rpio.write(31, rpio.LOW);
rpio.write(38, rpio.LOW);
rpio.write(40, rpio.LOW);
2) Servo- Refer to the circuit diagram and connect the wires.
cd ~/PiBot/PiBotServer/bin
chmod +x direct.py
- The position is controlled by duty cycle, normally ranges from 2.5 to 11.5. Go to middle position:
./direct.py 7
./direct.py 2.5
./direct.py 11.5
3) Temperature and Humidity Sensor- Refer to the circuit diagram and connect the wires.
cd ~/PiBot/PiBotServer/bin/temp_hum
chmod +x getTemp.py
chmod +x getHum.py
./getTemp.py
./getHum.py
4) IR ReceiverI use IR Receiver to read IR signal from remote controls of home appliances, then emulate the remote control by sending the same signal from Raspberry P.
I borrowed the code from this repo but changed the ports as well as the value of ST_BASE which was 0x20003000 for older Raspberry Pi but should be 0x3F003000 for Raspberry Pi 3 (BCM2837).
- Refer to the circuit diagram and connect the wires.
- Run
gpio -v
to check if wiringPi is already installed. If not, install Wiring Pi.
- Run
cd ~/PiBot/PiBotServer/bin
. Compile the code and generate the binary:
gcc ir_decode.c -lwiringPi -o decode.out
chmod +x decode.out
- Run
sudo ./decode.out
. It would print [0] every one second when no IR signal is received.
- Point the remote control to the IR receiver and press the button. The decoded IR signal is a series of hex numbers, ie: 0xb2,0x4d,0x1f,0xe0,0x98,0x67,[48].
- Repeat the same for "ON" button and "OFF" button, and note down the IR signals.
5) IR TransmitterDisconnect the IR Receiver as we are done with IR decoding.
- Refer to the circuit diagram and connect the wires.
- Run the following to duplicate the ir_encode code.
cd ~/PiBot/PiBotServer/bin
cp ir_encode.c on.c
cp ir_encode.c off.c
Run vi on.c
, and change the hex string in line 166 to what you have decoded, ie:
char data[6] = {0xb2,0x4d,0x1f,0xe0,0xd8,0x27};
Run vi off.c
, and change the hex string in line 166 to what you have decoded, ie:
char data[6] = {0xb2,0x4d,0x7b,0x84,0xe0,0x1f};
- Compile the code and generate the binary:
gcc on.c -lwiringPi -o on.out
chmod +x on.out
gcc off.c -lwiringPi -o off.out
chmod +x off.out
- Send "ON" signal:
sudo ./on.out
.
- Send "OFF" signal:
sudo ./off.out
.
6) Sound Card, Microphone and SpeakerRaspberry Pi has a built-in 3.5mm jack for audio output but no input. I use a USB sound card for both speaker output and microphone input.
- Plug the USB sound card in. Connect the microphone and speaker to the sound card.
- Run
arecord -l
and aplay -l
and identify card number of your USB Audio Device, e.g. card 1.
- Record a 5 seconds test audio:
arecord -Dplughw:[n] -fcd -d5 -c1 -twav -r16000 test.wav
(replacing [n] with the number of USB Audio Device, e.g. Dplughw:1).
- Play the test audio:
aplay -Dplughw:[n] test.wav
(replacing [n] with the number of USB Audio Device, e.g. Dplughw:1).
- To set the USB sound card to be the default audio device, run
sudo vi /lib/modprobe.d/aliases.conf
, insert the following and save:
options snd_usb_audio index=0
options snd_bcm2835 index=1
options snd slots=snd_usb_audio,snd_bcm2835
- Run
cat /proc/asound/modules
and you should have:
0 snd_usb_audio
1 snd_bcm2835
Play the .wav again without specifying device: aplay test.wav
.
7) CameraI use picam to generate HTTP Live Streaming (HLS).
- Connect Raspberry Pi Camera Board to the Raspberry Pi.
- Run
sudo raspi-config
, navigate to Interfacing Options and select Camera > Yes.
- Install dependencies for picam:
sudo apt-get update
sudo apt-get install libharfbuzz0b libfontconfig1
- Create directories and symbolic links:
cd ~;mkdir picam;cd picam
cat > make_dirs.sh <<'EOF'
#!/bin/bash
DEST_DIR=~/picam
SHM_DIR=/run/shm
mkdir -p $SHM_DIR/rec
mkdir -p $SHM_DIR/hooks
mkdir -p $SHM_DIR/state
mkdir -p $DEST_DIR/archive
ln -sfn $DEST_DIR/archive $SHM_DIR/rec/archive
ln -sfn $SHM_DIR/rec $DEST_DIR/rec
ln -sfn $SHM_DIR/hooks $DEST_DIR/hooks
ln -sfn $SHM_DIR/state $DEST_DIR/state
EOF
chmod +x make_dirs.sh
./make_dirs.sh
wget https://github.com/iizukanao/picam/releases/download/v1.4.6/picam-1.4.6-binary-jessie.tar.xz
tar xvf picam-1.4.6-binary-jessie.tar.xz
cp picam-1.4.6-binary-jessie/picam ~/picam/
- Start HTTP Live Streaming:
cd ~/picam
./picam -o /run/shm/hls
Configure Nginx server. Run sudo vi /etc/nginx/sites-available/default
and add the following inside server { ... } bloc:
location /hls/ {
  root /run/shm;
}
sudo /etc/init.d/nginx restart
The HLS will be available at http://[IP-of-Raspberry-Pi]/hls/index.m3u8.
sudo cp ~/PiBot/PiBotServer/public/hls_test.html /var/www/html/hls_test.html
- Open QuickTime player, go to File > Open Location, enter http://[IP-of-Raspberry-Pi]/hls/index.m3u8.
- Or playback in a web browser:
- i. Download the test file and copy it to Nginx root.
- ii. From the Raspberry Pi or any PC that in the same network, navigate to http://[IP-of-Raspberry-Pi]/hls_test.html in a web browser.
Configure NginxEnable both HTTP on port 80 and HTTPS on port 443. HTTPS is required to get recording working in Chrome when requests are not originated from local host. See: https://goo.gl/rStTGz
- Run
sudo openssl req -x509 -nodes -days 365 -newkey rsa:2048 -keyout /etc/nginx/snippets/nginx-selfsigned.key -out /etc/nginx/snippets/nginx-selfsigned.crt
to create the certificates used for HTTPS in nginx.
- Replace the content in /etc/nginx/sites-enabled/default with ~/Cognitive-Bot/ngnix/default.
- Run
sudo nginx -t
to test the configurations. If successful, restart nginx server sudo /etc/init.d/nginx restart
.
Run the Web Application- Run
cd ~/PiBot/PiBotServer;npm install
to install all dependencies.
- Start HLS video streaming:
cd ~/picam
./make_dirs.sh
./picam -o /run/shm/hls --vflip --hflip
- To start the application, run:
cd ~/PiBot/PiBotServer
sudo npm start
Navigate to http[s]://[IP-of-Raspberry-Pi]
in a web browser (replacing [IP-of-Raspberry-Pi] with the actual IP address, ie: 192.168.1.16).
Run the Mobile AppiOScd PiBot/PiBotApp
npm install
npm run ios
- Build and run in simulator:
- Refer to Running your app on iOS devices in React Native official guide.
Androidcd PiBot/PiBotApp
npm install
npm run android
- Build and run in simulator:
- Refer to Running your app on Android devices in React Native official guide.
- Or use the PiBot.apk in this repo.


Comments