

Hardware components | ||||||
 |
| × | 1 | |||
Software apps and online services | ||||||
 |
| |||||
Hand tools and fabrication machines | ||||||
| ||||||
As an exercise in utilizing Arduino coding and sewn circuits, I decided to create a basic, wearable tech piece out of an already existing pair of leggings. The LED's were programmed to respond to a sewn in light sensor, both from an Arduino Lilypad Board. When the light sensor registers that it is darker, the LED's blink. The practical idea behind this is that active person would have a flashing garment as it gets darker out, making their presence known to other passerbys or even drivers.
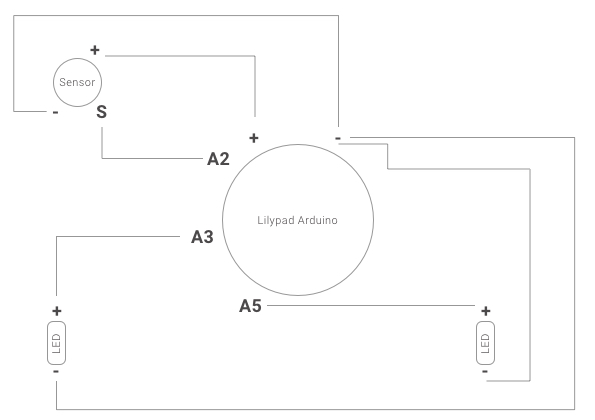
I sketched a very rudimentary design of what I wanted my leggings to look like, along with a circuit diagram. I recommend sewing the Arduino Lilypad board and sensor in the back, a little under the waist band.
I generated the code, however before actually embedding my hardware, I wanted to test if my program worked using alligator clips. I definitely suggest you do this, as it could potentially save you a lot of hassle later. This also changed the initial design of my project; I originally wanted to sew 4 LED's, but I realized that I would be looping 5 different threads into 1 negative pin on the board. I could already see that this was going to get messy, so I settled for 2 LED's.
Satisfied with my results, I began sewing. With the conductive thread, first sew the Arduino board on the back, below the waist band. This will keep it out of the way in a real world usage of the leggings, and will keep everything around one spot.
Now place the light sensor near the board, and loop conductive thread around whatever pin you decided. In my case, I chose A2. Be sure to loop this tightly. Then sew the same thread through pin "S" on the sensor.
Loop thread through the light sensor's positive pin, then sew this thread throw board's positive pin.
Do the same thing with sensor's negative pin through the board's negative pin.
Now you must choose what pin your first LED will be sewn to. I chose A3. This will be connected to the positive end of the LED. The negative end of the LED will have a thread sewn and looped through the same negative pin the sensor uses.
Determine what pin your other LED will be sewn from. I chose A5. Repeat the same process with A3, looping the pin to the positive end of the LED, then looping the negative end to the board's negative pin.
Everything is now shown! To test the sensor, go to a brightly lit area, then cover the sensor with your hand. The LED's should blink.

_3u05Tpwasz.png?auto=compress%2Cformat&w=40&h=40&fit=fillmax&bg=fff&dpr=2)


Comments