

Hardware components | ||||||
 |
| × | 1 | |||
 |
| × | 1 | |||
 |
| × | 1 | |||
 |
| × | 1 | |||
 |
| × | 1 | |||
| × | 1 | ||||
Software apps and online services | ||||||
 |
| |||||
| ||||||
| ||||||
| ||||||
| ||||||
 |
| |||||
The project have three main functionalities
- Turning on the Fan
- Turning off the Fan
- Auto Mode
These functions are controlled by 3 buttons which is designed by using Flask and Html and Bootstrap. Which are ON, OFF and AUTO respectively. The auto button when clicked, the code will collect the data from the temperature sensor per 5 minutes and according to the threshold set b the user, the fan will be turned on or off, And the best part of the code is When the temperature passes an Anomaly value, i.e. if the sensor sends the higher value then usual, the code will send a message to the user via SMS using twilio. This is done by the Anomaly Detection Technique, i.e. Z-score analysis.
2. DemonstrationFirst we should connect the circuit as shown in the circuit Diagram section Below, and run the code in the terminal, The Python code will give us an address that will be probably http://127.0.0.1:5000 (The address do not work if the python code is not executed and kept as it is), The address will redirect us to the page will be contained 3 buttons, ON, OFF, AUTO respectively, When ON button is clicked the fan will turn on, And OFF button is vice versa, When we click on the AUTO button, The code will manage whether to turn on the fan or no based on the temperature in the room. If the Temperature detects an anomaly if it's larger then the normal values then it sends an SMS to your phone, Assuming fire emergency in the room.
NOTE: Before starting the project, make sure that you have the access to the bolt cloud and your device is connected to it
As You know it uses Z-score analysis to detect the anomaly value and if the value is more then the threshold we have set it will turn on the fan, and as soon as it detects the temperature is normal it will turn off the fan and if it detects the lower value than the threshold it just shows the message in the terminal to get some warm cloths :)
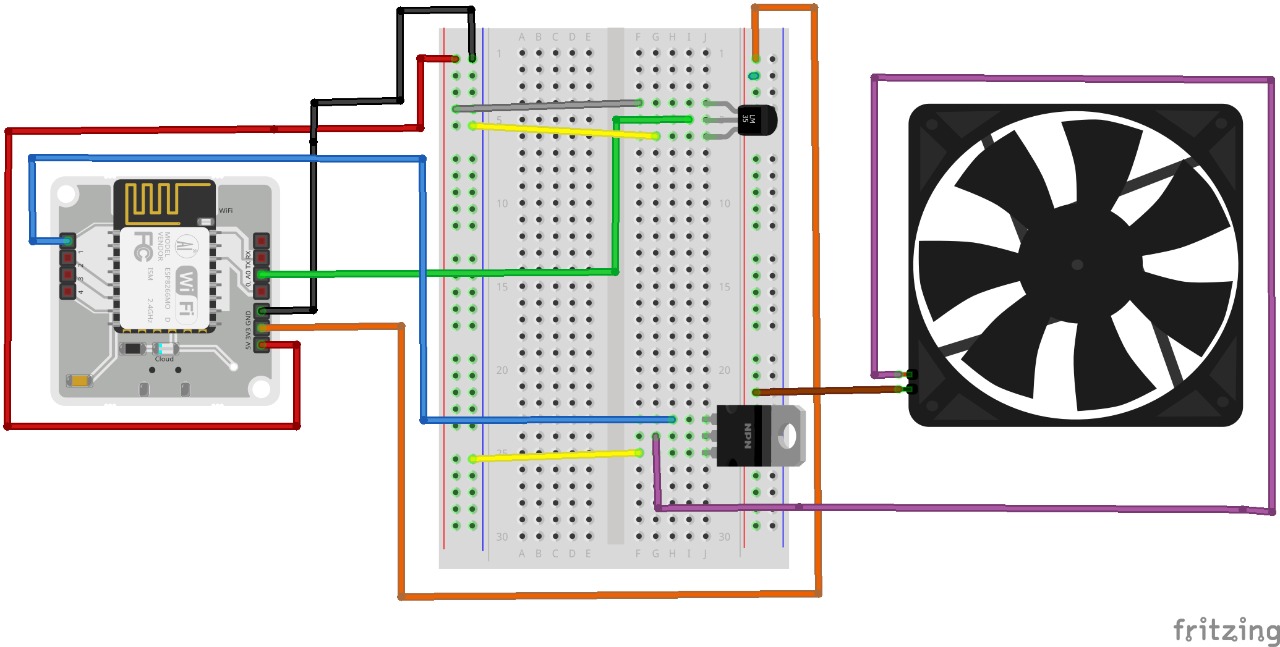
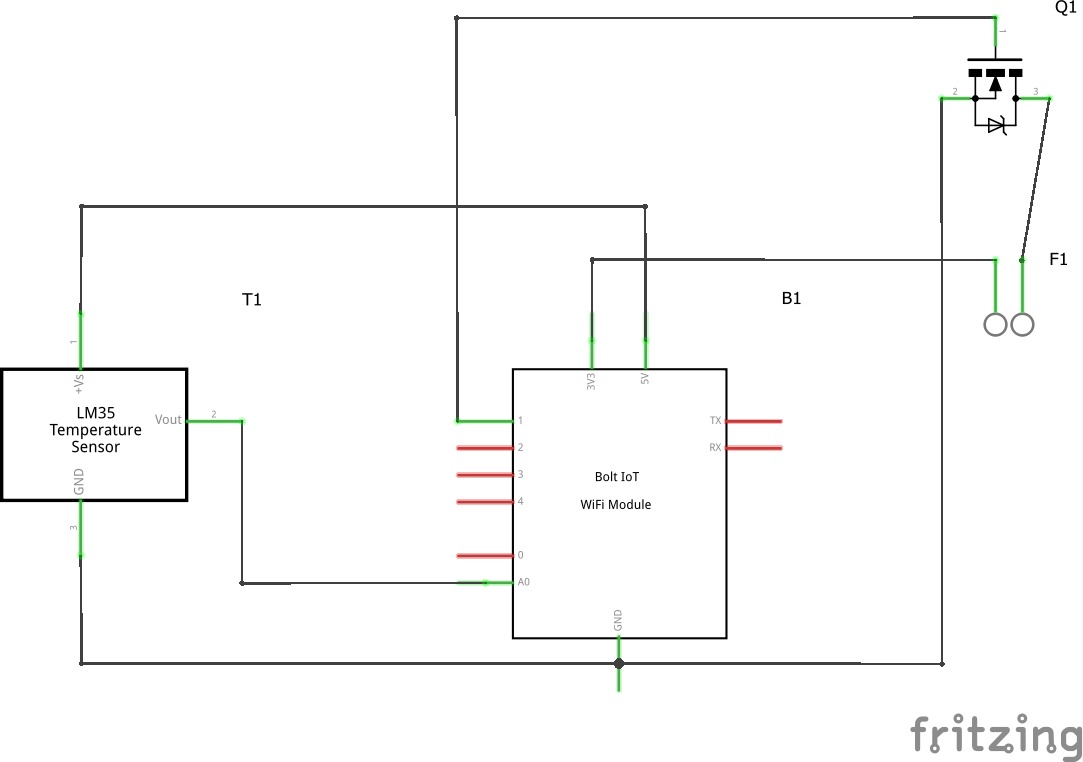
3.1 Circuit connection of the LM35 Temperature sensor to the Bolt module:
Step 1: Hold the sensor in a manner such that you can read LM35 written on it.
Step 2: In this position, identify the pins of the sensor as VCC, Output and Gnd from your left to right.
Step 3: And the middle pin is an input pin for the values for Bolt
The connection should be like as shown in the diagram
- VCC pin of the LM35 connects to 5v of the Bolt Wifi module.
- Output pin of the LM35 connects to A0 (Analog input pin) of the Bolt Wifi module.
- Gnd pin of the LM35 connects to the Gnd.
3.2 The fan connection to Bolt Module
Since the fan is small and can run on 5V and even on 3.3V of Voltage, For that we can supply the current directly from the Bolt module. But hold on!! How can we control it using the bolt module??? so here is the answer using N-MOSFET.
the Circuit for the N-MOSFET and the fan is as below.
The MOSFET formed in which the conduction is due to the channel of majority charge carriers called electrons. When this MOSFET is activated as ON this condition results in the maximum amount of the current flow through the device. This type of MOSFET is defined as N-channel MOSFET.
3.3Basics of N-Channel MOSFET and Working
N-Channel MOSFET is a type of metal oxide semiconductor field-effect transistor that is categorized under the field-effect transistors (FET). MOSFET transistor operation is based on the capacitor. This type of transistor is also known as an insulated-gate field-effect transistor (IGFET). Sometimes it is also known as a metal-insulator field-effect transistor (MIFET). This type of transistor is further classified astwo types, they are n-type and p-type. These p-types and n-type MOSFET’s are further classified as enhancement and depletion based MOSFETs. This classification is based on the formation of the channel in prior or the operation induced due to the existing channel. These transistors also consist of three terminals which referred to as the source, drain, and the gate. The functionality of the MOSFET’s is dependent on these terminals.
What is N-Channel MOSFET?
The MOSFET formed in which the conduction is due to the channel of majority charge carriers called electrons. When this MOSFET is activated as ON this condition results in the maximum amount of the current flow through the device. This type of MOSFET is defined as N-channel MOSFET.
Symbols for N-channel Depletion and Enhancement Types
These n-channel MOSFETs are further classified as
- N-Channel with Enhancement MOSFET and
- N-Channel with Depletion MOSFET
Working
The working of the n-channel MOSFET is based on the majority of the carriers that are electrons. These electrons move in the channel is responsible for the flow of current in the transistor. The p-substrate material is required in the formation of the gate terminals.
Basically in the circuit its connected to the 3.3V, GND and GPIO 1 pins, The current passes from 3.3V to GND if and only if the GPIO 1 is also passing the current.
And the complete circuit of the project will be the combination of the bolt LM35 sensor and the N-MOSFET to the fan. The whole circuit will be uploaded in the below circuit part.
3.4 Configuration File
The python coding for this project has been done in Ubuntu (Linux). Before we start coding of the Automatic Controls of fan in python, we need to make a configuration file which will have the specific keys for each user/device. We will import this file in our main code and use the various attributes. The advantage of this is that each user will only have to change the contents the configuration file to use the product.
SSID = 'You can find SID in your Twilio Dashboard'
AUTH_TOKEN = 'You can find  on your Twilio Dashboard'
FROM_NUMBER = 'This is the no. generated by Twilio. You can find this on your Twilio Dashboard'
TO_NUMBER = 'This is your number. Make sure you are adding +91 in beginning'
API_KEY = 'This is your Bolt Cloud accout API key'
DEVICE_ID = 'This is the ID of your Bolt device'
FRAME_SIZE = 10
MUL_FACTOR = 6
To get the above credentials you should sign in the Twilio Website as per instructions given in the training section of Boltiot platform.
Even the API_KEY and DEVICE_ID will be found in the your Bolt Cloud Dashboard.
What is API?
Since we are using Bolt API key in our module it is necessary to learn about the API's. So API stands for Application Programming Interface. An API is a software intermediary that allows two applications to talk to each other. In other words, an API is the messenger that delivers your request to the provider that you're requesting it from and then delivers the response back to you.
As here The API_KEY and DEVICE_ID helps us to get access to the bolt cloud using the program that we write. And helps us to get the data from the cloud. And to generate and access these, Please check the API section in the Bolt IoT training.
3.5 Converting the value of the Temperature sensor to Celsius
As per the training we know that the Voltage passed by the LM35 sensor is directly proportional to the surrounding temperature, So here is the formulae for converting it to Celsius
Temperature = ( 100 * value ) /1024
where value is the actual value passed by the sensor.
3.6 Detection of sudden increment in Temperature
Z-score analysis is used for anomaly detection. Anomaly here means a variable's value (Temparature of the surroundings) going beyond a certain range of values. The range of values is called bounds (upper bound and lower bound). These bounds are calculated using the input values, frame size and multiplication factor. The frame size is the minimum number of input values needed for Z-score analysis and the multiplication factor determines the closeness of the bounds to the input values curve.
Given above is the formula to calculate the bounds. Here the input is represented as 'Vi', 'r' denotes the frame size and 'C' is the multiplication factor. Firstly we calculate the mean (Mn) of the input values (for every new input, the mean is calculated again). The variation of each input value (from the mean) is given as (Vi - Mn)^2. The Z-score (Zn) is calculated as shown above ( square root of the mean of the variation of each input value multiplied by the multiplication factor). The bounds are represented as 'Tn' and the upper bound is calculated as (Vi + Zn) and the lower bound is calculated as (Vi - Zn). And in this project we are only dealing with upper bound. The frame size and multiplication factor are determined using trial-and-error method.
3.7 What is Bootstrap?
- Bootstrap is a free front-end framework for faster and easier web development
- Bootstrap includes HTML and CSS based design templates for typography, forms, buttons, tables, navigation, modals, image carousels and many other, as well as optional JavaScript plugins
- Bootstrap also gives you the ability to easily create responsive designs
3.8 What is Flask?
Flask
is a micro web frameworkwritten in python. It is classified as a microframework because it does not require particular tools or libraries.
It has no database abstraction layer, form validation, or any other components where pre-existing third-party libraries provide common functions. However, Flask supports extensions that can add application features as if they were implemented in Flask itself. Extensions exist for object-relational mappers, form validation, upload handling, various open authentication technologies and several common framework related tools. Extensions are updated far more frequently than the core Flask program.
3.9 HTML code
Before we move forward to the code, create folder named "MyProject" to save all the files in it. In the folder create another folder called "Templates" and in that save the below code in a file and name it as "index.html"
<!DOCTYPE html>
<html lang="en" dir="ltr">
  <head>
    <meta charset="utf-8">
    <title>Bolt iot</title>

    <link rel="stylesheet" href="https://stackpath.bootstrapcdn.com/bootstrap/4.5.2/css/bootstrap.min.css" integrity="sha384-JcKb8q3iqJ61gNV9KGb8thSsNjpSL0n8PARn9HuZOnIxN0hoP+VmmDGMN5t9UJ0Z" crossorigin="anonymous">
    <script src="https://code.jquery.com/jquery-3.5.1.slim.min.js" integrity="sha384-DfXdz2htPH0lsSSs5nCTpuj/zy4C+OGpamoFVy38MVBnE+IbbVYUew+OrCXaRkfj" crossorigin="anonymous"></script>
<script src="https://cdn.jsdelivr.net/npm/popper.js@1.16.1/dist/umd/popper.min.js" integrity="sha384-9/reFTGAW83EW2RDu2S0VKaIzap3H66lZH81PoYlFhbGU+6BZp6G7niu735Sk7lN" crossorigin="anonymous"></script>
<script src="https://stackpath.bootstrapcdn.com/bootstrap/4.5.2/js/bootstrap.min.js" integrity="sha384-B4gt1jrGC7Jh4AgTPSdUtOBvfO8shuf57BaghqFfPlYxofvL8/KUEfYiJOMMV+rV" crossorigin="anonymous"></script>

  </head>
  <body>
    <div class="" align="center">
    <form class="" action="/ON" method="post">
      <p><input type="submit" name="" value="ON" class="btn btn-success btn-lg" ></p>
    </form>

    <form class="" action="/OFF" method="post">
      <p><input type="submit" name="" value="OFF" class="btn btn-danger btn-lg"></p>
    </form>

    <form class="" action="/AUTO" method="post">
      <p><input type="submit" name="" value="AUTO" class="btn btn-dark btn-lg"></p>
    </form>
    </div>
  </body>
</html>
The above code is only for the User interface design and of no use without the backend programming.
Lets move forward for the backend programming.
3.10 Python code (Flask)
The Below code can be saved as file "app.py" in the folder "MyProject" And the above mentioned configuration file (section 3.4) should be saved in the same folder as "conf.py".
import conf, json, time, math, statistics
from boltiot import Sms, Bolt
from flask import Flask, request, render_template, url_for, redirect

app = Flask(__name__)

def compute_bounds(history_data,frame_size,factor):
    if len(history_data)<frame_size :
        return None

    else:
        del history_data[0:len(history_data)-frame_size]
    Mn=statistics.mean(history_data)
    Variance=0
    for data in history_data :
        Variance += math.pow((data-Mn),2)
    Zn = factor * math.sqrt(Variance / frame_size)
    High_bound = history_data[frame_size-1]+Zn
    Low_bound = history_data[frame_size-1]-Zn
    return [High_bound,Low_bound]

#creating an objects
mybolt = Bolt(conf.API_KEY, conf.DEVICE_ID)
sms = Sms(conf.SSID, conf.AUTH_TOKEN, conf.TO_NUMBER, conf.FROM_NUMBER)
history_data=[]

#The Threshold
min_limit = 25
max_limit = 35

#the below loop will collect the necessary data points for the Z-score Analysis
while True:
    response = mybolt.analogRead('A0')
    data = json.loads(response)
    if data['success'] != 1:
        print("There was an error while retriving the data.")
        print("This is the error:"+data['value'])
        time.sleep(10)
        continue
    temp1 = int(data['value'])
    temp1 = (100*temp1)/1024
    print ("This is the value "+str(temp1))
    sensor_value=0
    try:
        sensor_value = temp1
    except e:
        print("There was an error while parsing the response: ",e)
        continue

    bound = compute_bounds(history_data,conf.FRAME_SIZE,conf.MUL_FACTOR)
    if not bound:
        required_data_count=conf.FRAME_SIZE-len(history_data)
        print("Not enough data to compute Z-score. Need ",required_data_count," more data points")
        history_data.append(temp1)
        time.sleep(5)
        continue
    if bound:
        break

#The backend Prograam for the buttons
@app.route('/', methods = ['GET','POST'])
def index():
    return render_template('index.html')

#Turns ON the fan
@app.route('/ON', methods = ['GET','POST'])
def ON():
    response1 = mybolt.digitalWrite('1', 'HIGH')
    print(response1)
    return render_template('index.html')

#Turns OFF the fan
@app.route('/OFF', methods = ['GET','POST'])
def OFF():
    response1 = mybolt.digitalWrite('1', 'LOW')
    print(response1)
    return render_template('index.html')

#The below code will automatically turns on or off the fan
@app.route('/AUTO', methods = ['GET','POST'])
def AUTO():

    #this loop will continuesly checks for values per 5 minutes and takes the decision whether to turn on the fan or not.
    while True:
        #reading the value of the temperature sensor.
        try:
            response = mybolt.analogRead('A0')
            data = json.loads(response)
            if data['success'] != 1:
                print("There was an error while retriving the data.")
                print("This is the error:"+data['value'])
                time.sleep(10)
                continue
            temp1 = int(data['value'])
            #converting the value
            temp1 = (100*temp1)/1024
            print ("This is the value "+str(temp1))
            sensor_value=0
            try:
                sensor_value = temp1
            except e:
                print("There was an error while parsing the response: ",e)
                continue

            #the below if statement will send a msg to the phone if the temperature increases suddenly (in the Chances of fire)
            if sensor_value > bound[0] :
                print ("The temperature level increased suddenly!! \n Sending an SMS.")
                response = sms.send_sms("Alert!!! \n Chances of fire in the room... \n temperature detected " + str(sensor_value))
                print("Response received from Twilio is: " + str(response))
                print("Status of SMS at Twilio is :" + str(response.status))
                history_data.append(sensor_value);

            #the below code will turns on the fan
            if sensor_value > max_limit:
                print ("This is the value "+str(sensor_value))
                print("Turning on the fan \n or \n Already turned on")
                response1 = mybolt.digitalWrite('1', 'HIGH')
                print(response1)

            #this is the normal mode it will turn off the fan if its on
            elif sensor_value < max_limit and sensor_value > min_limit:
                print("temperature is normal")
                print ("This is the value "+str(sensor_value))
                print("Turning off the fan \n or \n Already turned off")
                response1 = mybolt.digitalWrite('1', 'LOW')
                print(response1)

            #this will execute when the temperature goes down.. Just a remainder to stay warm... :)
            else:
                print("It's too cold here!!! Get some warm Cloths... \n The Current temperature sensor value is " +str(sensor_value))
                response1 = mybolt.digitalWrite('1', 'LOW')
                print(response1)
        except Exception as e:
            print ("Error",e)
        time.sleep(300)
        return render_template('index.html')


if __name__ == '__main__':
    app.run()
To start the execution of the project, The file "app.py" should be run in the terminal (Before you run this code make sure that your Bolt device is linked to Bolt cloud).
Note:
Before running this code make sure that you have installed the Python, Flask and Bolt Libraries in your machine, To do so just run these below lines one by one in the terminal
sudo apt install python3-pip
sudo pip3 install boltiot
sudo pip3 install flask
After installing it, Now run the code
The output of the app.py will be:
It will collect the necessary vslues for the Z-score Analysis, and gives an Address, i.e. http://127.0.0.1:5000/, When we open this in a Web browser it will redirect us to the HTML page (The code we have came across earlier) And output will be like
And finally all set to the Main Execution of the project. Now just click on the but what the command you wanted to give the program. It will work and Even indicates the message for us in the terminal. Suppose you choose Auto mode The data will be counted after every 5 Minutes.
Just like in the below it will give us the message after each action is taken by it.


Comments